Applies to Riva On-Premise 2.4.29 or higher.
Contents:
Is there a Difference Between Advanced Options and Custom Options?
In the Riva Manager application and Riva On-Premise documentation, both terms are used interchangeably.
These advanced options are made available for a number of reasons:
- New features that do not yet have a user interface;
- A way of changing default values used in advanced deployments or configurations;
- When advanced configurations are specifically designed for a customer to meet a non-standard, customer-specific sync requirement. Typically, such options are provided through a billable professional service.
The Ways to Set an Option
There are multiple ways to set an option:
- Selecting something in the Riva Manager application, for example, selecting a check box next to an available option.
- Riva has many advanced features — only the most commonly used options are available in the user interface. These options are often initially available as advanced options, and then due to customer request, they are made available in the user interface.
- Entering keys and values in the Riva Manager application: Many advanced options available to all users and many customer-specific options are applied by entering keys and values into fields, as described in this article.
- This method provides support for
- advanced options that are not used very often; and
- non-standard, customer-specific advanced business requirements.
- Editing a file in a text editor:
- Some options are entered by creating or editing an App.Setting file.
- Advanced options for an Exchange connection cannot be added through the UI in the same way used for Gmail and HCL Notes connections. In an Exchange connection, it is necessary to add advanced or custom options to the Custom.settings file. For more information on adding keys and values to an Exchange connection, see How to apply advanced options to an Exchange connection.
- There are many tiers of options that are applied. "Application Executable" > "Riva Instance" > "Per-Connection" > "Per-Policy" > "Per-User" > "Sync Now API". As a rule of thumb, these are applied from least specific (left) to most specific (right). For more information, see Settings hierarchy and overrides.
Applying Options by Entering Keys and Values into Fields
-
Apply advanced or custom options to
-
a Riva Sync Policy: When applied to a policy, advanced or custom options affect data sync for all the users synced by that policy.
-
a Riva CRM Connection: When applied to a CRM connection, advanced or custom options affect data sync for all the users synced through that connection.
-
a Riva Gmail or HCL Notes Connection: When applied to a Gmail or HCL Notes connection, advanced or custom options affect data sync for all the users synced through that connection.
-
Apply advanced or custom options to individual users in the Riva sync policy: Advanced or custom options applied to specific users in a sync policy affect data sync for only those individual users.
Apply advanced or custom options to a sync policy or connection object
Key and value:
An advanced or custom option has two components:
- a key: the name of the advanced or custom option; also known as the key name; and
- a value: the part of the advanced or custom option that determines the option's behaviour; also known as the key value.
Example:
Sync.Crm.EmailFields.Contact = "Email,Email2,Email3" is the complete option.
| Key (Key Name) |
Value (Key Value) |
| Sync.Crm.EmailFields.Contact |
Email,Email2,Email3 |
Notes:
- The value is not case sensitive.
- The equal sign (=) is not part of the option. It is used only in the documentation or (in Riva 2.4.57 or higher) when copying and pasting from the documentation to the Advanced Options tab.
To configure advanced or custom options for a sync policy or connection object in Riva 2.4.53 or higher:
-
Best practice: If multiple option changes to the sync policy or connection are anticipated, stop the Riva synchronization service.
-
Edit the relevant sync policy or connection.
-
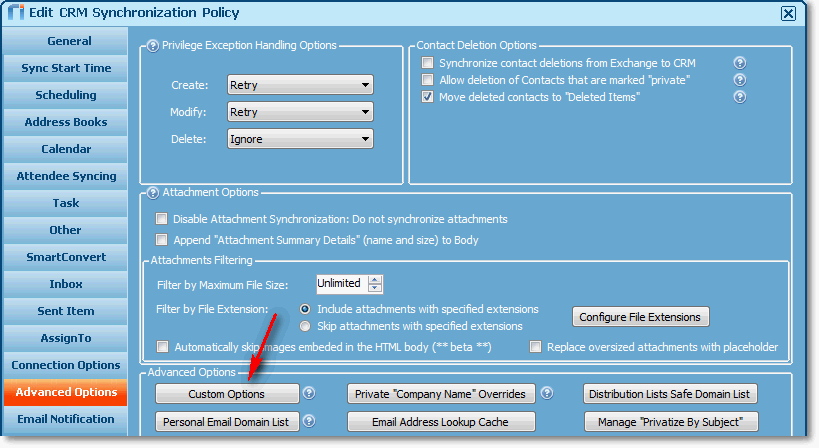
Select the Advanced Options tab, and select Custom Options.
-
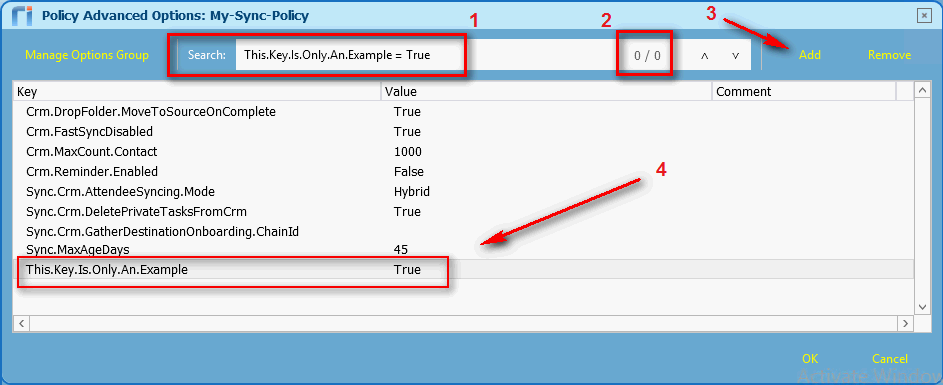
Best practice: In the Advanced Options window that appears, search for the key to confirm whether it already exists.
Note: In Riva 2.4.57 or higher, you can search for the key and value. Format: key = value. Example: Search for "This.Key.Is.Only.An.Example = True", without the quotation marks.
-
If the key exists, it appears in bold within the list. To change the value, double-click the cell that contains the value, and enter the new value.
If the key name does not exist, select Add. The key — or (in Riva 2.4.57 or higher) the key and value — appear on the list.
-
In order to add multiple keys and their values: For each key and value, repeat steps 4 and 5.
-
When done editing, select OK.
-
Save the sync policy or connection.
-
If the Riva synchronization service was stopped at step 1, start it.
Apply advanced or custom options to individual users in the Riva sync policy
To set advanced or custom options for specific users in Riva 2.4.53 or higher:
-
Best practice: If multiple option changes are anticipated, stop the Riva synchronization service.
-
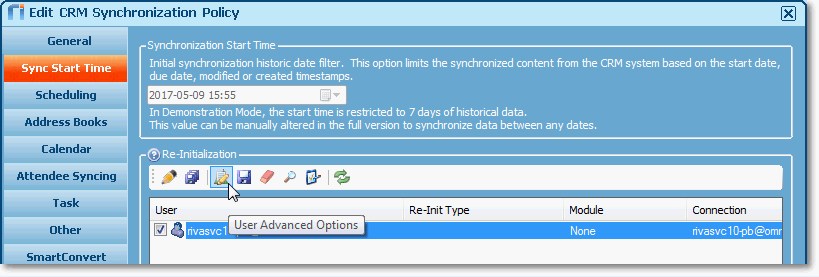
In the Riva sync policy, select the Re-Initialize or Sync Start Time tab.
Note: In sync policies created in Riva 2.4.46 or higher, the Re-Initialize page replaces the Sync Start Time page.
-
Select Load Users, select a user, and select the third icon from the left (User Advanced Options).
-
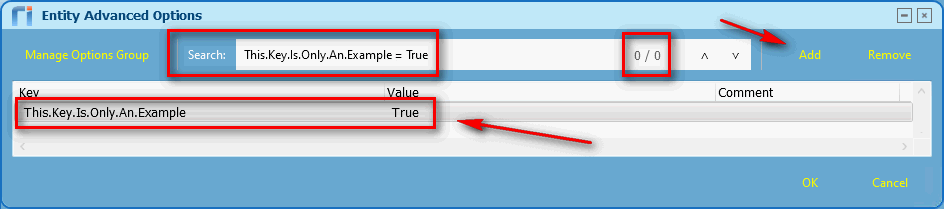
Best practice: In the Entity Advanced Options window that appears, search for the key to confirm whether it already exists.
Note: In Riva 2.4.57 or higher, you can search for the key and value. Format: key = value. Example: Search for "This.Key.Is.Only.An.Example = True", without the quotation marks.
-
If the key exists, it appears in bold within the list. To change the value, double-click the cell that contains the value, and enter the new value.
If the key name does not exist, select Add. The key — or (in Riva 2.4.57 or higher) the key and value — appear on the list.
-
Select OK to close the Entity Advanced Options window.
-
To save the changes,
- Right-click the selected user, and then select Save Changes; or
- Save the sync policy.
-
If the Riva synchronization service was stopped at step 1, start it.
How the Changes to the Advanced or Custom Options Are Applied
The changes made to the advanced or custom options take effect as follows:
- Connection and Sync Policy changes: If the synchronization service is already running, the service detects changes to the synchronization policy and will automatically restart the synchronization with the new configuration.
- Per-User change: During the user's next synchronization cycle, the new options are automatically used. If changed keys were applied only to users, there is no need to modify the synchronization policy.
Which Data Is Affected
Applying an advanced or custom option to a sync policy affects all the data that Riva syncs afterwards.
To apply the advanced or custom option to previously synced data, the users need be re-initialized. For instructions on selecting the correct re-initialization option, see Manage syncing users and re-init options for sync policies.
