|
|
Create & Configure a Sync Policy for Exchange or HCL Notes
Article ID: 476
Last updated: 19 Sep, 2023
Important Note: Riva makes use of Categories as the indicator that an item needs to be synchronized to the CRM. When Riva syncs data from the CRM to each mailbox, the Riva service automatically assigns the appropriate category.
Create a sync policy:
Configure the sync policy:
The following policy settings pages are available:
- General - Identify the name of the policy and the target CRM connection and target mailboxes.
- Sync Start Time - Identify the historic item filter for address book, calendar, and task items.
- In sync policies created in Riva 2.4.46 or higher, the Re-Initialize page replaces the Sync Start Time page. For more information, see Re-Initialize page.
- Scheduling - Settings to control full and quick drop folder sync frequencies.
- Address Books - Settings to control the sync of contacts and leads.
- Calendar - Settings to control the sync of calendar appointments and phone calls.
- Attendee Syncing - Settings to control calendar processing and attendee filter options.
- Tasks - Settings to control the sync of tasks.
- Other - Identify the modules to enable for SmartConvert and AssignTo.
- SmartConvert - Settings to enable and configure how email items can be converted to CRM items.
- Inbox and Sent Item - Settings to enable and configure auto sync of email from the mailbox sent folder.
- AssignTo - Settings to enable and configure creating and using drop folders for modules enabled on the Other page.
- Connection Options - Settings to select the CRM connection method.
- Advanced Options - Settings to handle advanced options.
- Email Notification (Optional.) - Settings to enable and configure email notification for specific Riva error events.
After the CRM sync policy has been completely configured, the policy can be saved and the Riva CRM Agent Service can be installed. Certain sync policy options will be locked down to prevent sync errors in the future.
Create a CRM Sync Policy
Before creating a Riva CRM sync policy, ensure that the following tasks have been completed:
- A Riva connection to the target CRM has been created and tested.
- A Riva connection to the target email system has been created and tested.
- A trial or purchase license has been requested and activated.
Types of Synchronization
With respect to this article, Riva performs four types of data synchronization:
- Initial Sync: After a target user has been added to a CRM sync policy, Riva reads all of the policy filter settings and syncs data from the CRM to the target user's mailbox. The initial sync normally makes the following changes to the mailbox (which are reflected in the email client):
- Contacts and leads are copied from the CRM to the user's Address Book and assigned a Riva sync category.
- Appointments and phone calls are copied to the user's calendar and assigned a Riva sync category.
- Tasks are copied to the user's task list and assigned a Riva sync category.
- If SmartConvert is enabled, a set of Create New email sync drop folders are created.
- If AssignTo is enabled, a set of AssignTo folders are created with corresponding unique email sync drop folders by module type.
- Full Sync: Normal scheduled sync of all new and modified data for enabled modules.
- Drop Folder Sync: Scheduled check for and sync of email from drop folders to the CRM.
- Re-initialize Sync: If data sync has stopped or become unlinked or corrupted, the administration can re-initialize all or selected target user accounts. For more information, see Manage syncing users and re-init options for sync policies.
Recommended Best Practices for Creating Riva On-Premise Sync Policies
The goal is to create a CRM sync policy that can be configured and tested against the target systems with minimal disruption to the target systems or users. These best practices should be followed for evaluation and production deployments:
- Ensure that you DO NOT select the SAVE button on a sync policy until all of the policy options have been configured.
- When creating a CRM sync policy, always ensure that the policy is disabled. This will permit installing and configuring the Riva sync service without having to attempt to sync individual users.
- To limit testing and mitigate the impact against the target systems, select only one or two target users. Actively involve those users in the testing of Riva syncing of CRM and email data.
- Configure the CRM sync policy to meet the expected requirements of the target users.
- Enable the CRM sync policy, and confirm that the initial synchronization is successful and at least two complete data sync cycles are completed.
- Tweak the CRM sync policy settings to better meet the needs and expectations of the target users, and confirm the results of all changes.
- After the CRM sync policy settings are finalized and tested, add the remaining target users. Confirm that the initial synchronization is successful and at least two complete data sync cycles are completed for every new target user added to the policy.
To Start the Wizard to Create a Riva On-Premise Sync Policy
-
Start the Riva Manager application. On the menu bar, select Policies.
-
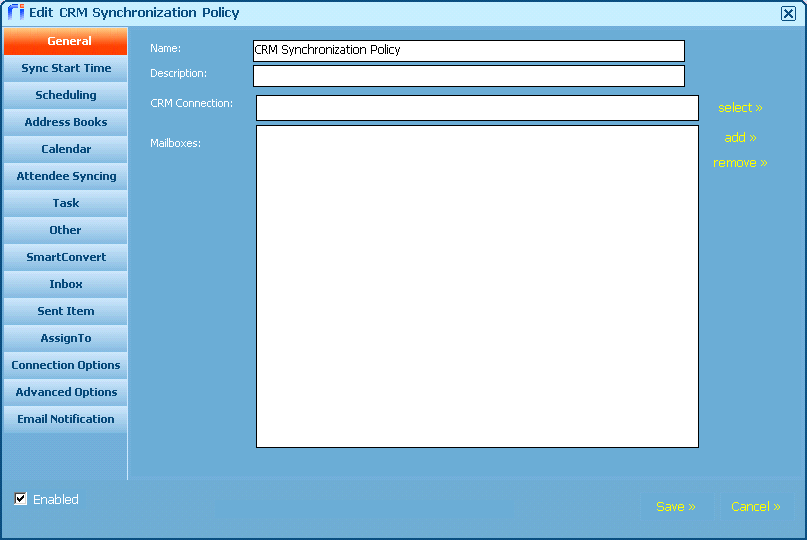
In the left pane, under Enterprise CRM Integration, select Exchange CRM Synchronization or HCL Notes CRM Synchronization.
.png)
The Edit CRM Synchronization Policy window appears and displays its General page.
-
In the lower left corner, clear the Enabled check box.
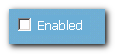
This ensures that the policy can be saved multiple times and Riva will not attempt to sync defined target users until the policy is enabled.
-
DO NOT SELECT SAVE. Proceed with setting the General settings.
Configure the CRM Sync Policy Settings
The next task is to configure the CRM sync policy. DO NOT select SAVE — which would save the CRM sync policy — until the various policy settings have been configured. Saving the policy early would lock in certain settings and prevent them from being modified. To allow the locked settings to be modified, you would need to select the General tab and select to Re-initialize All with the Full Option for all settings.
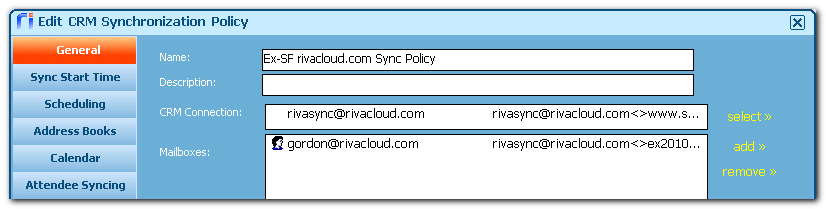
The General page
This is where you can
-
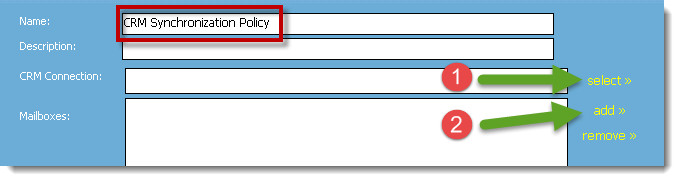
Modify the policy name as desired. Optionally provide a description.
-
To add the CRM connection, click or tap select.
-
If only one CRM connection exists, it is added. You are done here. Proceed to the next step.
-
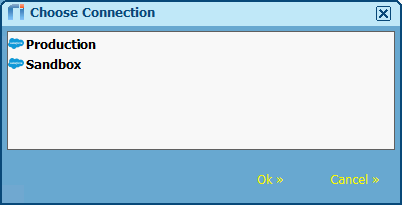
If there are multiple CRM connections, they appear in the Choose Connection window.
Select the desired connection, and select Ok.
-
To add the target mailboxes: To the right of the Mailbox list box, select Add. In the Mailbox Browser window, add individual mailboxes and/or distribution groups or import mailboxes from a .csv file. (Riva 2.4.40 or higher.)
-
To add individual mailboxes and/or distribution groups:
If the Choose Connection window opens and displays multiple connections, select the desired connection.
In the Mailbox Browser window that appears, do one or both of the following:
-
Enter the desired target mailbox email address, and select check name.
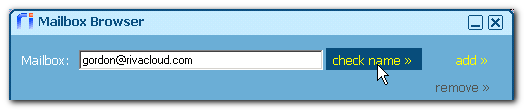
The system attempts to resolve the value against the target email system. If the target account exists, the email address for the account appears and is underlined.
-
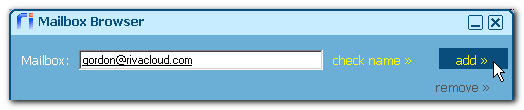
Enter the name or email address of a mail-enabled group.
At run-time, Riva extracts the names of the users and adds them to the list of users to synchronize. The group's members are refreshed once a day or every time the sync engine is started. For more information, see Use distribution groups.
Select add to add the target user and/or distribution group to the list.
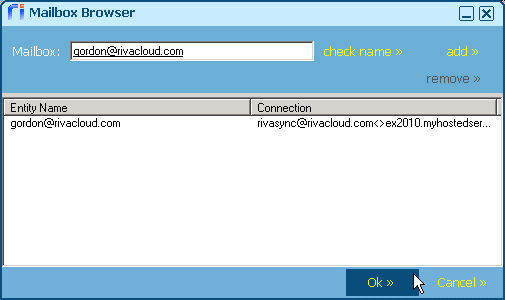
After adding all the target users and/or distribution groups, select Ok.
-
In the Mailboxes list box, confirm that the target or targets have been added to the list.
Only the target mailboxes are identified. When Riva syncs to the CRM, Riva links to a CRM account with the primary email value that is identical to the primary SMTP email address value of the corresponding target mailboxes identified in this list.
Note: It is common for some CRM accounts to be configured with the same primary email address value. This is often done for a CRM user who is also the administrator; both the admin account and the individual's CRM account will be configured with the same email address value. Because Riva cannot differentiate between multiple CRM accounts with the same email address value, it reports that as a sync error and will not sync data for that user.
-
DO NOT CLICK SAVE. Proceed with setting the Sync Start Time settings.
The Sync Start Time page
-
Select Sync Start Time.
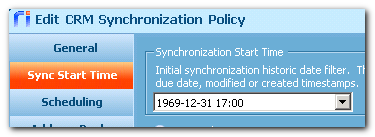
-
Enter the Synchronization Start Time, which creates a historic item filter and defines which items are copied from the CRM to the target user's mailbox during the initial sync.
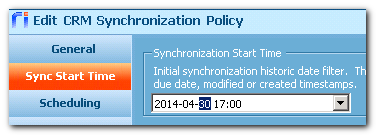
When Riva performs the initial sync, Riva selects contacts and leads, calendar items (appointments, phone calls, meetings, etc.), and uncompleted tasks that were created or last modified on or after the defined synchronization start time value provided.
Important Note
During the first sync cycle, Riva syncs items from the CRM to the email system as follows:
- Appointments whose “Start Date/Time” is the same as or later than the specified “Synchronization Start Time”.
- Tasks whose "Due Date" is the same as or later than the specified “Synchronization Start Time”; otherwise, if no “Due Date” is specified, Riva syncs active tasks.
- Items from all other modules when the items' “Modified Date” is the same as or later than the specified “Synchronization Start Time”.
-
DO NOT CLICK SAVE. Proceed with setting the sync schedule options.
The Scheduling page
How does Riva handle long running synchronizations?
When synchronizing a user's content, if the synchronization cycle lasts longer than the defined interval, Riva delays the scheduling of the next cycle until after the current synchronization cycle has been completed.
This is where you can
To control sync poll scheduling:
-
Select Scheduling.
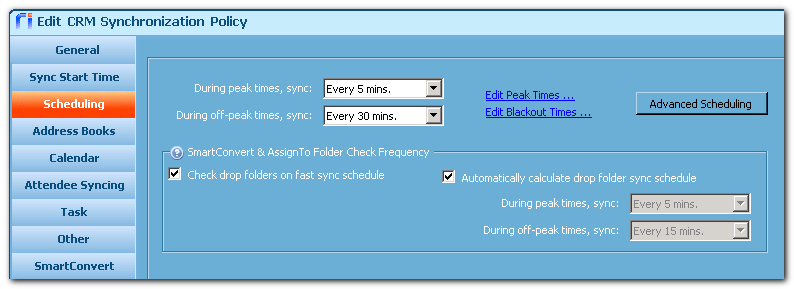
By default, Riva schedules each target user for a full sync every 5 minutes during peak times and every 30 minutes during off-peak times. Additionally, Riva is configured to perform drop folder checks at a faster frequency than full syncs and to dynamically schedule drop folder checks based on the number of target users and the full sync schedules.
-
Make adjustments to the full sync frequency values.
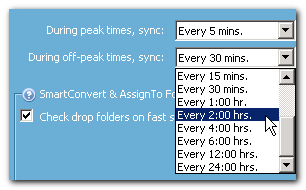
Adjust the peak and off-peak full sync frequency to best match the number of target users, which modules are enabled, the expected number of changes to data in the CRM or in the mailbox, and whether the CRM is on-premise or is hosted.
-
Select Edit Peak Times to adjust the parameters that define "peak" times.
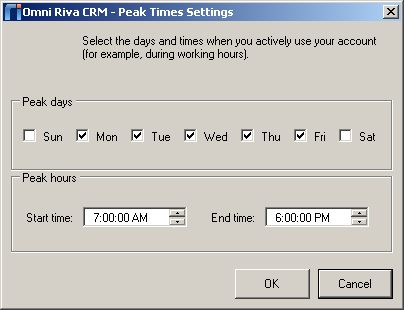
By default, Riva has "peak" times configured as Monday to Friday, 7 am to 6 pm. (Riva uses the Riva server locally configured time zone.) Make adjustments to these values to accommodate users who work from different time zones.
-
Select Edit Blackout Times to adjust the parameters that define "blackout" times when Riva does not sync data.
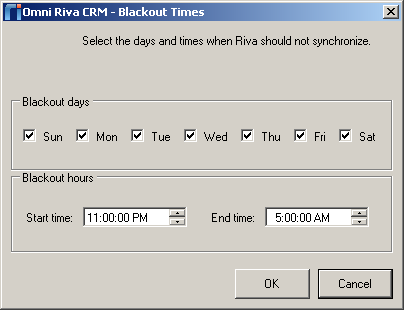
By default, Riva has "blackout" times configured as Sunday to Saturday, 11 p.m. to 5 a.m. (Riva uses the Riva server locally configured time zone.) Make adjustments to these values to accommodate users who work from different time zones and scheduled maintenance routines for on-premise mail servers and CRM servers.
-
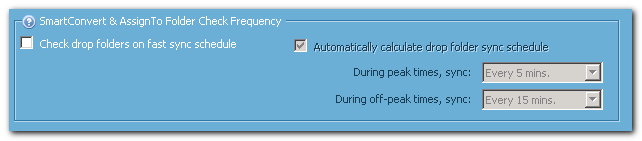
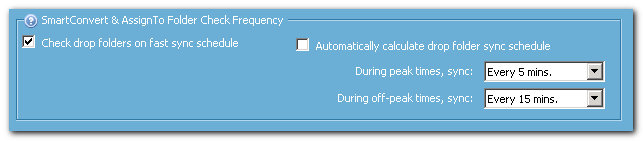
Clear or select the Check drop folders on fast sync schedule check box.
-
[Cleared]: Disables drop folder checking and syncing on a fast schedule. Email drop folders are checked during the full sync cycle for each target user. For more information, see Adjusting CRM drop-folder quick check schedule.
-
[Selected]: Drop folder checking and syncing are on a fast schedule. Clear the Automatically calculate drop folder sync schedule check box to manually specify a fixed schedule for drop folder syncing.
-
Select Advanced Scheduling to configure module level schedules.
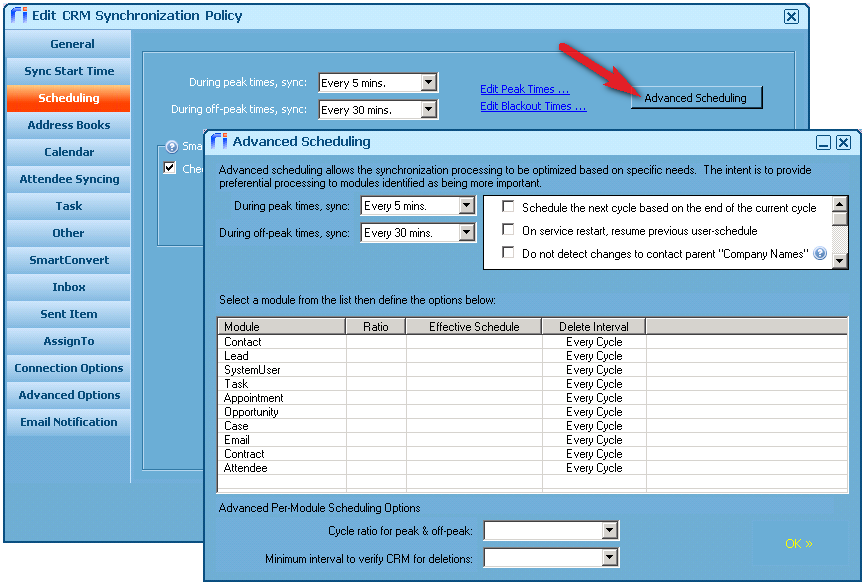
For more information, see How to configure advanced module-level scheduling.
-
DO NOT CLICK SAVE. Proceed with configuring address book sync options.
The Address Books page
This is where you can
-
Select Address Books.
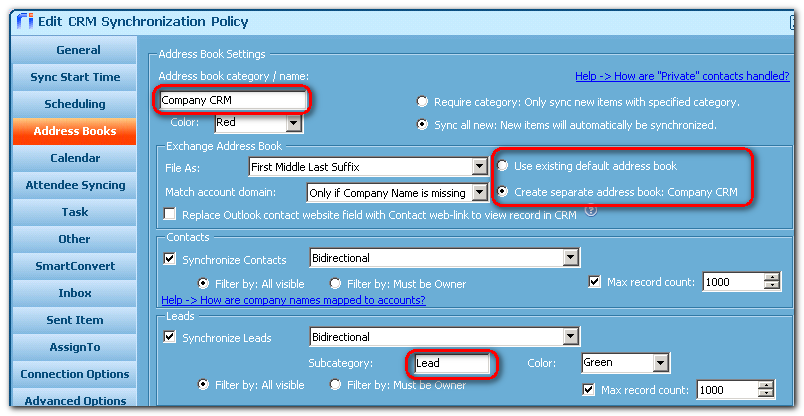
.png)
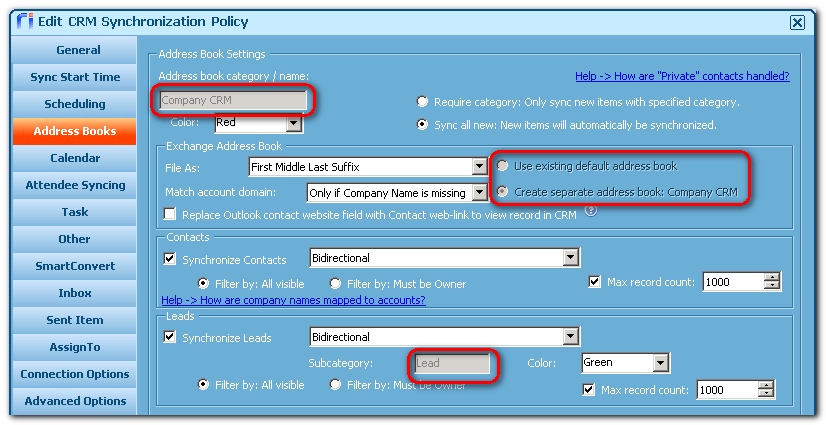
This screen shot displays the default settings for contact and lead synchronization.
-
Configure the Address book category / name and Color settings.
When Riva performs an initial sync, if either contacts or leads are enabled, Riva adds the Address book category name to the user's Exchange master category list. By default, Riva displays a category name that matches the target CRM. If the CRM sync policy has not been saved for the first time, the value for the category name can be modified. Once the CRM sync policy is saved for the first time, the values of category names are locked and grayed out.
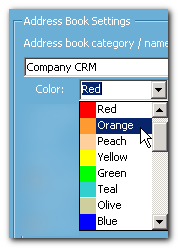
By default, all contacts that Riva syncs from the CRM and creates in the Exchange address book are categorized and colour-coded with the defined colour. A different colour can be selected from the drop-down list. For leads, assign a subcategory name and colour under Leads; see Apply one or more filters.
-
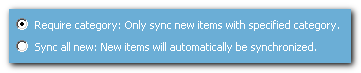
Look at the Require category and Sync all new from an Outlook perspective. By default, Riva is configured to Sync all new, which indicates that every time a user creates a new contact in the configured Exchange address book (new address book or the default address book), Riva automatically categorizes it and syncs it to the CRM during the next full sync cycle (unless the contact is marked as Private).

Changing to Require category means that the user must manually assign the Riva sync category to the contact to force it to sync to the CRM during the next full sync cycle.
-
Set the Exchange Address Book options.
File As: Defines how the contact is saved and displayed in the Outlook address book and matches the Outlook "file as" options for contacts.

The default is First Middle Last Suffix, which displays contacts like, for example, "Aldo Zanoni".
Match account domain: Defines how Riva matches the account name when it syncs new contacts from the Exchange address book to the CRM.
.png)
Default: Only if Company Name is missing.
| Match Account Domain Options |
Riva Processing Actions |
| Only if Company Name is missing: Riva looks for a CRM account that matches the email domain name only if the Company field is blank. |
If "Company" has a value, Riva searches the CRM for an account with a matching name.
(1) If a matching CRM account exists, Riva creates a CRM contact and links it to the matching CRM account.
(2) If a matching CRM account does not exist, Riva creates a CRM account by using the "Company" value as the account name and creates a CRM contact and links it to the new CRM account.
If "Company" is empty, Riva searches the CRM for an account with a matching email domain name. Riva checks the account website and email values for a match.
(1) If a matching CRM account exists, Riva creates a CRM contact and links it to the matching CRM account.
(2) If a matching CRM account does not exist, Riva attempts to create an orphan CRM contact. |
| Never: Riva never looks for a CRM account that matches the email domain name, whether the Company field has a value or not. |
If "Company" has a value, Riva searches the CRM for an account with a matching name.
(1) If a matching CRM account exists, Riva creates a CRM contact and links it to the matching CRM account.
(2) If a matching CRM account does not exist, Riva creates a CRM account by using the "Company" value as the account name and creates a CRM contact and links it to the new CRM account.
If "Company" is empty, Riva attempts to create an orphan CRM contact. |
| Always: Riva looks for a CRM account that matches the email domain name if it cannot find a match for the value in the Company field or if the Company field is blank. |
If "Company" has a value, Riva searches the CRM for an account with a matching name.
(1) If a matching CRM account exists, Riva creates a CRM contact and links it to the matching CRM account.
(2) If a matching CRM account does not exist, Riva searches the CRM for an account with a matching email domain name. Riva checks the account website and email values for a match.
(2a) If the email domain name matches a CRM account, Riva creates a CRM contact and links it to the matching CRM account.
(2b) If the email domain name does not match a CRM account, Riva creates a CRM account by using the "Company" value as the account name and creates a new CRM contact linked to the new CRM account.
If "Company" is empty, Riva searches the CRM for an account that matches the email domain name. Riva checks the account website and email values for a match.
(1) If a matching CRM account exists, Riva creates a CRM contact and links it to the matching CRM account.
(2) If a matching CRM account does not exist, Riva attempts to create an orphan CRM contact. |
Create Separate Address Book: <categoryName>: (Default.) If this is selected, Riva creates a contacts folder under My Contacts and assigns the folder name identified in the Address Book category / name value. For Riva to sync new contacts to the CRM, those new contacts must be created in this contact folder and be assigned the Address Book category from the master category list. If Sync all new is selected, Riva automatically assigns that category and syncs the new contact to the CRM.

Use existing default address book: If this is selected, Riva syncs contacts from the CRM to the default contacts folder under My Contacts. After Riva completes the initial sync cycle, then to cause a new contact that is created in the default address book to be synced to the CRM, users must manually assign the CRM category. Users can also assign the CRM category to pre-existing contacts in this folder if they want to sync them to the CRM.
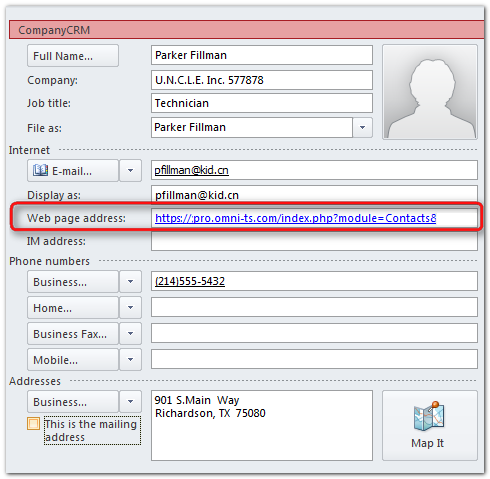
- Replace Outlook contact website field with Contact web-link to view record in CRM: If selected, this option forces Riva to sync the value of the CRM contact record website link into the Web page address field of the corresponding Outlook contact record. This allows the user to select that link to immediately open the contact record in the CRM, thus providing access to all the items that are related to the CRM contact. For more information, see Add Edit / View links to email contacts.
-
Under Contacts and under Leads, set the options.
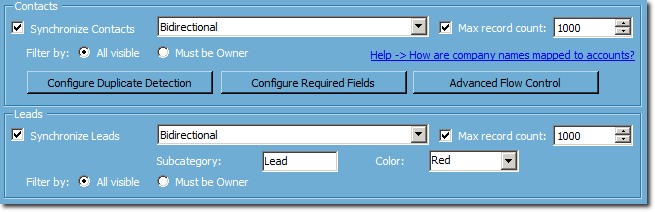
Synchronize Contacts: (Enabled by default.) Clear or select the check box.
-
[Cleared]: Syncing for contacts is disabled.
-
[Selected]: Riva adds a <categoryName> (for example, "CompanyCRM") to the user's Exchange master category list for contacts.
Configure Duplicate Detection: Includes options to ignore duplicate checking, prevent duplicate creation, or relate email to CRM contact records when duplicates are discovered. For more information, see Contact duplication prevention - detection and handling guide.
Configure Required Fields: Use this option to define fields in email contact records that must contain a value before Riva is allowed to sync a contact to the CRM. This is a valuable filter to prevent incomplete contacts from being created in the CRM. For more information, see Contact required fields - configuration guide.
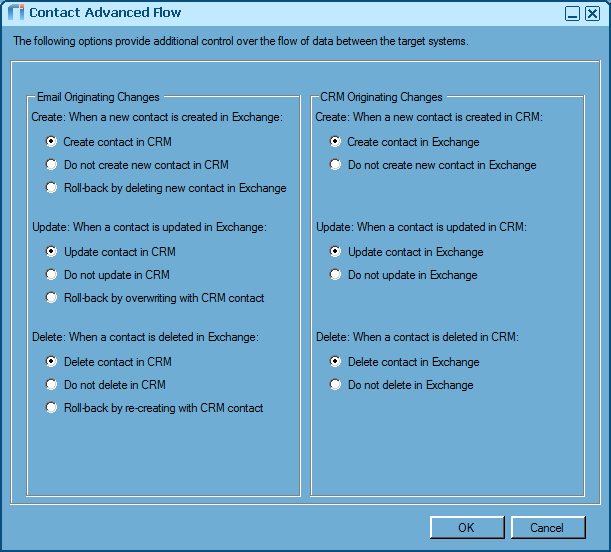
Advanced Flow Control: Use these options to modify the default handling of contact creates, updates, and deletes when originated in the CRM or email system.
Synchronize Leads: (Enabled by default.) If the check box is cleared, syncing for leads is disabled.
Lead Subcategory: Leads are placed in the same folder as contacts. All Leads synced from or to the CRM are assigned the <categoryName Lead> category (for example, "CompanyCRM Lead") from the user's Exchange master category list.
Lead Colour: Riva supports assigning a different colour to leads that are synced.
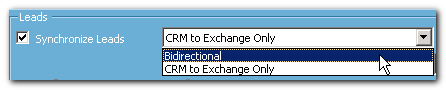
Sync Direction: Two options are available from a drop-down list.
Filter by: Two options are available:
-
All visible: All CRM contacts and/or leads that are visible are syncable to the corresponding user's Exchange address book, but other filters also apply.
-
For Salesforce, NetSuite, and Oracle On Demand, which use Basic Impersonation mode, this filter option syncs all contacts that are visible to the Riva connection user specified in the Riva connection to the CRM.
-
For Microsoft Dynamics CRM, GoldMine, Infor CloudSuite CRM (Infor CRM or Saleslogix), Sage CRM, Sugar, 1CRM (info@hand), and intelecrm, which use Enterprise Impersonation mode, this filter option syncs all contacts that are visible to the target CRM user.
-
Must be Owner: Only the contacts and/or leads that the user owns (or is assigned) in the CRM are synced to the corresponding user's Exchange address book.
Riva also supports "organic contact filters", which dynamically sync contacts if there is a relevant relationship documented in the CRM for an activity related to the contacts (appointment, archived email, or a contact on an opportunity, case, quote, project, etc. owned by the user). For more information, see Organic contact filtering.
Certain CRM systems "Sync to Contact" or similar options. For more information, see Sync to Outlook contact filter options for Sugar.
Max Record Count: (Enabled by default.) When this is enabled, Riva limits the total number of contacts or leads to sync. The default value is 1000. Riva selects the most current contacts or leads based on the date/time last modified or created.
-
DO NOT CLICK SAVE. Proceed with configuring Calendar sync options.
The Calendar page
This is where you can
By default, appointments, meetings, and/or events are synced from the target users' CRM calendar to their primary calendar in their Exchange mailbox (Outlook calendar). Riva supports appointments that are flagged as Private. See Private appointments.
-
Select Calendar.
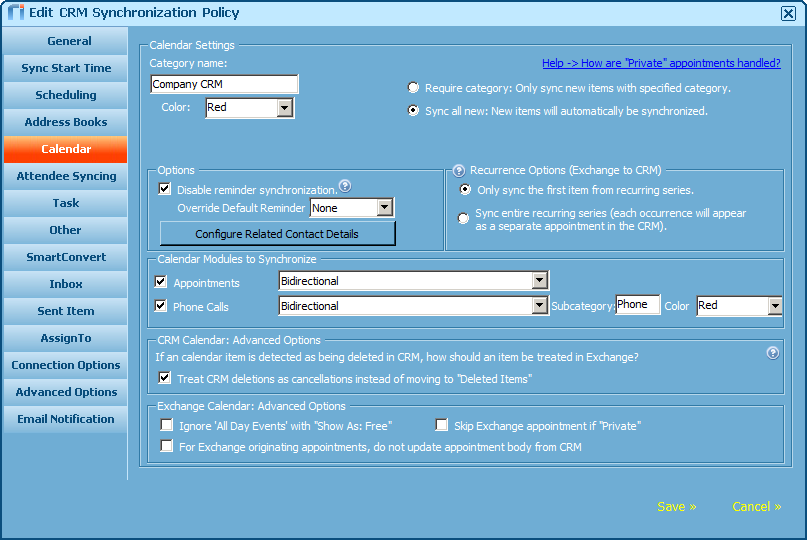
This screen shot displays the default settings for calendar synchronization.
-
Configure the Category name and Color settings.
If a calendar item is configured to sync, then when Riva performs its initial sync, Riva adds the Calendar category name to the user's Exchange master category list, and Riva syncs the current CRM calendar items to the target user's Exchange calendar and assigns the Calendar category name. By default, Riva displays a category name that matches the target CRM. If the CRM sync policy has not been saved for the first time, the value for the category name can be modified. Once the CRM sync policy is saved for the first time, the values of category names are locked and greyed out.

By default, all calendar entries that Riva syncs from the CRM and creates in the Exchange calendar are categorized and colour-coded with the colour selected here. A different colour can be selected from the drop-down list. For phone calls, assign a subcategory name and colour under Phone Calls; see Apply one or more filters.
-
Look at the Require category and Sync all new from an Outlook perspective. By default, Riva is configured to Require category. This means the user manually assigns the Riva sync category to the calendar item to force it to sync to the CRM during the next sync cycle. This option can be applied only by email clients that support categories; most mobile clients do not support this option.

Changing to Sync all new indicates that each time a user creates a new calendar item in the Exchange calendar (from any email client - including mobile clients), Riva automatically categorizes it and syncs it to the CRM during the next full sync cycle. To have historic calendar items processed that were created before starting Riva, the user can manually categorize them or work with our professional services team to handle historic calendar entries.
-
Configure the reminders.
Riva automatically syncs alarms in the CRM to Exchange/Outlook as notifications (and vice versa). The Disable reminder synchronization option turns alarm / notification sync off.
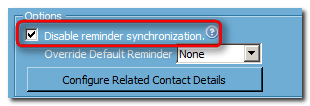
Even with this option selected, the first time sync of calendar items from the CRM to Exchange sets a 15-minute notification. For instructions on completely disabling all alarm and notification syncing, see Disable alarm and reminder synchronization.
If Disable reminder synchronization is selected, you can set the Override Default Reminder option. Riva sets the default reminder to the calendar appointment that it creates in the target system. If a user creates a calendar item in the CRM, Riva syncs that appointment to Exchange or Notes, overrides the default reminder setting, and sets the reminder by using the time specified in the drop-down. The same occurs when the calendar item is created in Exchange or Notes and synced to the CRM.
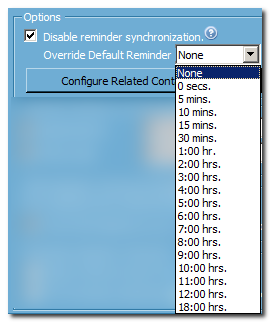
Once the calendar items have been created in the target system (email or CRM), reminder sync continues to be disabled.
-
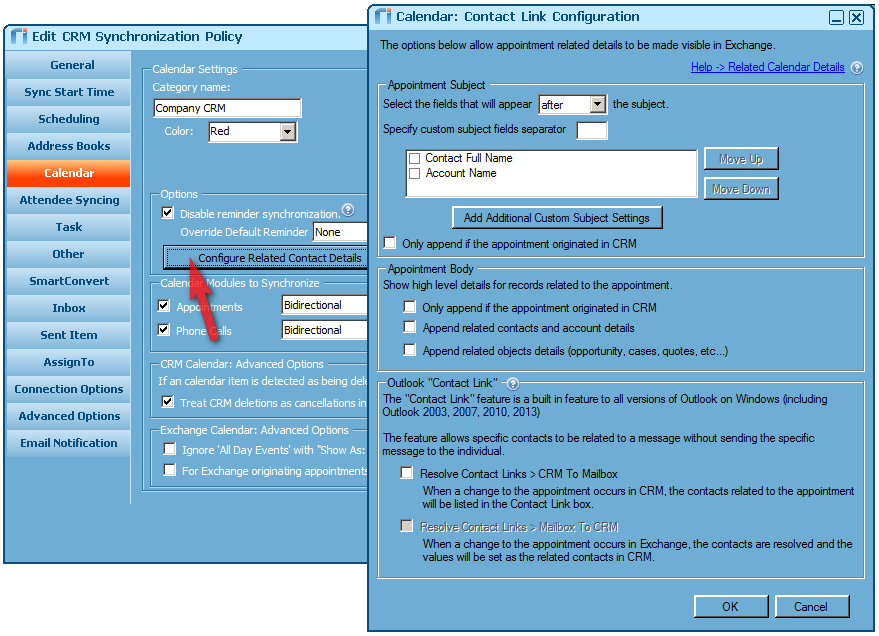
Configure the related contact details. Select the button for options to append contact details to the appointment subject or body, and resolve contact links between CRM and mailbox appointments..
-
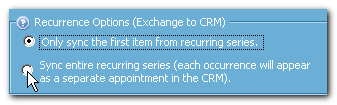
Select a recurrence option (Exchange to CRM): Make Riva sync the first appointment of a recurring calendar series from Exchange to CRM, or make it sync the entire recurring series. For more information, see Synchronize Exchange recurring appointments.
-
Apply one or more filters to the calendar items.
Because CRMs support different types of calendar items, the following settings may look different for your CRM.
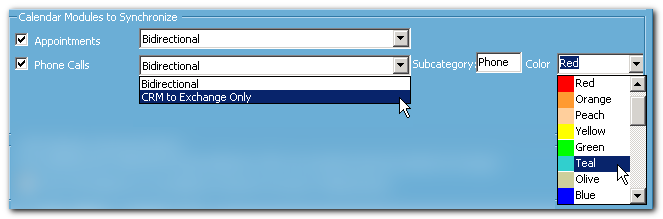
Enable / Disable: By default, syncing is enabled for all available calendar item types. Clearing a calendar item type disables the Riva sync for that type.
Sync Direction: By default, syncing for all Calendar item types is set to Bidirectional. Optionally set this to CRM to Mail Only, which makes Riva sync unidirectionally, from the CRM to the email system, essentially treating the CRM calendar items as read-only from the mail system.
Appointments: If this is selected, Riva assigns the calendar category name and colour to appointments.
Phone Calls (or other calendar item types): Riva provides a default Subcategory name and colour. A best practice is to provide a different colour for each calendar item type so that they can be easily differentiated in Outlook calendars.
-
Set the CRM calendar advanced options.
By default, Riva syncs CRM calendar deletions as deleted items in Exchange. To ensure that deleted CRM appointments sync to Exchange as Cancelled appointments, select this option. For detailed instructions, see Calendar option to handle deleted CRM calendar items.

-
Set the email system advanced options.
-
(Riva 2.4.50 or higher.) Skip Exchange appointment if set to "Show As: Free"
(Riva 2.4.50 or higher.) Skip HCL Notes appointment if set to "Show As: Available"
(Riva 2.4.49 or earlier.) Ignore "All Day Events" with "Show As: Free".
By default, Riva ignores all appointments that have the setting "Show As: Free" or "Show as: Available" (not only all day events that have those settings). By default, when someone schedules an appointment in Outlook or HCL Notes, it is marked respectively "Show As: Free" or "Show As: Available". In email clients, other users still see the user as free or available when doing a busy search.
Not all CRMs respond in the same way when Riva syncs an all day event to them. Some CRMs create an all day event and flag it as "Show As Busy". If the user tries to schedule another event during that time, it is denied because the user shows as busy.
Select or clear the check box.
- [Selected]: Riva does not sync appointments that are marked as free or available to the CRM.
- [Cleared]: Riva syncs every appointment to the CRM, unless another option prevents the syncing of some appointments.
The screen shot shows the wording used in Riva 2.4.49 or earlier.

- Skip email appointment if "Private". By default, Riva syncs Exchange appointments marked as private to the CRM and either handles them as private CRM appointments (if the CRM supports the private flag) or "privatizes" the appointment in the CRM (see Private appointment handling). Select this option to skip Exchange private appointments. This option can also be applied with an app.settings file; see Custom option to ignore private appointments.

-
For email system originating appointments, do not update appointment body from CRM. By default, Riva syncs any changes made to calendar appointments in the CRM. For appointments originating in the email system, Riva syncs the appointment body to the CRM, removes HTML formatting, and may drop contents past a certain number of characters. Selecting this option prevents Riva from syncing the body content of those appointments back to Exchange, which would inadvertently apply unwanted content changes to the Exchange appointment.

-
(Office 365 and Exchange only.) If Exchange appointment contains any private Outlook contact attendees, sync as privatized appointment to CRM. If this check box is selected and an Outlook appointment attendee list contains an Outlook contact that is flagged as private, the appointment is treated as a privatized appointment. Depending on other sync rules, it may or may not be visible in the CRM.

-
DO NOT CLICK SAVE. Proceed with configuring the Attendee Syncing options.
The Attendee Syncing page
This is where you can
Note: By default, this feature is configured to inherit and use the email processing options from the SmartConvert page, even if the SmartConvert feature has been disabled.
-
Select Attendee Syncing.
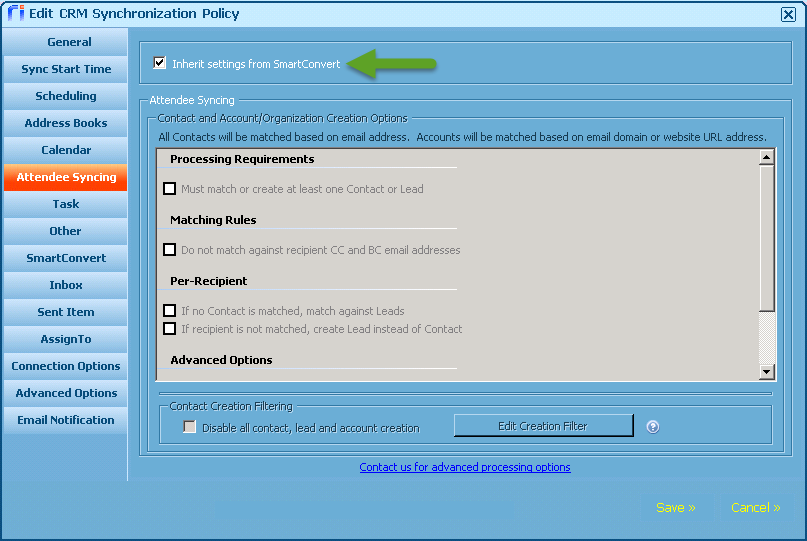
This screen shot displays the default settings for the Attendee Syncing page.
-
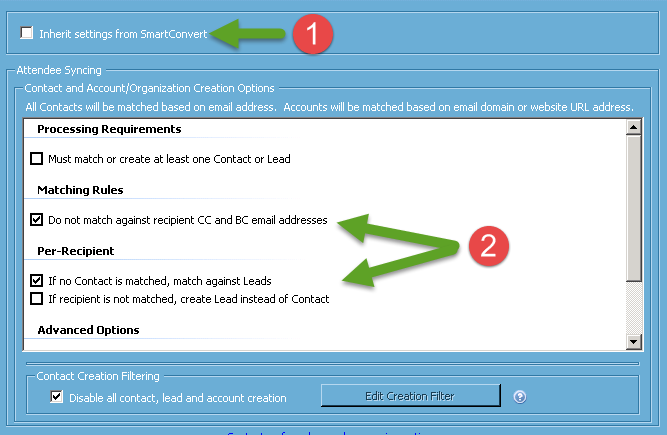
Configure the Inherit settings from SmartConvert option.
-
[Selected]: (Default value.) Calendar syncing uses the SmartConvert options to process attendee syncing and filter options — even if the SmartConvert feature is disabled.
-
[Cleared]: You can set the meeting attendee processing options and filters to be different from the SmartConvert email processing options. Configure the Contact and Account/Organization Creation Options and the Contact Creation Filtering settings accordingly. For an explanation of each option and filter, see the SmartConvert page.
-
DO NOT CLICK SAVE. Proceed with configuring the Task options.
The Task page
This is where you can
By default, Riva syncs CRM tasks (personal or module-specific) to the user's Exchange task list and syncs new Exchange tasks to the user's task list in the CRM.
-
Select Task.
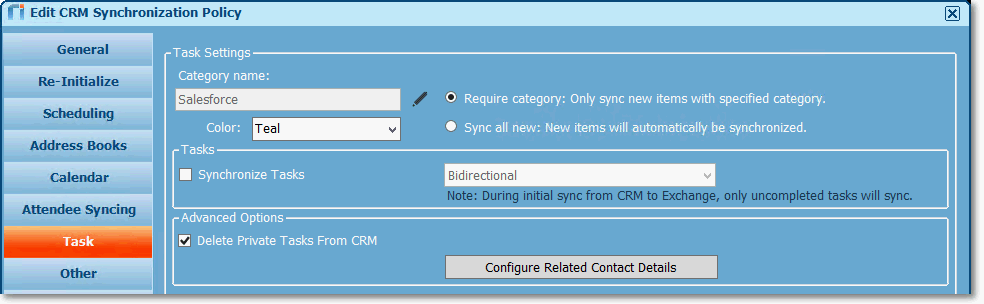
This screen shot, taken from Riva 2.4.56, displays the default settings for task synchronization.
-
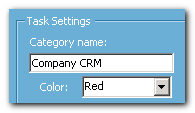
Set the Category name.
When Riva performs an initial sync, if any task item type is enabled, Riva adds the Task category name to the user's Exchange master category list, and Riva syncs the current CRM tasks to the target user's Exchange task list and assigns each the Task category name. By default, Riva displays a category name that matches the target CRM. If the CRM sync policy has not been saved for the first time, the value for the category name can be modified. Once the CRM sync policy is saved for the first time, the values of category names are locked and greyed out.
By default, all contacts that Riva syncs from the CRM and creates in the Exchange task list will be categorized and colour-coded with the defined colour. A different colour can be selected from the drop-down list.
-
Select Require category or Sync all new.
Not all CRMs support a privacy flag for tasks. Riva does not check or set privacy flags for tasks synced from Exchange to the CRM. Require Category is the recommended default option to permit more granular control for users, so that they can decide which tasks to sync.
-
Require category: (Default.) The user must manually assign the Riva sync category to the task item to force it to sync to the CRM during the next full sync cycle. This option is supported only by Exchange clients that support categories; this is not supported by most mobile clients.
-
Sync all new: Each time a user creates a new task item in the Exchange task list, Riva automatically categorizes it and syncs it to the CRM during the next sync cycle. The Sync all new option applies to all Exchange clients, including mobile clients.
-
Under Tasks, configure the options.
Because CRMs support different types of task items, the following settings may look different for your CRM.
.png)
Enable / Disable: By default, syncing is enabled on all available task item types. Clearing a task item type disables the Riva sync for that type.
Sync Direction: By default, syncing for Task items types is set to Bidirectional. Syncing can be set to CRM to Exchange Only, which makes Riva sync unidirectionally, from the CRM to Exchange, effectively treating the CRM task items as read-only.
-
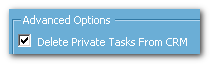
Set the advanced options.
-
Delete Private Tasks from CRM. This feature is used to remove previously synced Exchange tasks from the CRM that should have been personal or private tasks. If the check box is selected (which is the default setting), selecting a task in an email client and marking it as "private" ensures that the Riva sync removes that task item from the CRM in the next deletion cycle.
-
DO NOT CLICK SAVE. Proceed with configuring the Other options.
The Other page
This is where you can
CRMs have different modules available. The options available to you may vary depending on the CRM.
-
Select Other.
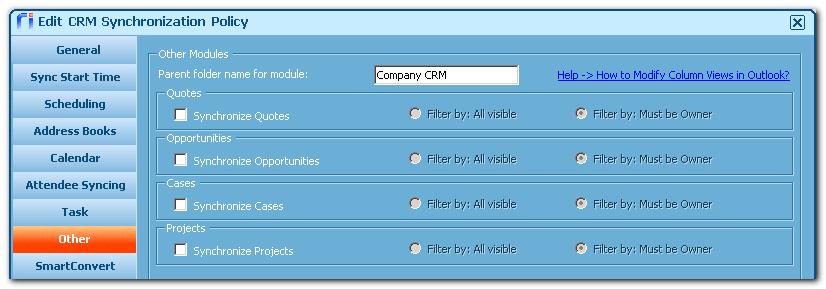
This screen shot displays the default settings on the Other page.
-
Configure the Parent folder name for module.
If either SmartConvert or AssignTo are enabled, during the initial sync, Riva creates a parent folder name to contain the email sync drop folder structure. By default, Riva displays a parent folder name that matches the target CRM. If the CRM sync policy has not been saved for the first time, the value for the parent folder name can be modified. Once the CRM sync policy is saved for the first time, the values of parent folder names are locked and greyed out.
-
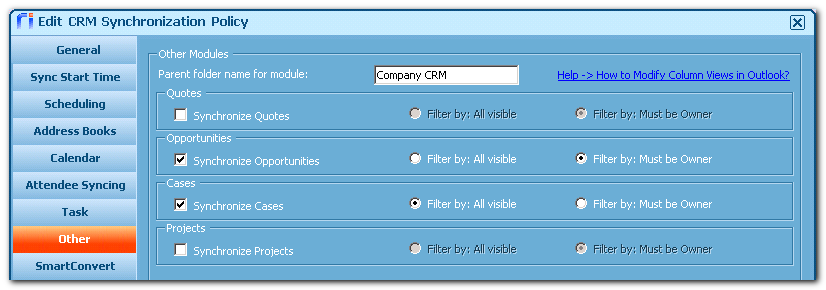
Enable the synchronization of one or more modules by selecting the Synchronize check box of that or those modules.
By default, email sync support is not enabled for any module. The modules list varies depending on the type of CRM that the sync policy is connecting to. Selecting a module check box enables email sync support for that module and creates a corresponding set of folders inside the parent folder: During the initial sync, Riva creates a parent folder structure that matches the enabled modules. These folders are created and managed by Riva. If a user moves or deletes a Riva-managed folder, Riva recreates the folder. Here is an example of a created folder structure:
Company CRM
Cases
Opportunities
-
Configure the filters.
Filters affect the email drop folders and connect email items that Riva will sync to the CRM. If the Opportunities module is enabled, Riva creates drop folders for the most current opportunities based on these filters and the filter settings in the AssignTo page.
-
Filter by: All Visible. Riva creates drop folders and connects to email items for the most current opportunities that are visible in the CRM. This may be a good option for supervisors, team leaders, and managers who need to see opportunities, cases, quotes, etc. that they do not own.
-
For Salesforce, Netsuite, and Oracle On Demand, which use the Basic Impersonation mode, this filter option syncs all items (opportunities, cases, etc.) that are visible to the Riva connection user specified in the Riva connection to the CRM.
-
For GoldMine, 1CRM (info@hand), intelecrm, Microsoft Dynamics CRM, Sage CRM, Saleslogix, and Sugar, which use the Enterprise Impersonation mode, this filter option syncs all items (opportunities, cases, etc.) that are visible to the target CRM user.
-
Filter by: Must be Owner. Riva creates drop folders and connects to email items for the most current opportunities that are assigned to the target user in the CRM. This may be more appropriate for account executives and sales reps with defined opportunities who need to see only the opportunities they own.
-
DO NOT CLICK SAVE. Proceed with configuring the "SmartConvert" options.
The SmartConvert page
This is where you can
-
Select SmartConvert.
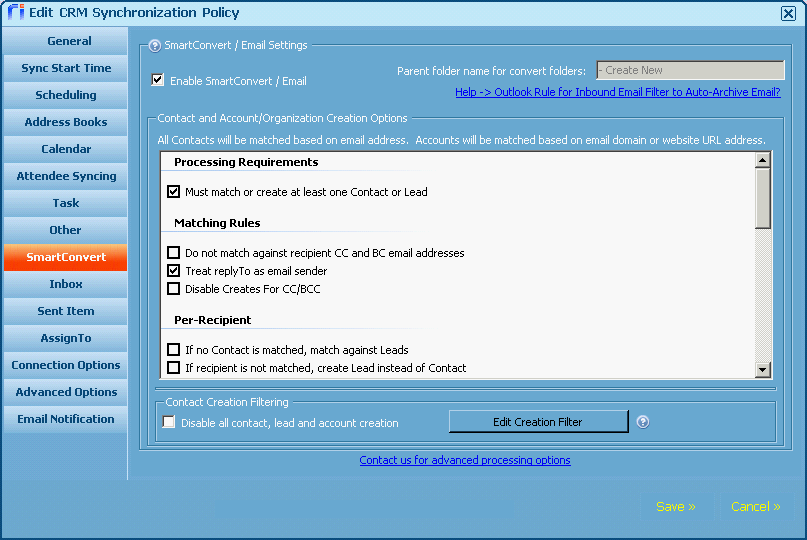
This screen shot displays the default SmartConvert settings.
SmartConvert is Riva's method to sync a copy of an email from Exchange to the CRM.
-
Enable or disable SmartConvert.
Enable SmartConvert: (Selected by default.) To disable SmartConvert for the target users, clear the check box.
Note: Even when the SmartConvert feature is disabled, its options remain editable, in case the Attendee syncing feature is set to inherit its settings from SmartConvert.
-
Define the parent folder name for the conversion drop folders.

Parent folder name for convert folders: This identifies the prefix for all of the email sync drop folders. If modules are not enabled on the Other page, this adds a "- Create New Email" drop folder immediately below the CRM sync parent folder. If modules are enabled on the Other page, this adds "- Create New <type>" folders throughout the CRM sync folder structure.
Tip: Place a "- " (hyphen) before "Create New", so that the "- Create New <type>" drop folders appear at the top of the respective folder where they are located. During the initial sync, Riva adds "- Create New" folders into the folder structure created by the Other settings, for example:
Company CRM
- Create New Email
Cases
- Create New Cases
Opportunities
- Create New Opportunities
Using SmartConvert to Create Cases, Opportunities, Quotes, or Projects. When a user places an email in a "- Create New <type>" drop folder, Riva creates the new item in the CRM by using the following process. For the purposes of this example, we will discuss creating a new opportunity. The process is the same for all object types that are enabled on the Other page.
-
Riva attempts to match the recipient email address to CRM users, contacts, leads, and/or accounts. If Riva does not find a match in the CRM, it creates a CRM account and contacts as required. New CRM contacts and accounts are assigned to the CRM user who converts the email by using SmartConvert. If multiple CRM matches are discovered, Riva relates the item to all matches by default.
-
Riva creates an opportunity. The Subj: of the email is used as the name of the new opportunity. This opportunity is created in the target CRM account, and the target CRM contacts are added to the new opportunity. The new opportunity is assigned to the CRM user who converts the email by using SmartConvert.
-
Riva creates a copy of the email in the email store of the CRM and links it to the opportunity and to the assigned CRM contact(s) and CRM account.
-
If the AssignTo feature is enabled, Riva creates an Opportunity connect email in the Opportunities folder in the target user's Exchange account. Riva also creates an Opportunity drop folder under the Opportunities - AssignTo folder. For more information, see the AssignTo page.
-
Riva manages the processed email item and either deletes it from the "- Create New Opportunities" drop folder or returns it to the Inbox, depending on the configured option.
-
Set the Contact and Account/Organization Creation Options.

When a user places an email into a "- Create New" drop folder, Riva reads the addressees in the header of the email and attempts to find a matching CRM user (referred to as the "system user" in the Riva logs), contact, and/or lead in the CRM for each addressee. Syncing (creating a copy of) the email into the CRM is handled in accordance with the contact and account/organization (and email item handling) option settings.
To select an option, select the corresponding check box.
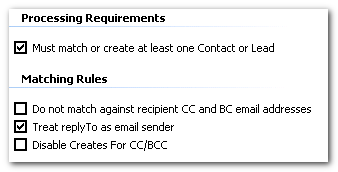
Must match or create at least one Contact or Lead: (Default: not enabled.) If this option is enabled, before Riva can create a copy of an email in the CRM, it must identify or create at least one CRM contact or CRM lead. Riva does not consider a CRM user (system user) to be the same as a contact or a lead. If both this option and the option "Users and Contacts are mutually exclusive" are enabled, then when a user attempts to sync an internal only email and all the addressees are CRM users, the sync fails because Riva cannot locate a matching contact or lead.
(Riva 2.4.53 or higher.) Automatically synchronize emails based on conversation: (Default: [cleared (= not selected).]) When selected, this option enables Conversation Follow UNLESS in Riva 2.4.55 or higher, the Salesforce connection option "Email: Enable Managed Package for Conversation Capture" is selected: in this case, Conversation Capture is enabled instead.
Do not match against recipient CC and BC email addresses: (Default: not enabled.) If this option is enabled, Riva does not attempt to match the CC and BC email addressees against CRM users, contacts, or leads in the CRM.
Treat replyTo as email sender: (Default: enabled.) When selected, this option ensures that Riva matches an email's replyTo value as the email sender. This feature supports syncing emails from web services that show the customer's email address as the replyTo value because the sender is always the email address of the web service that generates the email.
Disable Creates for CC/BC: (Default: not enabled.) If this option is selected, Riva does not match CC or BC recipient against CRM users, contacts, or leads.

If no Contact is matched, match against Leads: (Default: disabled.) If this option is enabled, Riva attempts to match email addressees against CRM leads if there is no corresponding CRM contact.
If recipient is not matched, create Lead instead of Contact: (Default: disabled.) If enabled, Riva will create a new CRM lead for an email addressee if Riva cannot match against a corresponding CRM contact or lead.
When creating a new Contact, if no Account is matched, create new Account: (Default: enabled.)
-
If this option is enabled, when Riva creates a new CRM contact, it links the new contact to an existing CRM account with the same email domain name; otherwise, Riva creates a CRM account and links the new CRM contact to the new CRM account.
-
If the email addressee is just an email address (for example, johnd@mycompany.com), then the new CRM contact is named for the email address (for example, johnd@mycompany.com).
-
If the email addressee is a name and email address (for example John Doe <johnd@mycompany.com>), then Riva creates a CRM contact named "John Doe".
-
If a CRM account is created, it is named for the email address domain name, for example "mycompany.com".
-
If disabled, Riva links a new CRM contact to an existing CRM account; otherwise, it creates an orphan CRM contact (if the target CRM supports orphaned contacts).

Delete item upon successful processing, instead of returning to folder: (Default: cleared.) Select or clear the check box.
-
[Cleared]: If Riva can sync the email item to the CRM, it moves the email item back to the Inbox and adds the category Processing Complete to the email. This is a visual cue to the user that the email sync was successful. If Riva cannot sync an email because an error has occurred, Riva leaves the email item in the "- Create New" drop folder and adds an ERROR category to the email item to help identify the cause of the non-sync issue. This option is recommended if users are going to manage emails from mobile devices.
-
[Selected]: If Riva can sync an email item to the CRM, Riva deletes and purges the email item from Exchange. Advise all users to place a copy of email items in "- Create New" drop folders. Placing an original email item in a drop folder results in its being deleted and purged, which makes the email item non recoverable. Caution: This option is not recommended for users who manage emails from mobile devices, unless the mobile device has a "copy" option. Most mobile devices allow users only to move an email to another folder.
-
This is a major change to how Riva handles email items in "- Create New" drop folders. Prior to the 2.4.24 release, Riva would delete and purge email items from drop folders unless this option was enabled as an advanced option. If Riva is configured with that advanced option, it automatically adopts that same setting when Riva is upgraded to release 2.4.24+. If the advanced option was not configured, Riva sets this option as enabled (selected) when Riva is upgraded to release 2.4.24+.
and delete item if no recipients matched or created, instead of remaining in folder: If the Delete item upon successful processing and Users and contacts are mutually exclusive options are both selected, this related suboption automatically removes emails for which Riva cannot find a required match. This option is normally selected when implementing Outlook rules to autoarchive inbound email.

Users and Contacts are mutually exclusive: (Default: [Selected].) Select or clear the check box.
-
[Selected]: Riva checks the recipient email addressees and compares them to CRM users (system users).
-
If Riva matches an email recipient with a system user, it archives that email to the CRM user account.
-
If it does not match, Riva creates a contact for each email recipient.
-
[Cleared]: Riva does not check email addressees against CRM users. If Riva cannot find a matching contact or lead for an internal user, Riva creates a contact for internal users. As a result, emails synced to the CRM by Riva are linked to contacts created by Riva instead of being linked to the CRM account that the user would log into the CRM with.
-
[Whether Selected or Cleared]: Riva creates a CRM contact for internal (employees) that do not have a CRM user account, unless a creation filter blocking the company email domain exists (see below).
Assign to Account of matched Contacts: (Default: [Cleared].) Select or clear the check box.
-
[Whether Selected or Cleared]: When Riva syncs an email to the CRM, it creates a copy of the email item in the email store of the CRM and creates a link for the email item in the activity history of the matching contact(s).
-
[Selected]: Riva also creates a link for the email item in the activity history of the CRM account of the matching contact(s).
Include Email Body As Attachment: (Default: [Cleared].) When this option is selected, Riva saves the email body as an attachment to the converted email item. Use this for CRMs that have a small maximum character limit on converted email items created in the CRM. For example, if the NetSuite option to sync email as a task item is enabled, NetSuite limits the description field of those task items to 10,000 characters. For long emails, Riva's Include Email Body As Attachment option allows the text of the email to be saved as an attachment to ensure that all the contents of the email are saved.
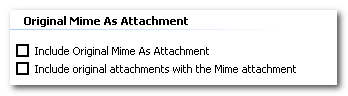
Include Original Mime as Attachment: (Default: not selected.) (Available for Exchange, but not for HCL Notes.) When this option is selected, Riva saves the email in the activity history and saves the original email as a MIME attachment (.EML file). For more information, see Sync original MIME email as .EML attachment in the CRM.
Include original attachment with the Mime attachment: (Default: not selected.) (Available for Exchange, but not for HCL Notes.) When this option is selected, Riva saves email attachments related to the Mime attachment (instead of being saved in the activity history).
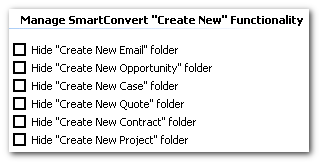
Hide "Create New ..." folder: (Default: not enabled.) When this option is selected, Riva does not create the corresponding email drop folder in the user's mailbox. This prevents the user from manually converting an email into a specific module while allowing email sync for other modules. If a module is not selected on the Other page, Riva does not create that "- Create New" drop folder. This option supports syncing detail emails for a module from CRM to email and supports AssignTo email sync but prevents creating new module items (for example, opportunities, or cases).
-
Set the contact creation filtering.
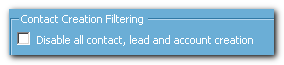
Disable all contact, lead and account creation: Select or clear the check box. (Default: [Cleared].)
-
[Selected]: Riva does not create contacts, accounts, or leads. Riva syncs the email item if email addressees are matched to corresponding contacts or leads (depending on the options selected previously). — If no matches exist: The email item is moved back to the Inbox or Sent Items folder, and at this point, Riva's default behaviour varies depending on the release:
-
In Riva 2.4.39 and earlier releases, Riva assigns the Skipped Item - No Matching Contact category to the email item.
-
In Riva 2.4.40 or higher, the category is not assigned by default. If you want Riva to assign that category, apply the following advanced option to the CRM connection:
Sync.Crm.PostItemSkipProcessing.Disabled.ReasonCode = NoTokenFound
-
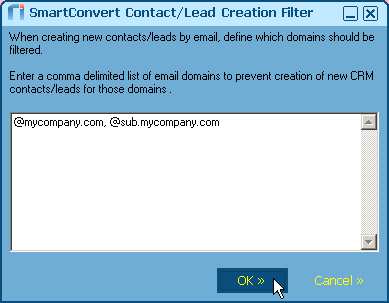
To filter specific email domains for CRM contact and account creation, select Edit Creation Filter.

-
In the filter creation window that appears,
-
Enter a comma-delimited list of email domains to exclude from CRM contact and account creation, for example "@mycompany.com, @yourcompany.net, @thecompany.org". You can also enter each domain on a separate line. Most companies include their email domain in this filter to prevent Riva from creating contacts for the company employees in the CRM.
-
To prevent SmartConvert from creating new CRM contacts and accounts, enter an asterisk (*).
-
Click OK to save the filter.
-
DO NOT CLICK SAVE. Proceed with configuring the Inbox and Sent Item options.
The Inbox and Sent Item pages
These pages are where you can
To enable email sync from the Inbox folder and/or the Sent Items folder:
-
Select Inbox or Sent Item.
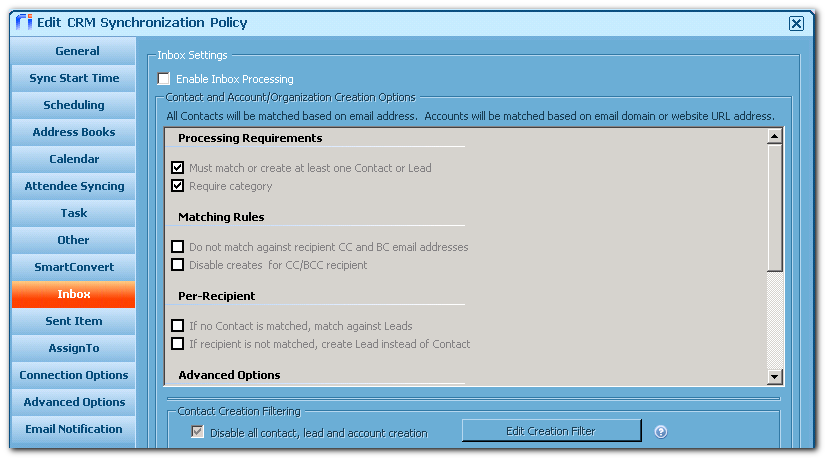
This screen shot displays the first few default Inbox settings. The Inbox settings and the Sent Item settings are the same, but they are configured independently and have an effect respectively only on the Inbox emails and the Sent Items.
-
Warning: This feature is disabled by default. Enabling this feature on the Inbox page and/or the Sent Items page in conjunction with clearing (= not selecting) the Require Category check box results in the automatic archiving in the CRM of respectively all email in the Inbox folder (not including child folders) and/or all email in the Sent Items folder (not including child folders). Automatic email archiving can contribute to a significant increase in the amount of data stored in the CRM. Because Riva cannot distinguish between single emails and threaded email discussions, a copy of every email in the thread is synced to the target CRM. Enabling automatic archiving of all email can result in significant additional associated data storage costs for the CRM solution. We recommend fully investigating data storage costs with the CRM vendor before enabling autosync of all email.
Riva does not sync email during a user first sync poll. After the first time sync, Riva autoarchives only newly received (inbound) and/or newly sent (outbound) email.
Require Category option: If you select the Require Category check box, the automatic email processing is disabled, and users can manually categorize any pre-existing email in the Inbox and/or Sent Items folders to trigger Riva to sync that email to the CRM. The category name is defined on the Other page as the parent folder name.
To enable email sync directly from the user's Inbox and/or Sent Items folders (but not their subfolders), select the Enable Processing check box on respectively the Inbox and/or Sent Items pages.
There are no email drop folders for Inbox or Sent Items processing. The Inbox and/or Sent Items processing archives in the CRM every email that is saved to respectively the Inbox and/or Sent Items folders (except their subfolders) in the target user's Exchange mailbox.
Note: Riva 2.4.33 or higher has a Require Category processing option on the Inbox and/or Sent Items pages. If it is selected, it archives the emails from respectively the user's Inbox and/or Sent Items mailbox folder only if the user has assigned the Riva category to the item. This is usually a category that is named after the SmartConvert parent drop folder/category name specified on the Other page.
-
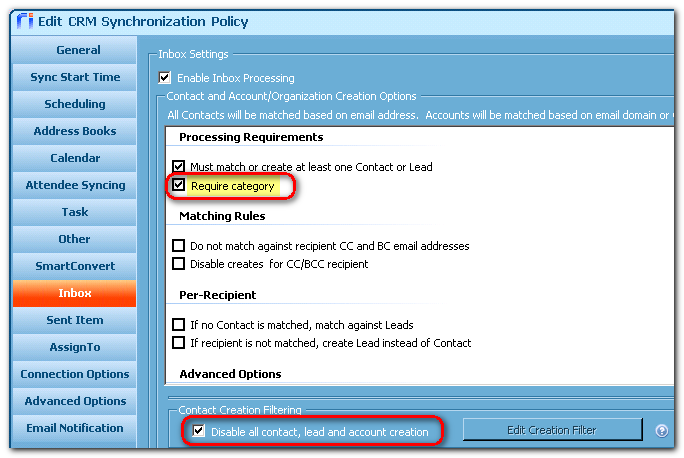
If you have selected Enable [Inbox and/or Sent Items] Processing, configure the Inbox and/or Sent Items Contact and Account/Organization Creation Options and the Contact Creation Filtering settings.
Note: The Inbox processing and Sent Items processing do not inherit settings from SmartConvert. Three distinct sets of options and filters must be configured: one for Inbox processing, one for Sent Items processing, and one for SmartConvert; but the explanations for the Inbox processing and Sent Item processing options and filters are the same as for SmartConvert. For an explanation of each option and filter, see the SmartConvert page.)
Recommended Best Practice: If you clear the Require Category check box and thereby enable the automatic processing of all new inbound or outbound email, we strongly recommend selecting the Disable all contact, lead and account creation option. This ensures that only email that matches an existing CRM contact or lead is processed and archived to the CRM and prevents unwanted, unsolicited email from being archived.
-
DO NOT CLICK SAVE. Proceed with configuring the AssignTo options.
The AssignTo page
AssignTo is Riva's technology: Dropping email items into designated folders archives the items to the CRM modules that are enabled on the Other page.
The AssignTo page is where you can
-
Select AssignTo.
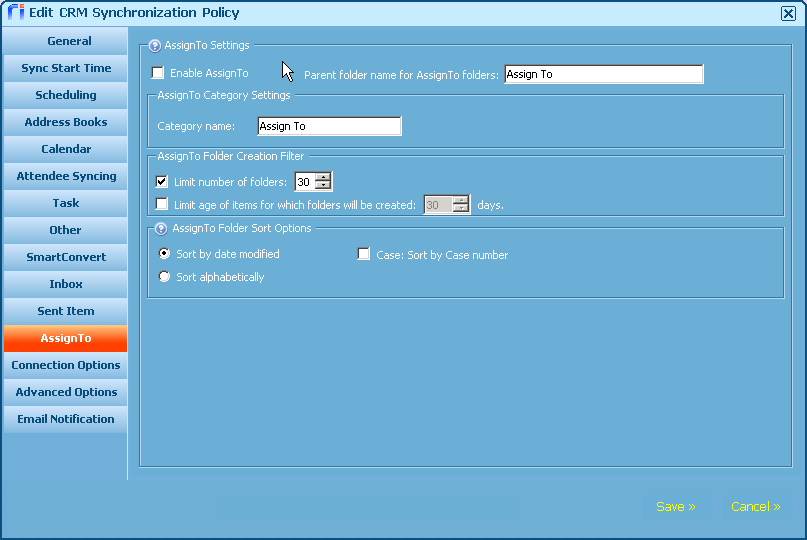
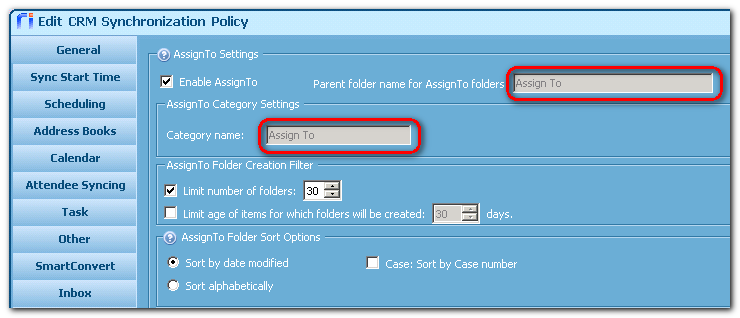
This screen shot displays the default AssignTo settings.
-
Enable AssignTo for the target users by selecting the Enable AssignTo check box.
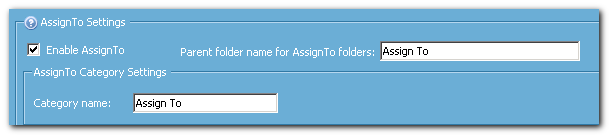
Enable AssignTo: (Default: [Disabled].)
Parent folder name for AssignTo folders: This identifies the parent folder for all of the email sync unique item drop folders. If modules are not enabled on the Other page, this has no effect. If modules are enabled on the Other page, this setting adds AssignTo folders throughout the CRM sync folder structure, one for each module type. During the initial sync, Riva adds AssignTo folders into the folder structure created by the Other settings. Riva adds a separate drop folder for each active item type. For example, a drop folder is created for each open case and active opportunity assigned to the target user. Following is an example of a Riva-created folder structure:
CompanyCRM
- Create New Email
Cases
- Create New Cases
Assign To
Drop folder for an open case (uses name for the case)
Drop folder for an open case (uses name for the case)
Drop folder for an open case (uses name for the case)
Opportunities
- Create New Opportunities
Assign To
Drop folder for an active opportunity (uses name for the opportunity)
Drop folder for an active opportunity (uses name for the opportunity)
Drop folder for an active opportunity (uses name for the opportunity)
Category name: This is the Exchange category that is assigned to an email item that is placed in an AssignTo drop folder. When Riva performs a sync, the category name instructs Riva to sync a copy of the email to the applicable item (case, opportunity, etc.) in the CRM. There is no need to change the category name.
-
Under AssignTo Folder Creation Filters, select and configure filters.
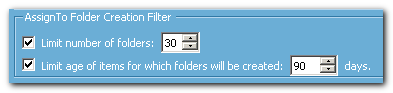
Limit the number of folders: Select or clear the check box. (Default: [Selected]. Default value: 30.)
-
[Selected]: Riva creates a maximum number of drop folders per module; for example, a maximum of 30 individual case drop folders and 30 opportunity drop folders. If the maximum number of folders exist and a new object (opportunity or case) is created or modified in the CRM, Riva removes the oldest drop folder to make room for the newest drop folder. During the initial sync, Riva creates individual drop folders for the most current items based on the last created or modified date for the item. Tip: If a drop folder does not exist for an open or active item, the user can force Riva to add a drop folder by opening that item in the CRM and saving it. The item does not need to be modified; all the user has to do is save it. The save modifies the date last modified, and Riva sees the item as the most current item and syncs an individual drop folder for the item.
-
[Cleared]: Riva creates a unique drop folder for every active item in the CRM that is assigned to the user (based on the security filter applied for that module on the Other page).
Limit the age of items for which drop folders will be created: Select or clear the check box. (Default: [Cleared].)
-
[Selected]: Riva automatically removes an item drop folder if it becomes stale based on the number of days that the item has not been updated in the CRM. Activity against an item includes changes made to the item in the CRM and any emails that are synced to the item through the corresponding AssignTo item drop folder. Tip: Set the value to the average length for sales cycles or case resolutions cycles.
-
[Cleared]: Tip: We actually recommend selecting the filter to reduce the total number of item folders that Riva has to check every sync cycle and quick folder check.
-
Under AssignTo Sort Options, select one or more options.
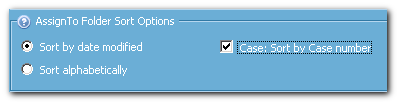
Sort by date modified: (Default.) Once drop folders are created under the AssignTo folders, the folders are displayed in a descending order by date/time last modified with the most current folder at the top of the list.
Sort alphabetically: Users who have many AssignTo drop folders may find them more easily in alphabetical order.
Case: Sort by Case number: If you select this option, Riva sorts Cases by case number in ascending order.
Riva also provides an advanced option to modify the order of AssignTo drop folders.
-
DO NOT CLICK SAVE. Proceed with configuring the Connection Options.
The Connection Options page
This is where you can
-
Select Connection Options.
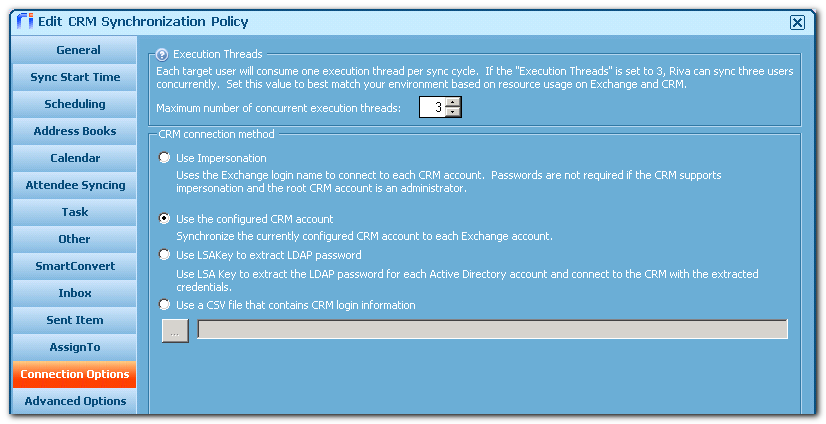
This screen shot displays the default Connection Options settings.
-
Under Execution Threads, set the Maximum number of concurrent execution threads.
Every target user consumes one execution thread per sync cycle. If the Maximum number is set to 3, Riva can sync three users concurrently. Set this value to best match your environment. This option is used to throttle the processor load on the Exchange and CRM systems.
Best practices:
-
For the initial sync of new users: 2 or 3 threads.
-
For normal sync cycles: 2 or 3 threads for GoldMine, Saleslogix, hosted On Demand CRM services, or Exchange MAPI connections.
-
For normal sync cycles: 3, 4, or 5 threads for on-premises CRM servers.
-
If not all modules are enabled, for normal user sync cycles, set to best match the performance parameters of the Riva host server and the target systems. Note: If the threads value is set to 11 or higher, Riva displays a warning.
.png)
The thread count is cumulative. If you have multiple sync policies enabled, Riva uses the total of the thread values set in each sync policy. See Controlling concurrent Riva synchronization threads.
For more information and recommendations for large systems, see Calculate Riva server requirements for scalability.
-
Select the correct CRM connection method for your system.
-
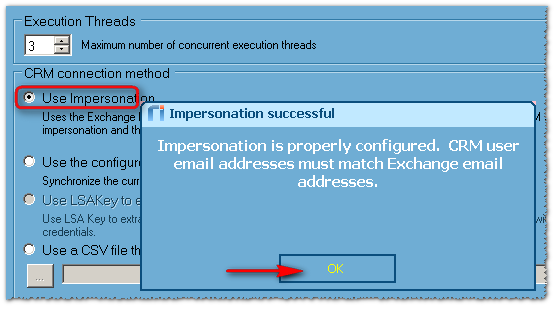
Use Impersonation: (Primary method.) (Default.) This is the most secure, scalable, and preferred option. It uses the credentials of the Riva connection accounts to the CRM and to Exchange to impersonate each account. Passwords are not required, because the connection "impersonates" the user of the Exchange and CRM service accounts. The CRM account used in the CRM Connection Wizard must be an administrator-level account, and the CRM must support impersonation. Not all CRM solutions are supported. Some CRM systems need special configuration. If this option was not already selected and you want to use impersonation for the CRM connection, select this option. Riva opens a window to confirm that the impersonation will work when using the CRM connection selected on the General page.
-
If the impersonation check passes, select OK.
-
If the connection fails, Riva displays a warning with an explanation.
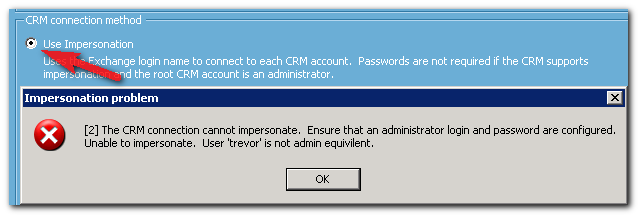
Refer to the Riva system requirements for your CRM, and ensure that those requirements are met. Try selecting Use Impersonation again. If it continues to fail, contact the Riva Success Team.
-
Use the configured CRM account: (Tertiary method.) Select this
-
to synchronize a single CRM account to many Exchange accounts.
-
to synchronize single user accounts, but this requires creating a unique CRM connection and CRM sync policy for each user, because this method synchronizes only the CRM account used in the CRM connection.
-
Use LSAKey to extract LDAP password: (Secondary method.) If LDAP authentication is configured on the target, this method uses the LSAKey to extract the LDAP password for each Active Directory account and connect to the CRM with the extracted credentials. This method requires configuring a Riva Active Directory Connection in addition to the Exchange connection. For more information, contact the Riva Success Team. To implement LSAKey support, contact the Riva Success Team.
-
Use a CSV file that contains CRM login information: This method uses a CSV file that contains the email address, CRM user name, and password. This is the least secure option. It is used when email addresses for target accounts in the CRM do not match the corresponding target account in Exchange and email addresses cannot be modified; or when no other option works with the target CRM.
-
DO NOT CLICK SAVE. Proceed with configuring the advanced options.
The Advanced Options page
This is where you can configure
-
Select Advanced Options.

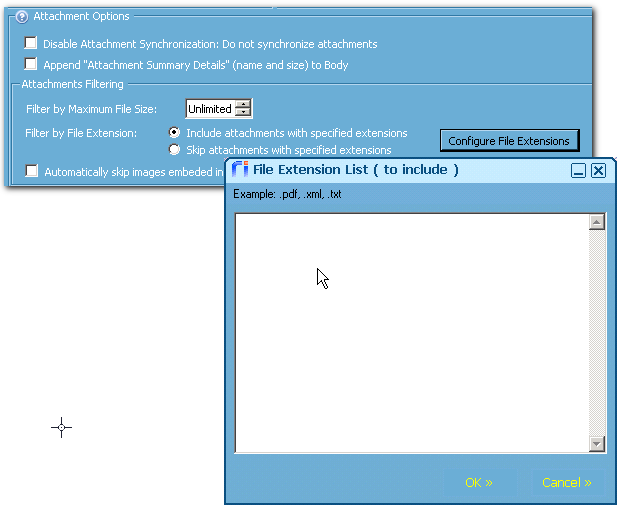
This screen shot displays the default Advanced Options settings in Riva 2.4.55.
-
Under Attachment Options, optionally select or clear the options that control the syncing of attachments of emails and calendar items to the CRM.
Do not synchronize attachments: (Default: [Cleared].)
Append attachment summary (name and size) to body: (Default: [Cleared].) This option works only with Sugar, intelecrm, SuiteCRM, GoldMine, NetSuite, Oracle On Demand, and Salesforce.
Attachment Filtering - Filter by Maximum File Size (MB): (Default: [0, which means "Unlimited".) Specify the maximum size value for attachments. This value is applied against any attachment that Riva attempts to sync to the CRM.
Attachment Filtering - File Extensions: (Default: [Filters are empty].) Select the Include or Skip option; select Configure File Extensions; and in the text box that appears, specify a comma-separated list of file extensions for this filter.
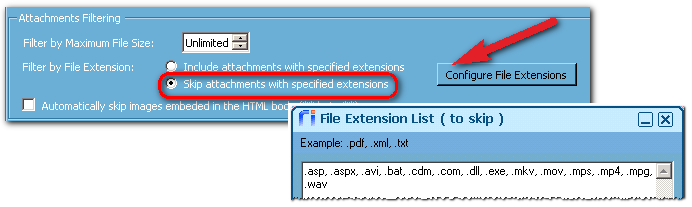
-
Inclusive filter: Select Include attachments with specified extensions to make this filter inclusive. Only the attachments that match the file extensions listed in the text box and equal to or less than the specified maximum file size are synced from Exchange to the CRM.
-
Exclusive filter: Select Skip attachments with specified extensions to make the filter exclusive. Riva does not sync attachments that match the file extensions listed in the text box.
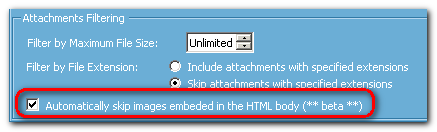
Automatically skip images embedded in HTML body: (Default: [Cleared].)
-
[Cleared]: Riva attaches embedded image files from HTML emails to the plain text emails created in the CRM. This includes images that are normally part of a signature block.
-
[Selected]: Riva does not sync the embedded graphics.
-
Under Privilege Exception Handling Options, optionally set how to handle create, modify, and delete CRM permission/privilege errors that prevent an item from being synced from the Exchange account to the CRM.
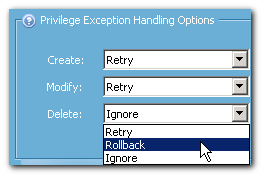
For more information, see Handling CRM permissions / permission errors / privilege exceptions.
-
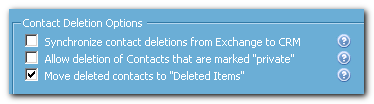
Under Contact Deletion Options, optionally select or clear the check boxes to govern the syncing of contact deletions from the Exchange account. For more information, select the links below the screen shot.
-
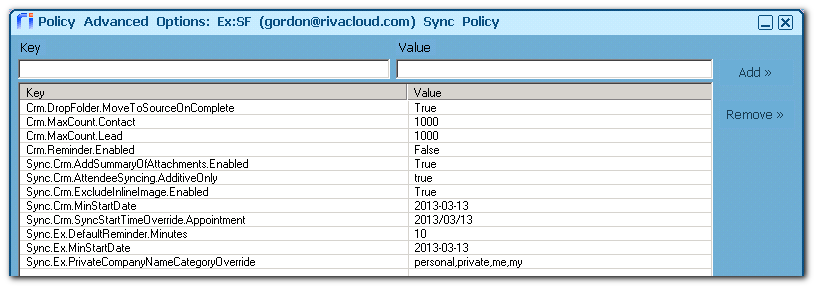
To add or edit advanced options or custom options, select Custom Options.
Not all advanced options are available for configuration on the CRM sync policy pages. Our clients often request additional features, which we make available by means of advanced or custom options. Such an option consists of a key name and an associated value; it enables and configures a feature or advanced capability.
For more information, see Set advanced or custom options for a CRM connection or a sync policy.
-
Optionally select Private "Company Name" Overrides.
This is for users who use email clients, applications, or mobile devices that do not support Exchange "Private" contacts. This option would be used if contacts are being synced to the Default Contact List and a mobile user wants to create a contact and flag the contact as "Private". By adding one of the key words to the "Company" field when creating a new contact, a user prevents Riva from syncing the contact to the CRM.
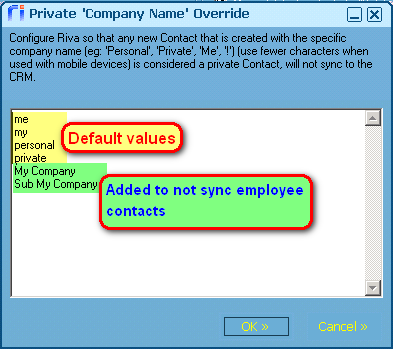
Riva automatically enables this option and configures it to check for "me", "my", "personal", or "private" as the keywords. Use this option to change the keyword list. For example, add additional phrases to indicate company employee contacts that you do not want Riva to sync to the CRM. For more information, see Prevent sync of Contacts marked as "Private" to CRM.
-
Optionally select Distribution Lists Safe Domain List.
Note: In earlier versions of Riva, this button is called Enable Distribution Group Lookups.
By default, if Riva encounters the email address of a distribution group, it does not expand that list to determine the addressees. If the Enable Distribution Group Look-ups check box is selected, Riva queries the Exchange system to expand the distribution group if the email address of the group matches the current user.
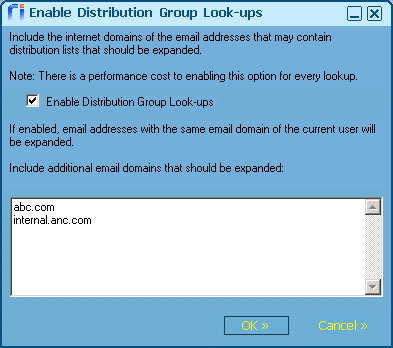
If the Exchange system supports additional email domains for distribution groups, use the list to add those domain names.
Warning: Enabling this option requires additional system resources and affects the performance of the Riva server and of the connected Exchange system.
-
Optionally select Personal Email Domain List. In the text box, add a comma-separated list of emails domains.
More and more people use "generic" or "personal" email services like Gmail or Hotmail for business use. Certain email domains, like gmail.com and yahoo.com, are not valid when using SmartConvert to create new contacts, because SmartConvert would assign the personal contact to a generic company called gmail.com or yahoo.com in the CRM. This option enables the use of SmartConvert and AssignTo to sync emails to the CRM from addressees that use personal email service accounts. These are called "person accounts".
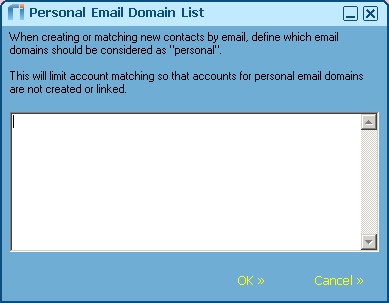
Note: This feature is automatically enabled and configured to handle the "gmail.com", "yahoo.com", "hotmail.com", "aol.com", "geocities.com", and "me.com" email domains. For more information, see How SmartConvert can support generic - personal email domains.
-
Optionally select Universal Change Detection (UCD).
UCD is used to modify how Riva queries the CRM for updates for all users at the same time and triggers immediate user sync polls for those users that have created, deleted, or updated an item in the CRM. Use this feature to prioritize user sync polls based on user updates to CRM data. Do not configure this option until you contact the Riva Success Team to discuss how to configure it.
-window.png)
-
DO NOT CLICK SAVE. Proceed with configuring Email Notification.
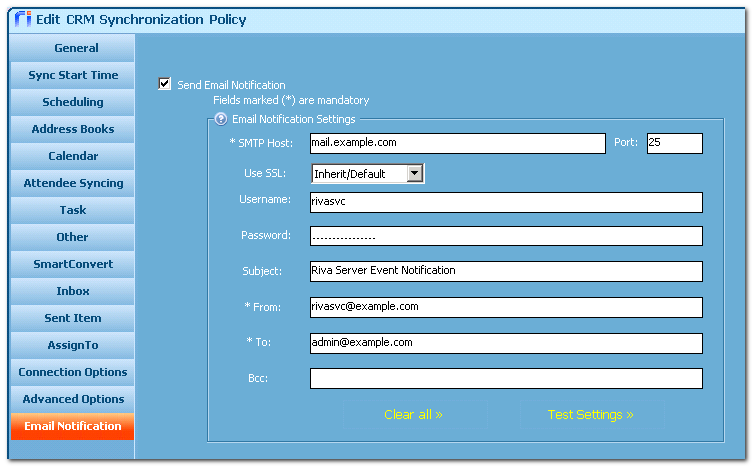
The Email Notification page (optional)
This is where Riva admins can configure settings for the Riva server to send out email notifications when Riva-related event error thresholds have been reached. For more information, see Enterprise event notification.
-
Select Email Notification.
-
Select Send Email Notification to enable the feature and configure the following options.
SMTP Host: Specify the DNS name (or IP address) of the SMTP service. Ensure that the service relaying enabled for the Riva server IP address.
Port: Provide the correct SMTP port for the SMTP host.
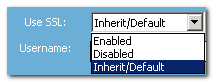
Enable SSL: Select the desired setting: Enabled: Use SSL. Disabled: Do not use SSL. Inherit/Default: We do not set any options.
Username and Password: Provide the login credentials to connect to the SMTP host.
Subject: Provide the desired generic subject for the email.
From: Provide the "reply-to" email address for the email.
To: Provide the primary email address of the user or distribution list that will receive the email notification.
BCC: Provide a comma-separated list of BCC email addressees.
Clear all >>: Clears all the values in the form.
Test Settings: Tests the connection to the SMTP host by using the provided username and password.
-
SAVE THE SYNC POLICY.
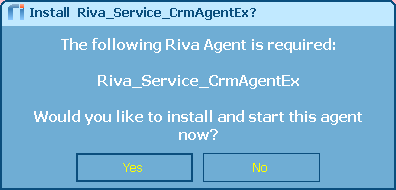
Saving the Policy File and Installing the Service
A new CRM sync policy can be saved at any time. The very first time the very first CRM sync policy is saved, Riva opens a window to ask if it can install the CRM Agent Service. If the CRM sync policy is enabled and Yes is selected, the service is installed and started. If there are no enabled policies (the best practice is to disable new policies when you create them), no data will be synched between the CRM and the email system.
-
Select Save to save the policy.
Because the Riva CRM Agent Service is not installed, Riva prompts to install the service.
-
If you have sync needs that are not addressed in the sync policy you just configured, select No, and contact the Riva Success Team for further configuration.
There may be other reasons for selecting No. Selecting No is safe: it merely prevents installing the Riva CRM Agent Service until you select Yes. Riva displays this prompt every time the CRM sync policy is saved until Yes is selected and the service is installed.
-
When the configured policy is ready for testing, select Yes.
Selecting Yes installs and starts the Riva CRM Agent Service. If you disabled the policy, the service starts but does not attempt to sync data to the target users.
How saving a sync policy changes the policy
Three significant changes occur when a new CRM sync policy is saved:
-
The policy object appears in the Policies tab of the Riva Manager application.
Tip: To open a policy, double-click the policy object.
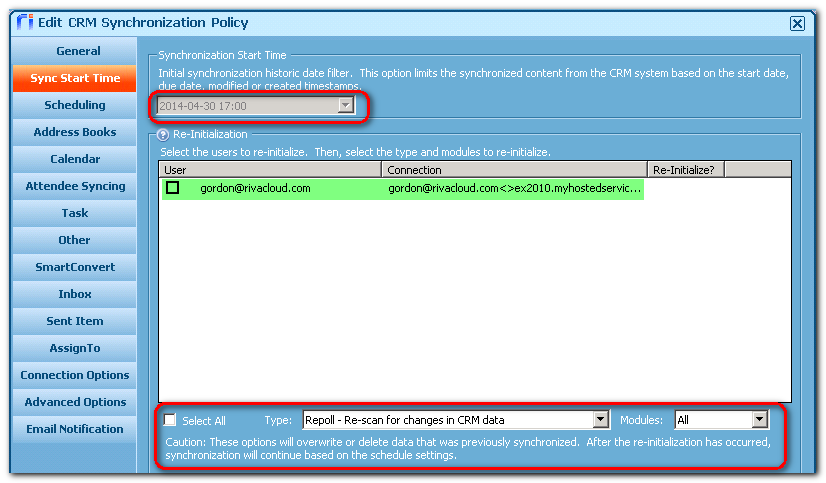
-
The Sync Start Time tab changes to lock the Sync Start Date and Time. For Riva 2.4.39 and earlier, the list of target users appears, and re-initialization options become available below the target users list. For Riva 2.4.40 and higher, a Load Users link appears, and re-initialization options are available by clicking the pencil icon in the tool bar.
Start Sync Time page: Riva 2.4.39 or earlier
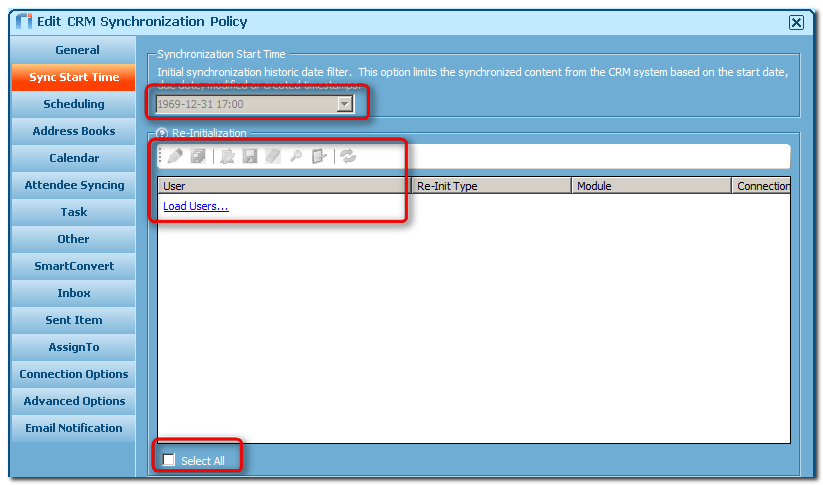
Sync Start Time page: Riva 2.4.40 or higher.
-
On all other policy pages, the category and sub-category names, address book names, and parent folders are greyed out.
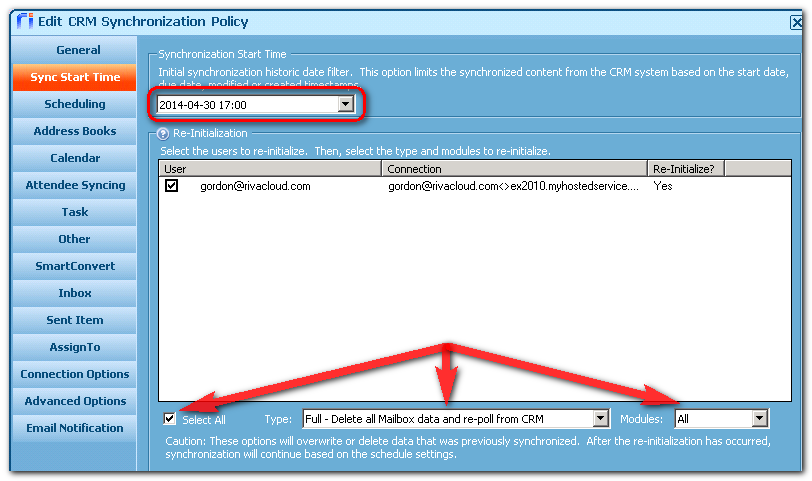
It is not possible to make changes to those items unless all of the users are selected and a Full re-initialization for all users for all modules is selected on the Start Sync Time page. See How to re-initialize users.
Sync Start Time: Full Delete All - Riva 2.4.39 and earlier
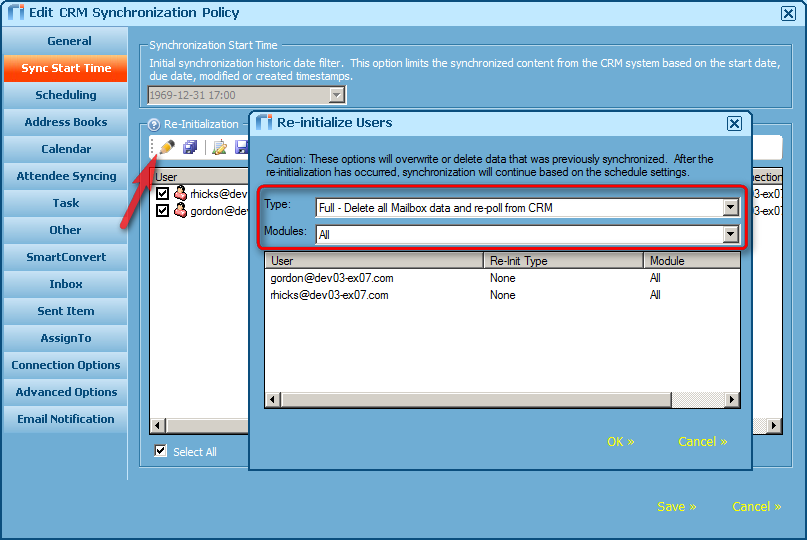
Sync Start Time: Full Delete All - Riva 2.4.40 or higher.
This action unlocks all the locked fields and settings in the CRM sync policy. If the policy has never been synced before through the Riva CRM Agent Service, there is no effect on the first initial sync of the users when the policy is enabled.
Applies to
- Riva On-Premise for Exchange.
- Riva On-Premise for HCL Notes.
Major changes:
- Support for Conversation Capture (Salesforce only): Riva 2.4.55 or higher.
- Support for Conversation Follow: Riva 2.4.53 or higher.
- In sync policies created in Riva 2.4.46 or higher, the Re-Initialize page replaces the Sync Start Time page. For more information, see Re-Initialize page.
- Change to the Sync Start Time page layout: Riva 2.4.40 or higher.
- Major changes to navigation: Riva 2.4.36 or higher.
- Inbox and Sent Items: Riva 2.4.35 or higher.
- Advanced scheduling: Riva 2.4.26 or higher.
- Attachment (inclusive/exclusive options): Riva 2.4.25 or higher.
- Advanced options page: Riva 2.4.24 or higher.
Article ID: 476
Last updated: 19 Sep, 2023
Revision: 69
Also read
Also listed in
|
