To create, test, and edit a user-credentials-based Riva connection to on-premises Dynamics CRM:
- Ensure that the system requirements are met.
- Create the Dynamics CRM connection.
- If connection errors occur in earlier versions of Riva, upgrade Riva for Dynamics CRM 2016+ compatibility.
- Test the Dynamics CRM connection.
- Configure contact filter options.
- Review how Riva will sync contacts.
- Optional: Assign a user-friendly Display Name.
- Apply support for the Dynamics CRM plug-in.
Step 1: Ensure That the System Requirements Are Met
In Riva On-Premise 2.4.42 through 2.4.64, the XRM-based Riva connection required a minimum of .NET 4.5.2 Framework on the Windows system hosting Riva.
Starting in Riva On-Premise 2021.1, the connection requires the same minimum .NET version as specified in the Riva On-Premise requirements.
Step 2: Create the user-credentials-based Dynamics CRM Connection
-
Ensure that you have followed the Prepare Microsoft Dynamics CRM for Riva procedure.
Note: If the preparations are not completed, the connection wizard will fail.
-
Open the Riva Manager application.
-
In your version of Riva, if the menu displays Add CRM, select Add CRM and choose Microsoft Dynamics CRM 2011+. If the menu displays Setup, select Setup and, on the left pane, select CRM: Microsoft Dynamics CRM 2011+.
-
On the wizard's Welcome page, do as follows:
- In Riva 2.4.41 or higher, select Next.
- In Riva 2.4.40 or earlier, select Install and Start to install and start the Omni Riva (CRM Remote Agent for Dynamics 2011) windows service. When a dialog box displays ON: Service has been detected and is running, select Next.
-
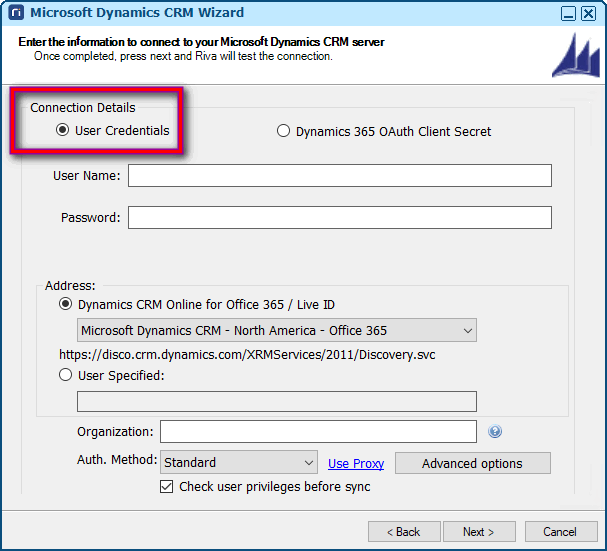
On the Connection Details page, provide the required information for the user credentials, as explained below the screen shot.
Notes:
- In Riva 2.4.50 or higher, User Credentials is selected by default, as on the screen shot. If you select Dynamics 365 OAuth Client Secret, follow the instructions at Create and test a Client Secret-Based Dynamics CRM OAuth connection.
- In Riva 2.4.49 or earlier, there are no User Credentials or Dynamics 365 OAuth Client Secret buttons to select from. All the fields on the page pertain to User Credentials.
-
User Name: Provide the user name for the Riva connection account. This user name can use either one of these formats:
- The NTLM format of DOMAIN\Username (for example OMNIDEVLABS8\administrator)
– or –
- The UPN format of username@AD-Domain (for example administrator@omnidevlabs8.com) - Usually used for Office 365 Dynamics Online.
-
Password: Provide the password for the Riva connection account.
-
Address: Provide the URL link to the root-level Dynamics CRM login screen:
-
For Office 365: Select the connection end-point from the drop-down list. Riva supports both Office 365 and Live ID authentication methods for data centers in North America, EMEA, and APAC. It also supports Office 365 authentication for South America and several specific countries: Australia, Japan, Canada, India, and the United Kingdom.
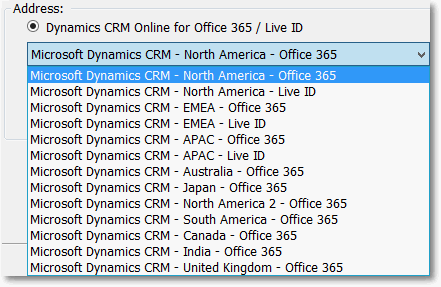
Note: If your version of Riva On-Premise does not display selections for EMEA or APAC, it is very old. Consider upgrading Riva On-Premise to the latest public release, or follow these instructions: Configure Riva for EMEA or APAC Passport URL.
-
For On-Premises or Commercially Hosted: If the URL is actually https://crm.mycompany.com, set Address to https://crm.mycompany.com. Riva also supports port values in the URL, for example https://crm.mycompany.com:444, if that is the root URL.
For the correct URL, ask your CRM administrator.
- Organization: Enter the case sensitive Unique Name. How to find it. Riva validates the entry in the CRM.
- If it is valid, the ID is used to sync.
- If it not valid, the sync is prevented and an error appears in the log.
Note: In Riva 2.4.43.40898 or earlier, if the name was not valid, the first name available on the list of organizations in Dynamics CRM was used, which sometimes caused the sync to be performed for the wrong organization.
-
Auth Method: Select either
- Standard, if the Dynamics server was originally configured for IFD using AD FS 2.0
– or –
- Active Directory, if the Dynamics server is configured for direct authentication to AD.
-
Use proxy: Specify a unique HTTP or HTTPS proxy setting that will apply to this CRM connection.
-
Advanced Options: Opens the Advanced Options window, where you can apply advanced options or custom options to this connection. For instructions on how to use the window, see configure advanced or custom options for a sync policy or connection.
-
Check user privileges before sync: (Selected by default.)
- When this option is selected, the sync is prevented for users whose Sync to Outlook CRM privilege is enabled. For more information, see Dynamics CRM privilege error prvSyncToOutlook.
- When this option is cleared, Riva does not check whether the Sync to Outlook CRM privilege is enabled. In this case, it is absolutely critical that the users currently being synchronized by Riva do NOT use the Outlook plug-in or any other synchronization solutions concurrently.
-
Select Next.
-
(Riva 2.4.47 or higher.) Optional. On the Additional Connection Options page, optionally select the check box Is the connection user dedicated for synchronization: [user name]. For guidance, see Is the connection user dedicated for synchronization.
-
On the Successful Connection page, select Finish.
The Riva Manager application creates a Dynamics CRM connection object.
Step 3: If Connection Errors Occur in Earlier Versions of Riva, Upgrade Riva for Dynamics CRM 2016+ Compatibility
While the connection can be successfully created, connection errors may occur in these releases:
- 2.4.41 or earlier;
- 2.4.42.33656 or earlier; or
- 2.4.43.33658 or earlier.
This issue exists with Dynamics 2016 On-Premises only; connections to Dynamics Online (Office 365) work without error.
Your version of Riva may need to be upgraded to make it compatible with Dynamics CRM 2016 or higher On-Premises. For instructions, see Upgrade Riva for Dynamics 2016+ compatibility.
Step 4: Test the Dynamics CRM Connection
To test the new connection to confirm that user impersonation is working:
-
In the Riva Manager application, if the menu displays Setup, select Setup.
-
On the right pane, double-click the Microsoft Dynamics CRM connection object to open the CRM Connection Edit window.
-
Select the Connection Test tab, and select Test Connection.
The Riva CRM connection account is tested to ensure that the credentials are correct.
-
In the Test succeeded message box, select OK.
-
In the User E-mail field, provide the email address for a CRM syncing user, and select Run Test.
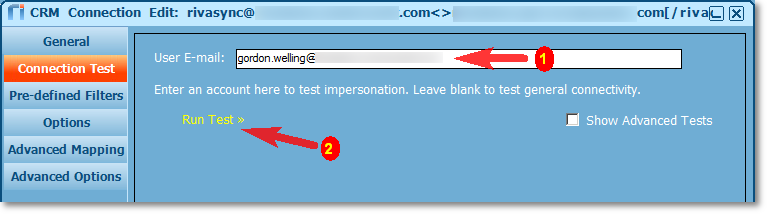
The system tests that the Riva connection account is able to impersonate into the Dynamics CRM syncing user account.
-
In the Test succeeded message box, select OK.
Step 5: Configure Contact Filter Options
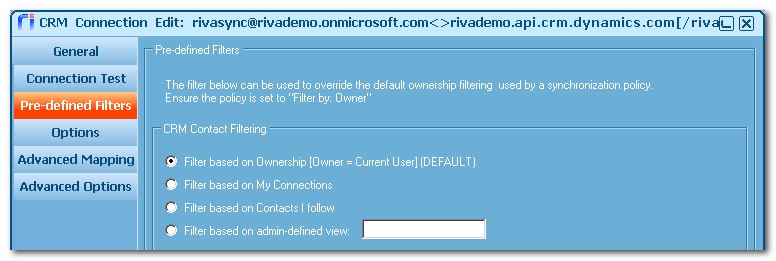
In Riva 2.4.35 or higher, the Microsoft Dynamics CRM Connection Edit window includes Pre-defined Filters to define how to filter the contact sync.
Step 6: Review How Riva Will Sync Contacts
For the First Time Sync: Riva creates contacts in Exchange based on the contact filter selected (defined) at step 4.
Poll Changes: Riva syncs changes to contact records based on the filter:
- Ownership (Owner = current user): As is.
- My Connections: Relates to contacts only. Changes are updated only if a contact is connected to the user.
- Admin-defined view: Changes are updated based on the defined view.
CRM Contact Deletions: Only if the option to not resync from CRM deleted Exchange contacts is enabled:
- Ownership (Owner = current user): Regular physical deletion. After a contact is deleted in the CRM, it is deleted in all related mailboxes.
- My Connections: Relates to contacts only. A contact is not deleted from the CRM, but Riva removes its Connection to the current user.
- Admin-defined view: Deletions are synced based on the defined view.
Step 7: (Optional.) Assign a User-Friendly Display Name
(The Display Name is supported in Riva 2.4.46 or higher.)
-
In the Riva Manager application, if the menu displays Setup, select Setup.
-
On the right pane, double-click the Microsoft Dynamics CRM connection object to open the CRM Connection Edit window.
-
Optional: Assign a user-friendly Display Name.
Step 8: Apply Support for the Dynamics CRM Plug-In
Riva 2.4.36.18616 or higher includes support for the Dynamics CRM Outlook plug-in (plug-in "compatibility" mode).
To apply support for the Dynamics CRM plug-in:
-
Apply the following advanced options to the Microsoft Dynamics CRM connection:
Crm.MsCrm.SetPrimaryClient = true
MsCrm.PluginCompat.All = true
-
Disable the "Sync to Outlook" privilege in the Dynamics CRM Role that the syncing CRM users are assigned to. For instructions and more information, see How to resolve the Microsoft Dynamics CRM privilege error "prvSyncToOutlook".
Applies to
- Riva On-Premise for Dynamics CRM 2011 or higher,
- Riva 2.4.36.18616 or higher (for plug-in compatibility),
- Riva 2.4.38.22199 or higher for the latest pre-defined filter options, and
- Riva 2.4.42.33657 (or higher) or Riva 2.4.43.33659 (or higher) for compatibility with Dynamics 365 CRM and Dynamics CRM 2016.
