The Riva Exchange MAPI and EWS connections (Riva On-Premise) and EWS connection wizard (Riva Cloud CORPORATE subscription) need to use the credentials of a fully enabled Exchange mailbox user that is configured to support IMPERSONATION into the mailboxes of the users that Riva will sync to (referred to as the "target users"). This mailbox user is referred to as the "Riva connection user" for Exchange.
This article explains the system requirements and procedures for configuring the Exchange mailbox for the "Riva connection user", so that it meets the requirements to support Riva "impersonation":
Procedures in this article apply to
- Riva On-Premise server deployments, and
- Riva Cloud Corporate subscriptions.
Basic Requirements and Recommendations for the Riva Connection User to Exchange
The Exchange mailbox user must meet the following requirements and should go along with the following recommendations.
| Requirements |
- Must have been logged in to at least one time to create the default folder structure and permissions for a mailbox.
- Must be configured with the permissions for delegate access or application impersonation. (See Impersonation methods.)
- For on-premises Exchange systems only: Must not be a member of the AD Domain Admins or Enterprise Admins groups.
|
| Recommendations |
- Be a fully enabled Exchange mailbox.
- Mailbox be visible in the Global Access List (GAL).
|
How Riva On-Premise Connects to Different Versions of Exchange
The Riva CRM Agent uses an Exchange service account to connect to through the Client Access Server (CAS). That connection is configured in the Riva Manager application. The preferred connection type depends on the version of Exchange.
Exchange 2016 / Exchange 2013 / Office 365
Microsoft Exchange Web Services (EWS) are used to connect to Exchange 2016, Exchange 2013, and Office 365. Exchange EWS requirements are the same as for Exchange 2010. Because Exchange 2013+ has replaced Exchange Management Console with Exchange Web Console, the procedure to enable Delegate Full Access permissions has changed.
Exchange 2010 (on-premises or hosted)
Microsoft Exchange Web Services (EWS) are used to connect to Exchange 2010, BPOS, and Office 365. Exchange 2010 includes many improvements to the EWS feature set and the deprecation of WebDAV. EWS 2010 now completely replaces the WebDAV features, and the WebDAV API is no longer used. EWS is traditionally installed on the same server as Outlook Web Access (CAS - Client Access Server). If EWS is not available, the Exchange 2003 Extended MAPI connection type is supported.
Exchange 2007 SP 1+
Microsoft Exchange Web Services (EWS) and Microsoft Exchange WebDAV API are used. The core synchronization capabilities are made via EWS, and supplementary capabilities like predefining custom fields on a folder and extending the Master Category List are made by using WebDAV. Both the EWS and WebDAV API are traditionally installed on the same server as Outlook Web Access (CAS - Client Access Server). If EWS is not available, the Exchange 2003 Extended MAPI connection type is supported.
Exchange 2003
The connection API used for Exchange 2003 is the Microsoft Extended Messaging API (MAPI). MAPI makes use of RPC (Remote Procedure Call). The design around MAPI and RPC make it a very chatty service and can use many different TCP ports. For sites where the Exchange server is offsite or hosted, an additional tunnelling over HTTP (RPC-over-HTTP / RoH / Outlook Anywhere) can be used to simplify firewall rules. The RoH server component is traditionally installed on the same server as Outlook Web Access (CAS - Client Access Server).
The Microsoft Office Outlook client (2010, 2007, 2003) MUST be installed on the Riva server to provide the Extended MAPI provider. Because the Outlook client is required, Riva cannot be installed on your Exchange server.
Riva Impersonation Methods
Riva connections to Exchange supports two Exchange "Impersonation Methods":
- "Impersonation" — a simpler means of authentication for EWS connections. Impersonation access rights are granted by an administrator and cannot be removed or denied by a target user. The one limitation with "Impersonation" is that it does not support the WebDAV API that Riva uses for EWS connections to Exchange 2007. Although "Impersonation" is available for Exchange 2007 connections, it is not recommended:
- 2016/2013/2010 using EWS — recommended
- Exchange 2007 using EWS — supported1
- "Delegate Full Access" — normally used for one-to-one relationships in a connection. Administrators and users can grant and remove delegate access. Riva can use it to establish a one-to-one relationship between the Riva connection account and each target user. This mode can be used to provide delegate access to a single folder to be synchronized by Riva. Riva can use "Delegate Access" for the following types of Riva connections:
- Exchange 2016/2013/2010/2007 using EWS connections — supported
- Exchange 2007 using EWS connections — recommended
- Exchange 2010/2007 using MAPI connections — required
- Exchange 2003 and all MAPI-based connections — required
|
Exchange Version
|
Connection Method |
Delegate Full Access Permissions |
Exchange ApplicationImpersonation
Role
|
|
Exchange 2016, 2013 and 2010
Office 365 - Exchange Online
|
Exchange Web Service |
Supported |
Recommended |
| Exchange 2007 |
Exchange Web Service
Exchange WebDAV1 |
Recommended |
Supported with
Limitations. (See note.) |
|
Exchange 2010, 2007, and 2003
|
MAPI - Direct TCP |
Required |
Not supported |
| Exchange 2003 |
MAPI - RPC over HTTP |
Required |
Not supported |
Exchange
2010 and 2007 |
MAPI - Outlook Anywhere |
Required |
Not supported |
1. Exchange WebDAV used for Exchange 2007 - Optionally, Riva leverages WebDAV to push user-defined fields and categories to the Master Category List. WebDAV does not work with ApplicationImpersonation. Exchange 2010 does not use WebDAV.
MAPI is not supported with Exchange 2013+ and Office 365.
Prepare the Exchange (On-Premises) Connection Account for Riva
Riva makes use of the built-in Exchange "Full Access" security model to access Exchange mailboxes without having to have each user's password. This is a standard process that is used by many services, including BlackBerry Enterprise Server, to implement secure user impersonation.
The Riva connection to the target Exchange CAS must use the credentials of an AD/Exchange account that has full access permissions to the target user mailbox(es). A best practice is to create an AD/Exchange user account called "Riva_On_Prem" or "Riva_SVC". This connection account must meet the following requirements:
- must be an AD user account with fully enabled Exchange mailbox.
- must be visible in the Global Access List (GAL)
- must NOT be a member of "Domain Admins"
Note: Exchange automatically places a "deny receive as" and a "deny send as" on any account with "Domain Admin" membership. It is best that the user selected for the Riva Exchange Connection not be a member of the "Domain Admins" group.
For on-premises Exchange environments, granting Full Access to a target user mailbox automatically grants "Delegate Access". For Hosted Exchange environments, refer to the service provider documentation on granting "Delegate Access".
To configure full access permissions, see the following sections:
Configure Delegate Full Access permissions - Exchange 2007 and 2010
Grant Delegate Full Access Permissions to Individual Target Users: The Exchange Management Console is used to grant delegate full access permissions to individual users.
Perform this procedure on each target sync user to grant full access permissions to the Riva connection account:
-
Start the Exchange Management Console.
-
In the console tree, select Recipient Configuration.
-
In the result pane, select the "end-user sync target mailbox" for which you want to grant the Full Access permission.
-
In the action pane, under the mailbox name, select Manage Full Access Permission. The Manage Full Access Permission wizard opens.
-
On the Manage Full Access Permission page, select Add.
-
In Select User or Group, select the user to which you want to grant the Full Access permission, and select OK.
-
Select Manage.
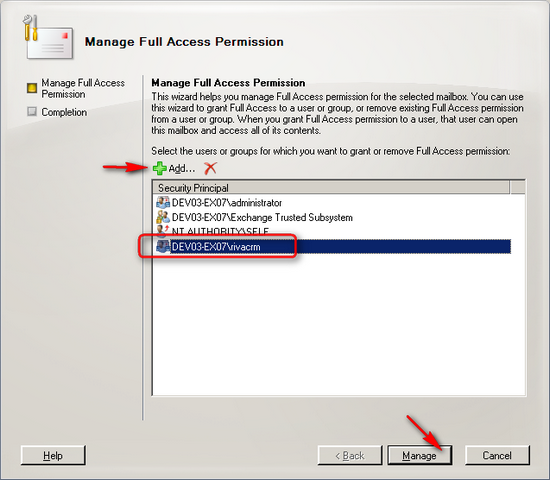
On the Completion page, the Summary states whether the Full Access permission was successfully granted. The summary also displays the Exchange Management Shell command that was used to grant the Full Access permission.
-
Select Finish.
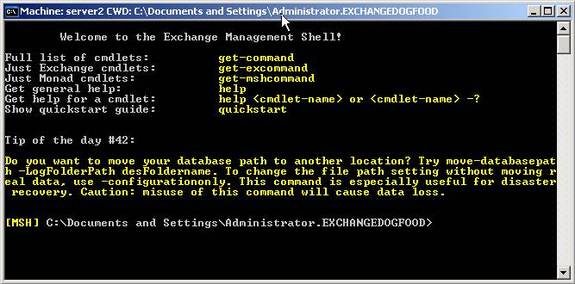
Configure Delegate Full Access Permissions by using Exchange Management Shell - Exchange 2013, 2010, and 2007
Exchange Management Shell, a command line utility introduced in Exchange Server 2007, provides an administrator the ability to configure, administer, and manage an Exchange 2007 server environment using text commands instead of solely a graphical user interface (GUI).
Administrators can use scripted commands, called cmdlets, to pass instructions to the Exchange system. Administrators can use either the Add-MailboxPermission or Add-AdPermission cmdlet to assign the necessary full access permissions.
Mailbox Permissions
When security policies dictate that full access permissions can only be granted to specific mailboxes, use the Add-MailboxPermission. This Exchange permission is restricted to mailboxes only. This permission in not inheritable, so it cannot be assigned to Storage Servers, Storage Groups, or Storage Databases. A Windows Powershell script can be used in EMS to apply this permission when a mailbox is created, or to bulk assign the permission to multiple mailboxes.
Note: Starting with Exchange 2010 SP1, Delegate Full Access implemented automapping by default. In Microsoft Outlook 2010 and in Microsoft Office Outlook 2007, Autodiscover automatically maps to any mailbox for which a user has full access permissions. Autodiscover automatically loads all mailboxes for which the user has full access permissions. But, that is not desired for the Riva connection user; therefore, add the parameter - AutoMapping $false to the end of the Add-MailboxPermission line:
To grant full access permissions for a single mailbox:
Add-MailboxPermission -Identity "targetmailbox" -User "Riva Connection User" -AccessRights FullAccess -AutoMapping $false
Add-MailboxPermission -Identity “isample” -User “DEV03-EX07\rivacrm” -AccessRights FullAccess -AutoMapping $false
To confirm what permissions are assigned to a mailbox:
Get-MailboxPermission -Identity "targetmailbox" | Format-List
Get-MailboxPermission -Identity “isample” | Format-List
You can use Get-Mailbox to get mailboxes and pipe them to the Add-MailboxPermission cmdlet. To get mailboxes in an Organizational Unit or container:
Get-Mailbox -OrganizationalUnit "MyOU" | Add-MailboxPermission -User "Trusted User" -AccessRights FullAccess -AutoMapping $false
get-Mailbox -OrganizationUnit "OU=NewYork,OU=Users" | Add-MailboxPermission -User “DEV03-EX07\rivacrm” -AccessRights FullAccess -AutoMapping $false
AD Permissions
AD permissions can be assigned to objects, and those permissions will be inherited by corresponding child objects. You can use Add-ADPermissions to grant ExtendedRights to an Exchange server or a specific Storage Group database.
Advantage with using AD Permissions - Since this permission is inheritable, if a new mailbox is added to the target Exchange server or store, it will inherit the ExtendedRights assignment.
Ensure Inheritance is Enabled - If the plan is to grant full access permissions on the Exchange server level so that those permissions flow down to user mailboxes in Storage Group mailbox store databases, inheritance must be granted. Use ADSI Edit to verify or grant inheritance permissions.
-
Install ADSI Edit. (See Installing ADSI Edit.)
-
Start ADSI Edit.
-
Click Start, click Run, type adsiedit.msc, and click OK.
-
Locate the object in question, right-click the object, and click Properties.
-
In the Security tab, click Advanced.
-
Click Allow inheritable permissions from the parent to propagate to this object and all child objects to re-enable permissions inheritance.
-
Click OK twice to apply the change.
-
Wait for Active Directory replication to propagate the changes, or force Active Directory replication if it is necessary. For more information about how to force Active Directory replication, see Microsoft Knowledge Base article 232072, Initiating Replication Between Active Directory Direct Replication Partners.
Add-ADPermission - To grant full access to user mailboxes, you need to grant the equivalent of the Add Information Store, Receive-As, and Send-As permissions that were granted for Exchange 2003 systems.
-
Run the following command to add the permission to the Exchange server:
Get-MailboxServer "<Exchange-server-name>" | Add-ADpermission -user "<Riva-connection-user>" -AccessRights GenericRead, GenericWrite -ExtendedRights Send-As, Receive-As, ms-Exch-Store-Admin
Get-MailboxServer "EX-01" | Add-ADpermission -User "DEV03-EX07\rivacrm" -AccessRights GenericRead, GenericWrite -ExtendedRights Send-As, Receive-As, ms-Exch-Store-Admin
-
Run the following command to add permissions to an Exchange Store Database (if inheritance is not and will not be enabled):
Get-MailboxDatabase "<Exchange-server-name>"\"First Storage Group\Mailbox Database" | Add-ADpermission -user "<Riva-connection-user>" -AccessRights GenericRead, GenericWrite -ExtendedRights Send-As, Receive-As, ms-Exch-Store-Admin
Get-MailboxDatabase "EX-01"\"First Storage Group\Mailbox Database" | Add-ADpermission -user "DEV03-EX07\rivacrm" -AccessRights GenericRead, GenericWrite -ExtendedRights Send-As, Receive-As, ms-Exch-Store-Admin
-
To verify that permissions have been added to the Exchange Store Database:
Get-MailboxDatabase "<Exchange-server-name>"\"First Storage Group\Mailbox Database" | Get-ADpermission -user "<Riva-connection-user>" | Format-List
Get-MailboxDatabase "EX-01"\"First Storage Group\Mailbox Database" | Get-ADpermission -user "DEV03-EX07\rivacrm" | Format-List
Information Store Cache - It may take up to 2 hours for the permissions to propagate throughout the Exchange stores. To effect immediate propagation, stop and start the Exchange Information Store service.
Tip: Some Exchange administrators have reported that using the Add-ADPermission appears to work, but running the Impersonation test in the Riva EWS connection will fail with some of the modules reporting "False". This can be the result of the Exchange Information Store cache not refreshing.
References:
- "Understanding mailbox permissions": http://technet.microsoft.com/en-us/library/bb123879(EXCHG.80).aspx.
- "How to allow mailbox access": http://technet.microsoft.com/en-us/library/aa996343%28EXCHG.80%29.aspx.
- "Add-MailboxPermission": http://technet.microsoft.com/en-us/library/bb124097(EXCHG.80).aspx.
- "How to remove automapping for a shared mailbox in Office 365": http://support.microsoft.com/kb/2646504.
- "Disable Outlook auto-mapping with full access mailboxes": http://technet.microsoft.com/en-us/library/hh529943(v=exchg.141).aspx.
- "Add-ADPermission": http://technet.microsoft.com/en-us/library/bb124403(EXCHG.80).aspx.
- "Exchange Server 2007 recipient management one-liners": http://blogs.technet.com/b/exchange/archive/2006/09/05/3394830.aspx.
Configure Exchange impersonation by using Exchange Management Shell - Exchange 2013 and 2010
Setting up Exchange Impersonation for Exchange Server 2013/2010 is much easier than it is for Exchange Server 2007. The Roll-Based Access Control (RBAC) mechanism allows an administrator to define a ManageScope of a collection of users and assign that ManagementScope to the ApplicationImpersonation role, which enables applications to impersonate users in an Exchange organization to perform tasks on behalf of that user. Once that is done, any new users added to the ManagementScope are automatically subjected to ApplicationImpersonation (Exchange Impersonation).
Important: All cmdlets mentioned in this article must be run from the Exchange Management Shell (Exchange 2010 and 2007) or the Exchange Power Shell (Exchange 2013 and 2016). Some of these cmdlets will not work in normal Windows power shell.
Option 1) Configure Exchange Impersonation for all users in an organization
For this option, the objective is to assign Exchange Impersonation to a "rivasvc" user. Riva would use the credentials of the "rivasvc" user to impersonate into any mailbox in the Exchange organization.
-
Open the Exchange Management Shell.
-
Run the New-ManagementRoleAssignment cmdlet to add the permission to impersonate to the specified user.
The following example shows how to configure Exchange Impersonation to enable a service account to impersonate all other users in an organization.
New-ManagementRoleAssignment –Name ManagementRoleName –Role:ApplicationImpersonation –User cn_of_RivaServiceAccount
New-ManagementRoleAssignment –Name "RivaCRM Sync Role" –Role:ApplicationImpersonation –User rivasvc
Option 2) Configure Exchange Impersonation for specific users or groups of users
-
Open the Exchange Management Shell.
-
Define the Management Scope, which is a collection of target users. The key is to define a suitable recipient filter to accurately identify the collection of target users:
New-ManagementScope -Name ManagementScopeName -RecipientRoot (Optional root OU in AD) -RecipientRestrictionFilter { recipient filter }
This example creates a scope for mailboxes within the "Executives" OU in the contoso.com AD domain.
New-ManagementScope -Name "RivaCRM TargetUsersScope" -RecipientRoot "contoso.com/Executives" -RecipientRestrictionFilter { RecipientType -eq "UserMailbox" }
This example creates a scope for membership of an AD group in the contoso.com AD domain.
New-ManagementScope -Name "RivaCRM TargetUsersScope" -RecipientRestrictionFilter {MemberofGroup -eq "CN=Riva Sync Exch Impersonation,OU=Users,OU=Resources,DC=contoso,DC=com"}
This example creates a scope for any recipient where the value of the property City equals the string "Vancouver":
New-ManagementScope -Name "RivaCRM TargetUsersScope" -RecipientRestrictionFilter { City -eq "Vancouver" }
This example shows a complex query used the the filter for any recipient where the City equals "Vancouver and the Department equals "Sales" (must both be true) or the Title is similar to "Manager":
New-ManagementScope -Name "RivaCRM TargetUsersScope" -RecipientRestrictionFilter { ((City -eq "Vancouver") -And (Department -Eq "Sales")) -Or (Title -Like "*Manager*") }
Use the Get-ManagementScope to display the scope of target users to a formatted list:
Get-ManagementScope "RivaCRM TargetUsersScope" | Format-List
Refer below to references 1, 2, 3, 4, and 5.
-
Assign one or more management roles to the management scope. For Riva, assign a role called RivaCRM SyncRole role for the rivasvc user to the "RivaCRM TargetUsersScope" management scope that was created at step 1:
New-ManagementRoleAssignment -Name "ManagementRoleName" -Role:ApplicationImpersonation -User "username" -CustomRecipientWriteScope "ManagementScopeName"
New-ManagementRoleAssignment -Name "RivaCRM SyncRole" -Role:ApplicationImpersonation -User "rivasvc" -CustomRecipientWriteScope "RivaCRM TargetUsersScope"
References:
- "Configuring Exchange Impersonation" for Exchange 2010: http://msdn.microsoft.com/en-us/library/bb204095.aspx.
- "New-ManagementScope" for Exchange 2010: http://technet.microsoft.com/en-us/library/dd335137.aspx.
- "New-ManagementScope" for Exchange 2010 SP2: http://technet.microsoft.com/en-us/library/dd335137.aspx.
- "Understanding Management Role Scopes", specifically "Recipient Filter Scopes": http://technet.microsoft.com/en-us/library/dd335146.aspx#Recipient.
- "Understanding Management Rols Scope Filters": http://technet.microsoft.com/en-us/library/dd298043.aspx.
- "New-ManagementRoleAssignment" for Exchange 2010: http://technet.microsoft.com/en-us/library/dd335193.aspx.
- "Exchange Server 2010 Role Based Access Control": http://www.exchangeinbox.com/article.aspx?i=159.
Configure Exchange impersonation by using Exchange Management Shell - Exchange 2007
Exchange Server 2007 makes use of Access Control Lists (ACL) to apply the permissions. You apply two rights; one that authorizes the Service Account access to Exchange Impersonation rights on the Client Access Server (CAS), and the other that is applied to either an AD account or an entire Mailbox database. This limits impersonation to an account-by-account basis, or to an entire mailbox database.
Information: Remember that Exchange Impersonation for EWS 2007 is not compatible with WebDAV, which Riva is dependant on for synchronizing "user defined fields" and categories to the Master Category List. The use of Exchange Impersonation for EWS 2007 is not recommended.
Exchange 2007 requires that you apply two rights to be able to get Exchange Impersonation working:
- ms-Exch-EPI-Impersonation – This right is applied to the Client Access Server and grants the Service Account permission to function as an Exchange Impersonation account on that CAS.
- ms-Exch-EPI-May-Impersonate – This right is applied on either a user-by-user basis for each of the users that require impersonation to be enabled, or it can be applied on a mailbox database.
Applying the ms-Exch-EPI-Impersonation right
To set the Impersonation permission on the Client Access Server (CAS):
-
Log on to the physical CAS machine.
-
Launch the Exchange Management Shell.
-
At the command line, type the following command (replacing CAS-Server-Name with your own CAS server name and Service-Account with the name of your own Service Account):
Add-ADPermission -Identity (Get-ExchangeServer -Identity CAS-Server-Name).DistinguishedName -User (Get-User -Identity "Service-Account").Identity -extendedRight ms-Exch-EPI-Impersonation
Add-ADPermission -Identity (Get-ExchangeServer -Identity MailServerCAS1).DistinguishedName -User (Get-User -Identity "rivacrm").Identity -extendedRight ms-Exch-EPI-Impersonation
Note that those cmdlets are typed on a single line. The examples above have been word-wrapped.
To set the Impersonation permission on all Client Access Servers in an Exchange organization:
Get-ExchangeServer | where {$_.IsClientAccessServer -eq $TRUE} | ForEach-Object {Add-ADPermission -Identity $_.distinguishedname -User (Get-User -Identity "User1" | select-object).identity -extendedRight ms-Exch-EPI-Impersonation}
Get-ExchangeServer | where {$_.IsClientAccessServer -eq $TRUE} | ForEach-Object {Add-ADPermission -Identity $_.distinguishedname -User (Get-User -Identity "rivacrm" | select-object).identity -extendedRight ms-Exch-EPI-Impersonation}
Applying the ms-Exch-EPI-May-Impersonate right
To set Impersonation for a single user account:
- For each user for which we want to enable Exchange Impersonation, from the command line, use the Add-ADPermission cmdlet.
Add-ADPermission -Identity (Get-User -Identity "Target-User").DistinguishedName -User (Get-User -Identity "Service-Account").Identity -extendedRight ms-Exch-EPI-May-Impersonate
Add-ADPermission -Identity (Get-User -Identity "Gordon Welling").DistinguishedName -User (Get-User -Identity "rivacrm").Identity -extendedRight ms-Exch-EPI-May-Impersonate
To set Impersonation for all user accounts in a mailbox database:
-
From the command line, use the Add-ADPermission cmdlet.
This example shows how to configure Exchange Impersonation for a user on all databases in an organization.
Get-MailboxDatabase | ForEach-Object {Add-ADPermission -Identity $_.DistinguishedName -User Service-Account -ExtendedRights ms-Exch-EPI-May-Impersonate}
Get-MailboxDatabase | ForEach-Object {Add-ADPermission -Identity $_.DistinguishedName -User rivacrm -ExtendedRights ms-Exch-EPI-May-Impersonate}
To set Impersonation for all users on an Exchange server:
It is also possible to set the permissions on all users on a Server for which we want to enable Exchange Impersonation.
-
From the command line, use the Add-ADPermission cmdlet.
This example shows how to set the impersonation permissions on all Client Access servers in an Exchange organization.
Get-ExchangeServer | where {$_.IsClientAccessServer -eq $TRUE} | ForEach-Object {Add-ADPermission -Identity $_.distinguishedname -User (Get-User -Identity Service-Acount | select-object).identity -extendedRight ms-Exch-EPI-Impersonation}
Get-ExchangeServer | where {$_.IsClientAccessServer -eq $TRUE} | ForEach-Object {Add-ADPermission -Identity $_.distinguishedname -User (Get-User -Identity rivacrm | select-object).identity -extendedRight ms-Exch-EPI-Impersonation}
References:
- "Configuring Exchange Impersonation (Exchange Web Services)" for Exchange 2007: http://msdn.microsoft.com/en-us/library/bb204095(v=EXCHG.80).aspx.
- "Add-ADPermission" for Exchange 2007: http://technet.microsoft.com/en-us/library/bb124403(EXCHG.80).aspx.
- "Get-MailboxDatabase" for Exchange 2007: http://technet.microsoft.com/en-us/library/bb124924(EXCHG.80).aspx.
- "Get-ExchangeServer" for Exchange 2007: http://technet.microsoft.com/en-us/library/bb123873(EXCHG.80).aspx.
Configure Full Access permissions - Exchange 2003
Grant Full Access Permissions to Individual Target Users: Full access permissions can be granted to individual users using Active Directory Users & Computers MMC (with Exchange Management snap-ins). Perform this procedure on each target user to grant full access permissions to the Riva connection account.:
-
Start Active Directory Users and Computers.
-
On the View menu, ensure that the Advanced Features check box is selected.
-
Double-click the target user whose mailbox you want to give permissions to.
-
On the Exchange Advanced tab, select Mailbox Rights.
-
Select Add, select the Riva connection user that you want to have access to this mailbox, and select OK.

-
In the Permissions window that appears, do as follows:
-
In the Group or user name box, ensure that the user or group is selected.
-
In the Permissions list, check Allow next to Full mailbox access.
-
Select OK.
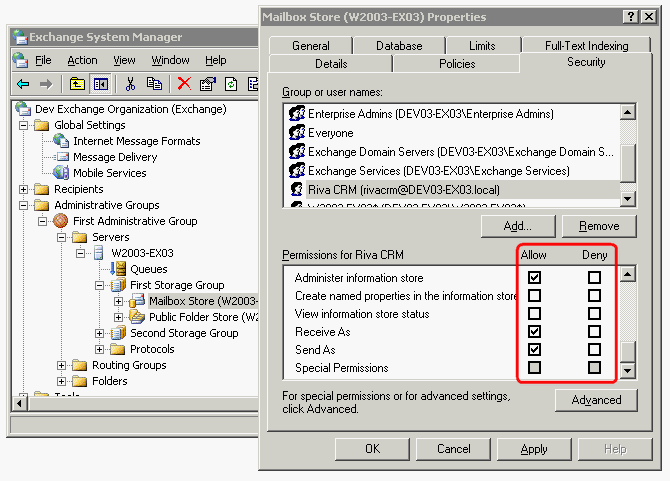
Grant Full Access Permissions to all User Mailboxes Located With a Specific Mailbox Store: Full access can be granted to all user mailboxes in a mailbox store by granting the Add Information Store, Receive-As, and Send-As permissions. Perform this procedure on each target mailbox store to grant full access permissions to the Riva connection account.:
-
Start the Exchange System Manager.
-
Drill down to your server object within the appropriate Administrative Group. Expand the server object, and find the required mailbox store within the appropriate Storage Group. Right-click it, and select Properties.
-
In the Properties window, select the Security tab.
-
Select Add, select the Riva connection user that will have access to the mailboxes, and select OK.
-
In the Group or user names box, ensure that the Riva connection account is selected.
-
In the Permissions list, select Allow next to Administer Information Store, Receive-As, and Send-As. Ensure that the Deny check box is cleared next to the Send As and Receive As permissions.
-
Select OK all the way out.
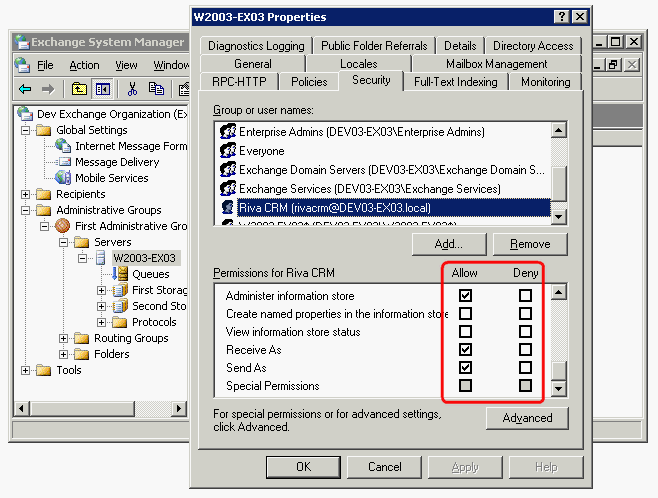
Grant Full Access Permissions to all User Mailboxes Located on a Specific Server: Full access can be granted to all user mailboxes on a specific physical server (multiple mailbox stores) by granting the Add Information Store, Receive-As, and Send-As permissions. Perform this procedure on each target mailbox server to grant mailbox full access permissions to the Riva connection account.:
-
Start Exchange System Manager.
-
Drill down to your server object within the appropriate Administrative Group. Right-click it, and select Properties.
-
In the Properties window, select the Security tab.
-
Select Add, select the Riva connection account that will have access to the mailboxes, and select OK.
-
In the Group or user names box, ensure that the Riva connection account is selected.
-
In the Permissions list, check Allow next to Administer Information Store, Receive-As, and Send-As. Ensure that the Deny check box is cleared next to the Send As and Receive As permissions.
-
Click OK all the way out.
Applies to
- Riva On-Premise server for Exchange 2016, 2013, 2010, 2007, and 2003
- Riva Cloud Corporate subscription accounts
