The Riva connection to NetSuite requires the credentials of an account that can impersonate into the target CRM user accounts.
In Riva 2.4.50 or higher, the NetSuite connection supports user credentials and token-based authentication. You can switch from one to the other by selecting a button.
In Riva 2.4.49 or earlier, only user credentials are supported.
- Create a NetSuite CRM connection.
- If required, set the Override Role ID and Default Subsidiary values.
- Test the NetSuite CRM connection.
- If required, enable the NetSuite "Team Selling" option.
- If required, set other NetSuite sync options.
- Optional: Assign a user-friendly display name.
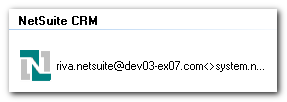
Step 1: Create a NetSuite CRM Connection
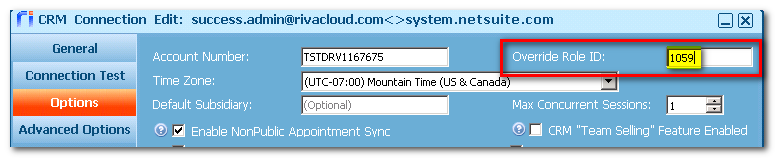
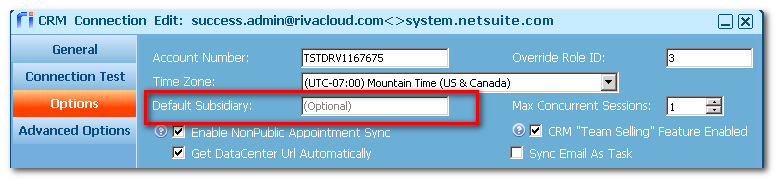
Step 2: If Required, Set the Override Role ID and Default Subsidiary Values
If a role other than the default role has been set as the "web services role" for the Riva connection user, you must edit the NetSuite connection and apply the RoleID Override. If subsidiaries are enabled, assign a default subsidiary ID.
To set the Override Role ID and Default Subsidiary:
-
Start the Riva Manager application. On the menu bar, select Setup.
-
In the right pane, double-click the NetSuite CRM connection object.
-
Select Options, and enter the value for the Override Role ID.
-
If subsidiaries are enabled, identify the Default Subsidiary. For more information, see Set a default subsidiary for NetSuite.
-
Save the connection.
Step 3: Test the NetSuite CRM Connection
To test the connection to confirm that user impersonation is working:
-
Start the Riva Manager application. On the menu bar, select Setup.
-
In the right pane, double-click the NetSuite CRM connection object.
-
In the CRM Connection Edit window that appears, select the Connection Test tab, and select Run Test.
The NetSuite connection account is tested to ensure that the credentials are correct.
-
In the Test succeeded message box, select OK.
-
In the User E-mail field, provide the user name for a NetSuite target user, and select Run Test.
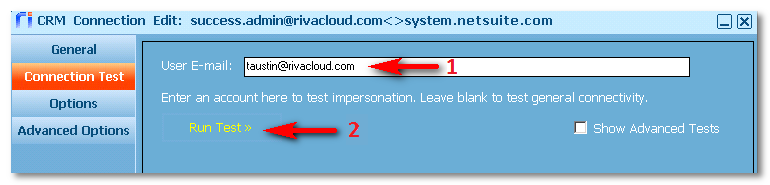
The system tests that the NetSuite connection account is able to impersonate into the NetSuite target user account.
-
In the Test Succeeded message box, select OK.
-
In the CRM Connection Edit window, select Cancel to close the window.
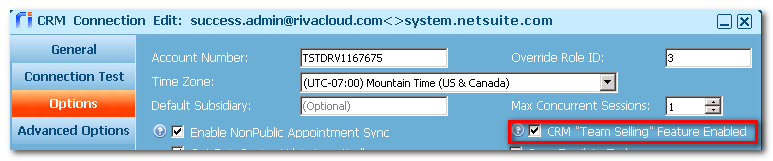
Step 4: If Required, Enable the NetSuite "Team Selling" Option
If Team Selling is enabled in NetSuite, enable it in Riva.
To enable the NetSuite Team Selling option in Riva:
-
Start the Riva Manager application. On the menu bar, select Setup.
-
In the right pane, double-click the NetSuite CRM connection object to open the CRM Connection Edit window.
-
Select Options, and select the CRM "Team Selling" Feature Enabled check box.
Step 5: If Required, Set Other NetSuite Sync Options
-
Start the Riva Manager application. On the menu bar, select Setup.
-
In the right pane, double-click the NetSuite CRM connection object to open the CRM Connection Edit window.
-
On the Options page, set and confirm other NetSuite sync options, including:
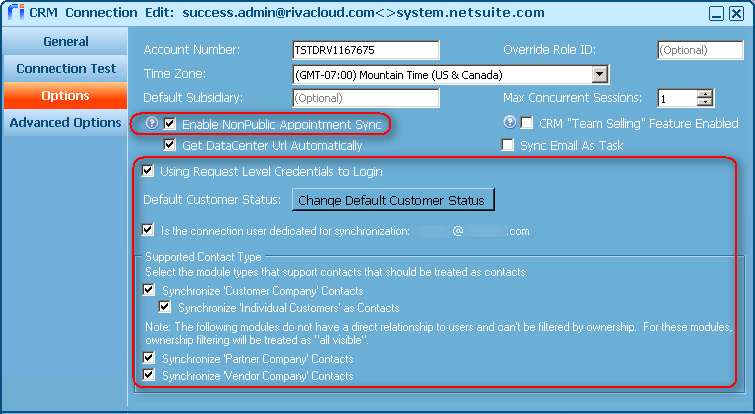
-
Enable NonPublic Appointment Sync: (Default: [Selected].)
- [Selected]: Retain this setting only if the connection user is not the NetSuite administrator. This enables Riva to attempt a different sync technique for the non-NetSuite administrator connection user to sync Show as busy and Private calendar items. For more information, see NetSuite connection option: Enable private appointment handling.
- [Cleared]: If the connection user is the NetSuite administrator, clear the check box, because Riva's regular sync technique does sync all appointments for that user, regardless of the "Event Access" setting.
-
Using Request Level Credentials to Login: (Default: [Selected].)
- [Selected]: The users' credentials are sent in the SOAP header of every request, which eliminates the need for session management and separate logins.
- [Cleared]: A login is required to authenticate to NetSuite.
-
Default Customer Status: If Riva SmartConvert creates a new customer or individual customer, Riva can set the default customer status. On the drop-down list, select the desired default status. Default: No stage is set.
-
Is the connection user dedicated for synchronization: [user name]. (This option is available in Riva 2.4.41 or higher. Default: [Cleared].)
- [Selected]: — Requirement for selecting this option: The user [user name] is a true admin service user in the CRM and is used only for syncing other users. It is not a normal user that is assigned as an Administrator. Example: Rivasync@[domain].com. — When this option is selected, if an appointment is organized by a non-NetSuite user, the admin service user is assigned as the organizer. If later on, the non-NetSuite user becomes a NetSuite user, the organizer is reassigned from the admin service user to the new NetSuite user (who was the real organizer in the first place). For more information, see Handle appointments organized by non-users who become users.
-
Supported Contact Types: Enable the types of contact sync Riva can perform. For more information, see Contact type filtering options.
-
Select Save to save the connection options and settings.
Step 6: (Optional.) Assign a User-Friendly Display Name
(The Display Name is supported in Riva 2.4.46 or higher.)
-
In the Riva Manager application, on the menu bar, select Setup.
-
In the right pane, double-click the NetSuite CRM connection object to open the CRM Connection Edit window.
-
Optional: On the General page, assign a user-friendly Display Name.
