Creating, Testing, and Editing a NetSuite CRM Connection Based on User Credentials
- Create a NetSuite CRM connection based on user credentials.
- If required, set the Override Role ID and Default Subsidiary values.
- Test the NetSuite CRM connection.
- If required, enable the NetSuite "Team Selling" option.
- If required, set other NetSuite sync options.
- Optional: Assign a user-friendly display name.
Step 1: Creating the Connection
To create a NetSuite CRM connection based on user credentials:
-
Ensure that you have followed the procedure Prepare NetSuite CRM for Riva.
-
Start the Riva Manager application.
-
Do one of the following to open the NetSuite CRM Wizard.
-
In the new UI, on the menu bar, select Add CRM, and choose NetSuite; or
-
In the classic UI, on the menu bar, select Setup. In the left pane, select CRM: NetSuite.
-
On the wizard's Welcome page, select Next.
Result: The Connection Details page appears and displays the User Credentials fields.
In Riva 2.4.50 or higher, a Token-Based Authentication button is available for selection. If you select Token-Based Authentication, follow the instructions at
Token-Based Authentication (TBA); otherwise, enter the user credentials as described below this box.
-
Provide the required user credentials.
The screen shot applies to Riva 2.4.49 or earlier.
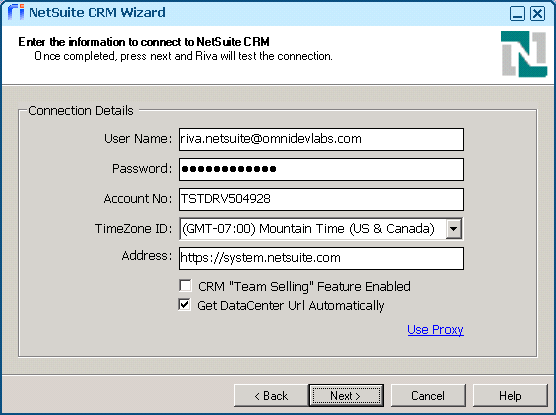
-
User Name: This must be a NetSuite account with sufficient role permissions that Riva will use to connect to the NetSuite CRM system and impersonate into the target user accounts.
-
Password: Provide the password for the Riva connection account.
-
Account No: Provide the NetSuite Account ID. (To find the Account ID, log in to NetSuite as an administrator, and select Setup > Integration > Web Services Preferences > Account ID.)
-
TimeZone ID: On the drop-down list, select the timezone.
-
Address: Leave it as https://system.netsuite.com.
-
Role ID: This is an ID number assigned to a role configured as the Web Services Default Role for the NetSuite account being used for this Riva Cloud connection. By default, if a user is assigned to only one role, NetSuite enables that role as the default Web Services role. This text box can normally be left blank. If the NetSuite account is assigned more than one role, the NetSuite administrator must define one of the roles as the default Web Services role. Contact your NetSuite administrator to obtain the number assigned to your default web services role and provide that value in this text box. For more information, see Prepare a Riva connection user for NetSuite.
-
Application ID: (Riva 2.4.50 or higher. Required for logging in to NetSuite 2018.2 or higher.) This ID number is found in the NetSuite integration record created in NetSuite for Riva Cloud. See NetSuite Application ID: where to generate it.
-
CRM "Team Selling" Feature Enabled: If this feature is enabled in NetSuite, select the check box.
-
Get dataCenter Url Automatically: The check box is selected by default.
-
Using Request Level Credentials to Login: For information, see https://system.netsuite.com/app/help/helpcenter.nl?fid=section_4489690806.html and https://system.netsuite.com/app/help/helpcenter.nl?fid=section_4489690806.html#bridgehead_N3447228.
-
Use proxy: Specify a unique http or https proxy setting that will apply to this CRM connection.
-
Select Next.
-
(Riva 2.4.47 or higher.) On the Additional Connection Options page, optionally select the check box Is the connection user dedicated for synchronization: [user name]. For guidance, see Is the connection user dedicated for synchronization.
-
On the Successful Connection page, select Finish.
The Riva Manager application creates a NetSuite CRM connection object.
Steps 2 Through 6: Testing and Editing a NetSuite CRM Connection
The following configuration and testing steps apply whether the connection relies on user credentials or Token-Based Authentication.
- If required, set the Override Role ID and Default Subsidiary values.
- Test the NetSuite CRM connection.
- If required, enable the NetSuite "Team Selling" option.
- If required, set other NetSuite sync options.
- Optional: Assign a user-friendly display name.
