If after upgrading Riva you observe problems, you can restore the previous version of Riva without losing connection settings or policies.
Possible Challenges
Riva performed properly before the upgrade, but afterwards, one or more of the following occurs:
- Riva does not start.
- A Riva policy does not execute properly — it displays errors in the logs.
- The update partially failed.
- Riva On-Premise fails to synchronize properly.
- Riva closes when I attempt to run a policy or perform a scheduled policy using Windows scheduler.
Can I restore the previous version without losing connection settings or policies?
Can a Rollback be Performed?
Yes, the current installation of Riva can be rolled back to a previous version if Riva stops working after an upgrade or if directed to do so by Riva Technical Support.
To perform a rollback
-
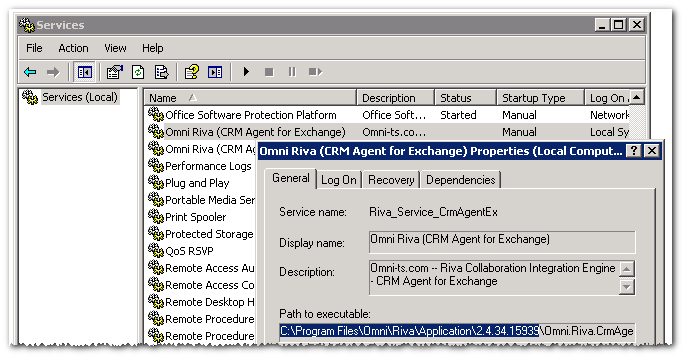
Open Windows Services, and stop any Omni Riva services.
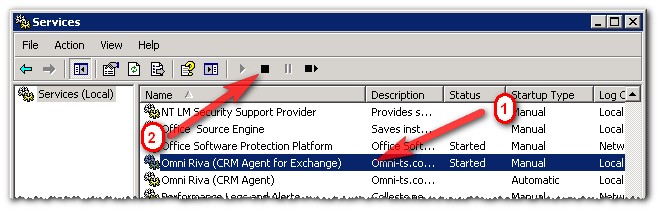
If a Riva service is stuck in a Stopping state, stop it manually. For instructions, see Riva service is stuck "stopping".
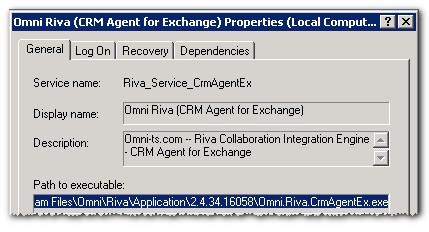
- In Windows Services, for each Omni Riva service, open its properties, and confirm the path to the service executable file.
-
Start the Riva Manager application.
-
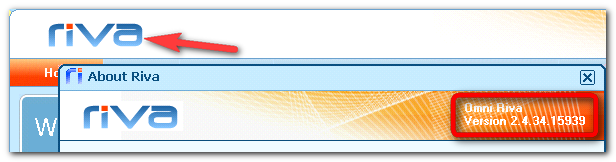
In the top-left corner, select the Riva icon. In the About Riva window that appears, confirm the version number, and double-click the version number.
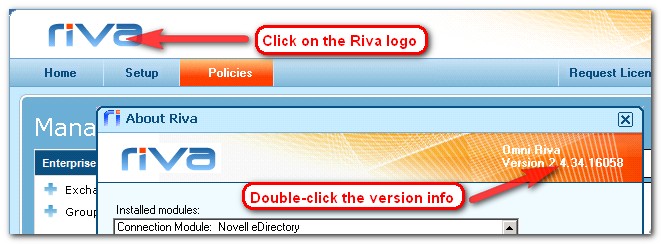
Windows Explorer displays the contents of the \Riva installation folder.
-
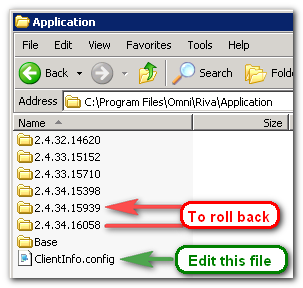
Close the Riva application windows.
-
In Windows Explorer, navigate to the \Riva\Application folder. Take a note of the previous version number.
-
Open the ClientInfo.config file in an ASCII-based text editor, and modify the <versionRuntime> <versionRuntime> value to reflect the version number of the previous Riva version to roll back to, for example, 2.4.34.15939.

Save the file, and close the text editor application.
-
Close Windows Explorer.
If performing a Riva rollback for Riva Policies and Reports, skip steps 9 to 12 and 14.
-
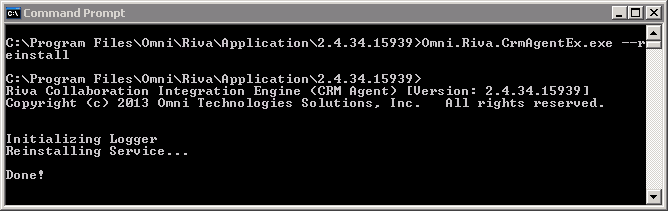
Open a CMD prompt with elevated privileges (Run as administrator).
-
CD to the path of the version to roll back to, for example
CD C:\Program Files (x86)\Omni\Riva\Application\2.4.34.15939 [enter]
-
To reinstall the Omni sync service for Riva for Exchange, type Omni.Riva.CrmAgentEx.exe --reinstall [enter]
To reinstall the 64-bit sync service, type Omni.Riva.CrmAgentEx64.exe --reinstall [enter]
The 64-bit Riva sync service is not available in Riva releases prior to 2.4.40. If you need to roll back to a release prior to 2.4.40, the 64-bit service must be uninstalled, and the 32-bit service must be installed. For assistance,
contact the Riva Success Team.
To reinstall the Omni sync service for Riva for GroupWise, type Omni.Riva.CrmAgent.exe --reinstall [enter]
Services not related to CRM Sync
To reinstall the Omni Riva IIAgent service for Riva IIS for GroupWise, type Omni.Riva.IIAgent.exe --reinstall [enter]
To reinstall the Omni Riva Monitor service for Riva for GroupWise SDL, type Omni.Riva.Monitor.exe --reinstall [enter]
For more information on Riva services not related to CRM sync, see Expose Riva services to monitor software.
-
Close the CMD window.
-
Start the Riva Manager application. Select the Riva logo, and confirm that the version has been rolled back.
If performing a Riva rollback for Riva Policies and Reports, skip step 14.
- Open Windows Services, open the properties of the applicable Omni CRM Agent service, and confirm that the path is now set to the version that you rolled back to.
Applies to
All installations of:
- Riva On-Premise server
- Riva Policies and Reports
- Riva Managed Applications
- Riva Identity Integration
