The Riva connection to Oracle CRM On Demand requires the credentials of an admin account that can impersonate into the target CRM user accounts.
- Create an Oracle CRM On Demand connection.
- Test the connection.
- Optional: Enable Stateless Session Mode to handle web service allotment limits.
- Optional: Assign a user-friendly Display Name.
Step 1: Create an Oracle On Demand CRM Connection
-
Ensure that you have followed the procedure Prepare Oracle On Demand for Riva.
-
In the Riva Manager application, on the menu bar, select Setup.
-
In the left pane, select CRM: Oracle CRM On Demand to open the Oracle CRM On Demand Wizard.
-
On the wizard's Welcome page, select Next.
-
Provide the required information:
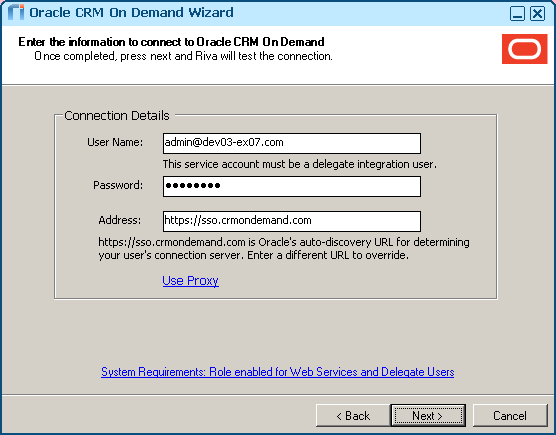
User Name: This must be an admin-level Oracle CRM On Demand account that Riva will use to connect to the CRM system and impersonate into the target user accounts.
Password: Provide the password for the admin account.
Address: If the URL link to the Oracle On Demand login window is different from the default, provide it here.
Use proxy: Specify a unique http/s proxy setting that will apply to this CRM connection.
-
Select Next.
-
(Riva 2.4.47 or higher.) On the Additional Connection Options page, optionally select the check box Is the connection user dedicated for synchronization: [user name]. For guidance, see Is the connection user dedicated for synchronization.
-
On the successful connection page, select Finish.
The Riva Manager application creates an Oracle CRM On Demand connection object.
Step 2: Test the Oracle On Demand CRM Connection
To test the connection to confirm that user impersonation is working:
-
In the Riva Manager application, on the menu bar, select Setup.
-
In the right pane, double-click the Oracle On Demand connection object to open the CRM Connection Edit window.
-
Select Connection Test, and select Run Test >>.
The CRM connection account is tested to ensure that the credentials are correct.
-
In the Test succeeded message box, select OK.
-
In the User E-mail field, provide the email address for a CRM target user, and select Run Test >>.
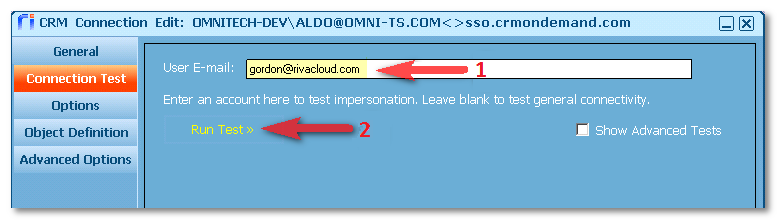
The system tests that the Oracle On Demand connection user is able to impersonate into the Oracle On Demand target user.
-
In the Test succeeded message box, select OK.
-
In the CRM Connection Edit window, select Cancel to close the window.
Step 3: Enable Stateless Session Mode to Handle Web Service Allotment Limits
By default, Riva connections use stateful sessions, but there are limits to web service allotments based on the Oracle On Demand edition currently deployed. For CRM environments that include a large number of users and/or contacts, those limits can be reached during the initial sync cycles as users are added to sync policies or when someone imports a large number of contacts into the CRM.
Configuring the Riva Oracle On Demand connection to run in stateless mode will help with the concurrent sessions limits that Oracle has in place.
To configure the connection to run in stateless mode:
-
In Oracle On Demand, clear the R16 Compatibility Mode check box.
-
In the Riva Manager application, on the menu bar, select Setup. In the right pane, double-click the Oracle On Demand connection.
-
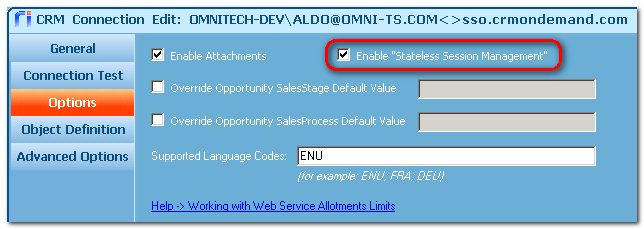
Select Options, and select the Enable "Stateless Session Management" check box.
-
Save the connection.
Step 4: (Optional.) Assign a User-Friendly Display Name
(The Display Name is supported in Riva 2.4.46 or higher.)
-
In the Riva Manager application, on the menu bar, select Setup.
-
In the right pane, double-click the Oracle On Demand connection to open the CRM Connection Edit window.
-
On the General page, assign a user-friendly Display Name.
-
Save the connection.
