|
|
Create, Test, and Edit an Exchange / Office 365 (EWS) Connection
Article ID: 43
Last updated: 19 Sep, 2023
To create, test, and edit an Exchange / Office 365 (EWS) connection:
- Prepare for the EWS connection.
- Create the connection.
- Test the connection.
- Edit the connection.
Step 1: Prepare for the EWS Connection
-
Supported Exchange Versions: Office 365 and Exchange 2016, 2013, 2010, or 2007 SP1.
-
Exchange Web Services: Riva will connect to Exchange Web Services (EWS) for the Exchange system.
-
For on-premises Exchange (single version): Requires the EWS URL for one connection end point.
-
For on-premises Exchange (multi version): For Exchange systems that have user mailboxes stored on different Exchange versions (for example, Exchange 2013 and Exchange 2010), Riva needs to connect to one EWS connection end point that services each Exchange version.
-
For Exchange Online (Office 365): Riva will detect the EWS connection end-point for your subscription.
-
For commercially hosted Exchange: Riva will detect the EWS connection end-point for the most popular Exchange service providers; otherwise, you need the URL for the EWS connection end point.
-
Outlook Client Not Required: EWS connections do not require an Outlook client to be installed on the Windows system hosting the Riva server.
-
Riva Connection Mailbox User: The sync requires a fully enabled Exchange mailbox user that has full access permissions assigned to each target Exchange user mailbox that data will be synced for.
Step 2: Create a Riva EWS Connection
To create and configure an Exchange Web Services (EWS) connection:
-
Start the Riva Manager application.
-
On the menu bar, select Setup. In the left pane, select Microsoft Office 365, Microsoft Exchange 2016, Microsoft Exchange 2013, Microsoft Exchange 2010, or Microsoft Exchange 2007 to open the corresponding connection wizard.
-
On the wizard's Welcome page, select Next to access the connection details page.
The screen shot shows Exchange 2016, but the page looks the same for Office 365 and the other supported versions of Exchange — except that in Riva 2.4.45 or higher, the page for Office 365 is different. See Create, test, and edit an Office 365 connection to Riva 2.4.45 or higher.
.png)
-
Fill out all the fields as follows:
-
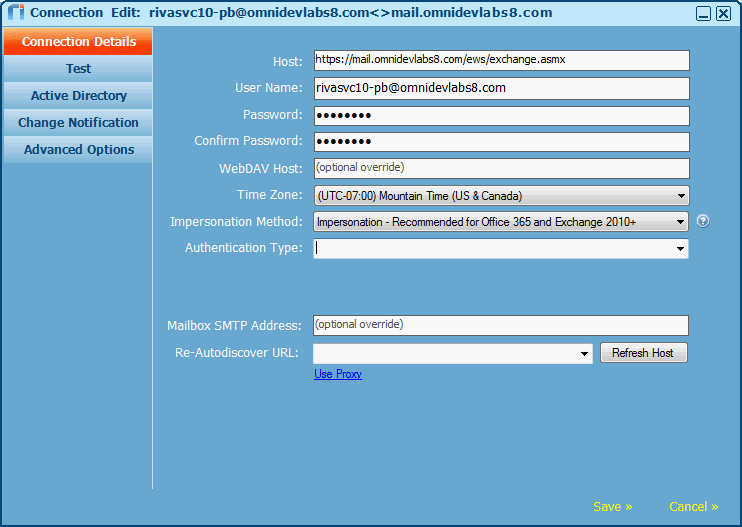
Email Address: Provide the primary SMTP email address for the connection account.
-
Use Windows Service 'Log on as' Integrated Authentication: (Riva 2.4.47.48415 or higher; Exchange 2016, 2013, 2010, or 2007 SP1 only.) If this check box is selected, the system uses the credentials of the user that the Omni Riva Sync Service logs on as. The Service Account User Name and Password fields become unavailable.
-
Service Account User Name: Provide the AD user credentials for the Exchange user account that has been selected as the Riva connection account. This account must be configured with the Full Access or Impersonate permissions to the target Exchange accounts that will be synchronized with the target CRM system.
Note: AD login credentials may not be the same as the Exchange email address for the same account. Ensure that if the UPN is used, it is the AD UPN for the connection user. You can use either:
- domain name\username (NTLM), for example, OMNIDEVLABS\rivacrm; or
- user principal name (UPN), for example, rivacrm@omnidevlabs.com
-
Password: Provide the AD password for the connection account.
-
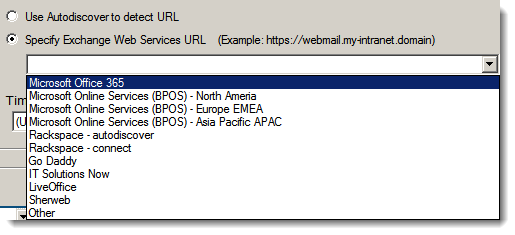
Host: Provide one of the following:
- Use Autodiscovery to detect URL: If your on-premises EWS server has Autodiscovery properly configured, or if connecting to a commercial hosted Exchange provider, use this option; or
- Specify Exchange Web Services URL: If Autodiscovery is not enabled or does not work, select this option and specify the URL path to your EWS server. For example, if the OWA server login URL is "https://demo3-ex07.omnidevlabs.com/owa/auth/logon.aspx?", use https://ex2010.myhostedservice.com:8080/ews/Exchange.asmx as the URL value. (The EWS connection supports specifying non-standard ports.)

For Office 365: (Riva 2.4.44 or earlier.) To determine the correct URL, log in to Office 365 as the Riva connection account and switch to Outlook Web Access. Copy the base URL from the browser, for example, https://pod12345.outlook.com. Ensure that the delegated access permissions have been properly set for the Riva connection account. For detailed information, see Prepare the Riva connection account for Office 365 - Exchange Online.
Select from the drop-down list: Select one of the common hosted service providers:
-
Time Zone: Select the time zone configured for the target Exchange server.
-
Select Next and Finish.
This creates a Microsoft Exchange connection.
Step 3: Test the Riva EWS Connection
This step applies to...
To test the Riva EWS connection:
-
In the Riva Manager application, on the menu bar, select Setup.
-
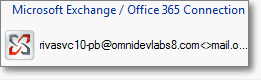
In the right pane, double-click the Microsoft Exchange / Office 365 Connection object.
-
Confirm that the connection credentials look correct.

-
Test the connection as follows. Select the Test tab. Leave the User E-mail field empty, and select Run Test >>.
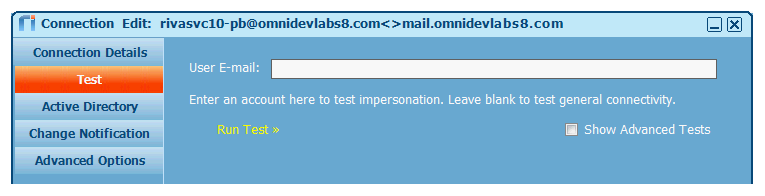
This verifies whether the credentials configured for this connection are working correctly. If so, a Connection Test Succeeded message box appears.
-
Test impersonation access as follows. On the Test page, provide the login credentials (username@email.domain) for one of the Exchange accounts that will be synchronized with the target CRM, and select Run Test >>.
This test passes
-
if "EWS Impersonation" has been set as the Authentication Type and Exchange ApplicationImpersonation Role permissions have been assigned; OR
-
if "Delegate Full Access" has been set as the Authentication Type and Delegate Full Access permissions have been assigned.
-
If the Connection Test Succeeded message box appears, select OK, and then select Cancel.
If the Connection Test Failed message box appears, select OK, and then select Cancel:
- Full Access Delegate impersonation method: If the connection uses the "Full Access Delegate" impersonation method, take measures to correct the "full access" permissions assigned to the Riva connection user. Repeat the test until it is successful.
Note: In Riva, cache connection test results tend to be cached. If changes are made to Delegate Full Access permissions, close the Riva Manager application and wait five to ten minutes before restarting the Riva Manager application and running the test again.
- EWS Impersonation method: If the connection uses the "EWS Impersonation" method, a failed test result can be ignored.
Step 4: Edit the Riva EWS Connection
-
In the Riva Manager application, on the menu bar, select Setup.
-
In the right pane, double-click the Exchange EWS connection to open the CRM Connection Edit window.
-
(Riva 2.4.46 or higher is required for this step.) Optional: On the General page, assign a user-friendly Display Name.
-
Save the connection.
Article ID: 43
Last updated: 19 Sep, 2023
Revision: 19
Also read
Also listed in
|
