Riva CRM Integration - Documentation and Knowledge Base

Connect Riva Cloud to Exchange EWS with User Credentials

Article ID: 278
Last updated: 13 Oct, 2020
This article is about creating a user-credentials ("traditional") connection to Exchange EWS or Office 365 from Riva Cloud.
In Riva Cloud, it is also possible to create an Office 365 OAuth connection or convert an Exchange Online connection to OAuth.

Contents:

Prerequisites

Riva Cloud connects to Microsoft Exchange by using Exchange Web Services (EWS).

By default, EWS is installed and is hosted on the same server as the Outlook Web Access server (CAS).

This is the same host and service that is required to support Apple Mail, Entourage 2008 for Mac, and Office 2011 for Mac.

Create the EWS Connection

To create the user credentials-based EWS connection to Exchange or Office 365:

  1. Log in to https://www.rivacloud.com.

  2. On the Get Started page, select Configure your email.

  3. Select the Exchange logo or the Office 365 logo.

    1. If you selected the Office 365 logo, then on the Connection page that appears, select Use Traditional Authentication.

  4. On the Exchange Connection page that appears (whether you selected the Exchange logo or Use Traditional Authentication), provide the following Exchange or Office 365 account information:

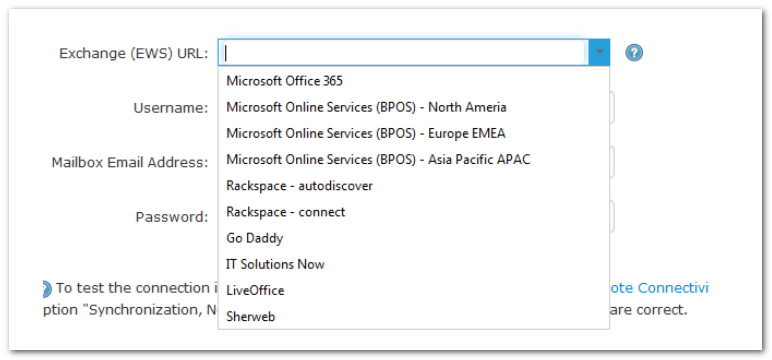
    • Exchange (EWS) URL: Host address to the Exchange Web Services URL:
      • Manually Type In a URL: (Company-operated or hosted Exchange service provider.) You can use the path you use to log in to Outlook Web Access, for example https://mail.myservicecompany.com/owa

      • Use the Drop-Down List: Use the drop-down list to select one of the available commercial Exchange service providers.


    • User name: Depending on your server configuration, the format for your user name may be

      • SAM User name: <NT_DOMAIN>\Username, for example MyDomain\MyUserName; or
      • UPN User name: User name@<Active Directory Domain>, for example MyUserName@MyDomain.local
         
    • Password.

  5. Select OK.

    The connection to Exchange or Office 365 is tested with the user credentials and connection information that you have provided.

  6. Do one of the following:

    • If the connection setup is successful, select OK. The user credentials-based EWS connection is added to your Riva Cloud account.
    • If you experience an issue, see the following section.

Resolving Issues

Whitelist the Riva Cloud IP address range

Riva Cloud must be able to connect to your Exchange Web Services server from the internet.

If Riva Cloud reports that the connection was not successful, contact your Exchange administrator (or hosted Exchange service provider) to confirm the following:

  • The EWS host URL uses the correct website URL for your Exchange Web Services connection.
  • The correct authentication credentials (user name and password) are saved to the connection.
  • For on-premises Exchange, ensure that the Riva Cloud service can connect through your company firewall. Ensure that ports 80 / 443 are allowed IN and OUT. For the list of IP subnets to whitelist in the corporate firewall, contact the Riva Success Team.

How to locate the Exchange Web services URL for Office 365 and Exchange 2003-2019

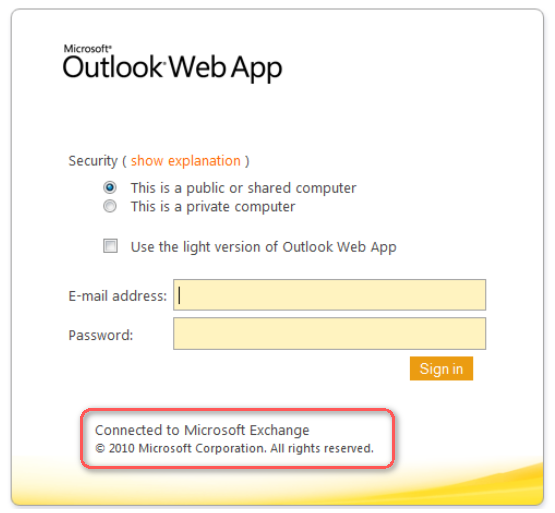
  1. Go to your "Outlook Web Access" address.

  2. Look at the bottom of the login page to see which version of Exchange you are running.


  3. Do one of the following:

    • For an Outlook client: Select File, and see the URL that is listed at the top.

    • For Outlook for Mac: Start Outlook, select Tools > Accounts > Advanced, and see the URL that is listed in the Server field. Copy and paste that address, remove everything after the first .com or .ca or other such suffix, and append /OWA. For example, if the server name in Outlook 2011 is "mail.example.com/aspx/html", remove everything after the .com, so that you end up with "mail.example.com"; now append /OWA, so that the end result should look like this: "https://mail.example.com/OWA".

    • For Office 365: In the Riva Cloud Exchange Connection window, on the drop down field, select Microsoft Office 365, which automatically selects the correct URL.

This article was:   Helpful | Not helpful
Report an issue
Article ID: 278
Last updated: 13 Oct, 2020
Revision: 8
Views: 12137
Comments: 0