This article discusses how to request and implement licenses for the Riva On-Premise server.
Riva License Modes
Riva On-Premise supports the following license modes and types of licenses:
-
Demo: This is deployed as soon as you open Riva the first time. You can create connections between Riva and your email system, as well as between Riva and your CRM, but you cannot synchronize. In demo mode, you can request a synchronization and the sync log displays the same sorts of entries that Riva would output during a sync, but the sync is not being performed. The demo mode is intended only to give an idea of what Riva On-Premise does.
-
Trial License: Allows full CRM synchronization functionality for the period that the license is issued for. When the license expires, data is no longer synced between the email system and the CRM system. Trial licenses are usually limited to 5 users for 15 days.
-
Purchase License: Allows full CRM synchronization functionality for the period that the license is issued for. When the license expires, data is no longer synced between the email system and the CRM system. Purchase licenses are for an annual term for the desired number of users that Riva can sync.
-
Sandbox/Testing License: Allows for full Riva functionality in a dedicated testing environment. For more information, contact the Riva Success Team.
When to Request a License
- Trial license: Request a license after configuring and testing the mail server and CRM connections, but before creating a CRM synchronization policy.
- Purchase license: Request at any time before your trial license expires. You can also request a purchase license even if you have not had a trial license, for example if a partner of Riva International, Inc. has done all the testing for you and provided you with the connection and configuration files that you need to request your license and to sync with.
How Is the Riva On-Premise Server Licensed
The Riva On-Premise server is licensed as per a subscription model based on the number of email users and the number of CRM users that Riva will sync data for.
- If more email users are to be synced than there are CRM users to be synced, the cost of the Riva license is increased according to the extra number of email users being synced.
- Likewise, if there are more CRM users to be synced than there are email users to be synced, the licensing cost is increased according to the extra number of CRM users to be synced.
Riva supports multiple internet email domains, provided that every domain is identified in the license request.
How to Request a License
To request a Riva On-Premise license:
-
Open the Riva Manager application. On the main menu, select Licencing, and choose Request License.
-
On the Welcome to the Riva License Wizard page, select Next.
-
On the Choose Licensing page, under CRM Integration, select the email platform, and select Next.
Riva Licensing does not license CRM systems based on an IP address. The CRM must be licensed against a fully qualified domain name. If your CRM is listed as an IP address, you need to recreate your CRM connection in Riva and submit a new license request.
-
On the CRM Licensing page, ensure that the desired CRM connection is displayed, and select Next.
-
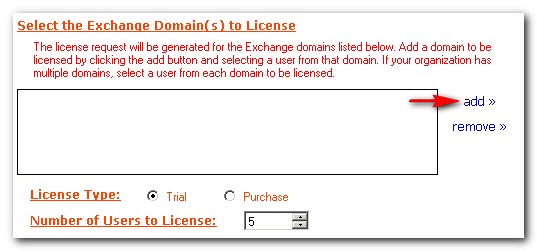
On the Select the [Email] Domain(s) to License page, if the desired email domain is on the list and you are licensing only that email domain, select Next, and select a Trial or Purchase license type.
If the list is empty or if you need to include other email domains that are not on the list, do as follows:
-
To the right of the box. select add.
Note: Only email addresses in these domains will be authorized to sync.

-
In the Choose Connection window that appears, select the email connection that has access to the additional domains and select OK at the bottom of the window.
-
In the Select Entities window that appears, enter the email address of a user with a different email domain name, and select check name.
.jpg)
-
If the mailbox account resolves through the mail server connection, the mailbox name is underlined. Select add to add the email address and domain to the list.
.jpg)
-
For each different email domain that needs to be licensed through this connection, repeat steps c and d.
.jpg)
-
Select OK to add the domain names to the domains to license.
-
Select Next.
-
On the Select the Domain(s) to License page, below the list box, select a Trial or Purchase license type, and specify the number of sync users to license.
.jpg)
-
Select Next.
-
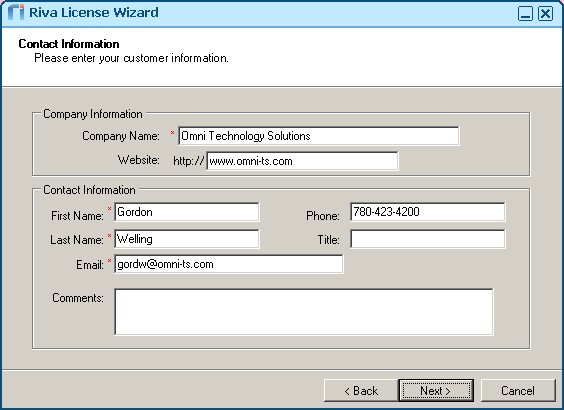
On the Contact Information page, fill in the information, and select Next.

Result: The Riva Licence Request wizard creates two request files:
-
In the Submit Request Electronically? window, do as follows:
-
If you want Riva to attempt to upload the license request to the Riva License Request server, select Yes, and see Electronic submission; or
-
If you have already selected Yes earlier and the automatic submission has failed, or if you have selected No, see Request a license manually.
Electronic submission:
-
If the license request upload was successful, Riva displays a successful Completed message box.
- Close the Completed message box.
- Close the Riva Manager application.
- Wait to receive an email with an activation key or a license file.
- Activate the license.
-
If the license request upload was not successful, Riva displays a Completed window to prompt you to email us the file that was created, but follow these instructions first:
- Jot down the path to the .request file, because you will need it to request the license manually. The path should point to the Riva\LicenseRequests folder.
- Close the Completed message box.
- Close the Riva Manager application.
- Request a license manually.
Request a license manually:
(This is the bottom of step 9 of How to request a license.)
If the License Request wizard fails or if you selected No on the Submit Request Electronically? page, the Riva wizard displays a Completed window that prompts you to email us the file that was created.
- Create an email to send to licensing@omni-ts.com.
- Attach the .request file that is located in the Riva\LicenseRequests folder.
- Send the email.
- Wait to receive an email with an activation key or a license file.
- Activate the license.
How to Activate a License
For trial license requests, you will receive an email with an activation key and a corresponding license file.
How to apply a license activation key
If you receive an email with a license activation key:
-
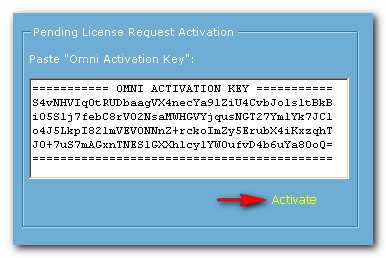
Open the Riva Manager application. On the main menu, select Licencing, and then choose Activate Licence. Note the text box for pasting the activation key.
-
From the email, copy and paste the activation key into the text box.
IMPORTANT: All the equal signs (=) at the top and bottom of the activation key ARE PART AND PARCEL of the activation key.
-
Select Activate.

-
In the Activation Success! message box, select OK.
If the activation key is not successful
Under certain conditions, applying the activation key may fail. If that occurs, follow the steps in How to manually apply a license file, using the license file attached to the email that delivered the trial license activation key.
How to manually apply an original or additional license file
In some circumstances, the license activation key does not work. In some circumstances, you may need to apply more than one license file to a Riva server.
Note: This procedure is not used to apply a replacement license file, that is, a license file that replaces an existing license file that has expired or for which additional connections have been added. For the correct instructions, see
How to apply a replacement license file.
To manually apply an original or additional license file:
-
In the Riva Service Monitor application, or in Windows services, stop the Omni Riva (Sync Service).
Note: In earlier versions of Riva, the service was named "Omni Riva CRM Agent service" or "Omni Riva (CRM Agent for Exchange)".
-
In the top left of the Riva Manager application, double-click the Riva logo.
-
In the About Riva window that appears, double-click the Riva version number.
Result: Windows Explorer displays the contents of the Riva folder, which is the root folder of the Riva server installation.
-
Navigate to the Riva\Licenses folder. Remove the existing [guid_crmex].licensees file and any .license file. Copy the new .license file that you received, and paste it into the Riva\Licenses folder.
-
Close and re-open the Riva Manager application.
-
On the Policies pane, right-click the applicable sync policy, and select License Details.
-
In the License Details window, confirm that the license details are correct.
- In the Licenses list box:
- Number of licenses consumed (used).
- Number of licenses remaining.
- In the bottom left corner of the window:
- When support for the licenses expires.
-
If the license details are not correct, email your license file to the Riva Success Team at support@omni-ts.com, and explain the issue. Do not follow the remaining steps of this procedure.
If the license details are correct, close the License Details window and continue with the next step.
-
In the Riva Service Monitor application, start the service, and confirm that there are no license errors in any of the Activity Monitor panes.
-
If you encounter any errors, contact the Riva Success Team.
Tip: At any time, you can double-check the number of licenses. In Riva 2.4.48 or higher, you can also release inactive licenses to refresh the license count. For instructions, see Verify and/or refresh the number of licenses.
How to manually apply a replacement license file
To manually apply a replacement license file received from the Riva License services:
-
In the Riva Service Monitor application, or in Windows services, stop the Omni Riva (Sync Service).
Note: In earlier versions of Riva, the service was named "Omni Riva CRM Agent service" or "Omni Riva (CRM Agent for Exchange)".
-
In the top left of the Riva Manager application, double-click the Riva logo.
-
In the About Riva window that appears, double-click the Riva version number.
Windows Explorer displays the contents of the Riva folder, which is the root folder of the Riva server installation.
-
If this is the first license file being applied, navigate to the Riva\Licenses folder, and remove the existing files.
If this is to replace an existing Riva license file, rename the Riva\Licenses folder to Riva\Licenses.old, and create an empty Riva\Licenses folder. This saves the existing license files in case you have to roll back to a previous license. In subsequent attempts to replace an existing license, move the existing license files to the Riva\Licenses.old folder.
-
Copy the replacement license file you have received, and paste it into the Riva\Licenses folder.
-
Close and restart the Riva Manager application.
-
On the menu, select Policies. In the right pane, right-click the applicable sync policy, and select Licensing Details.
-
In the License Details window, confirm that the license details are correct.
- In the Licenses list box:
- Number of licenses consumed (used).
- Number of licenses remaining.
- In the bottom left corner of the window:
- When support for the licenses expires.
-
If the license details are not correct, email your license file to the Riva Success Team at support@omni-ts.com, and explain the issue. Do not follow the remaining steps of this procedure.
If the license details are correct, close the License Details window and continue with the next step.
-
In the Riva Service Monitor application, start the service, and confirm that there are no license errors in any of the Activity Monitor panes.
- If you encounter any errors, contact the Riva Success Team.
Tip: At any time, you can double-check the number of licenses. In Riva 2.4.48 or higher, you can also release inactive licenses to refresh the license count. For instructions, see Verify and/or refresh the number of licenses.
How to Request a License Extension or Purchase a License
If you need a trial license extension or would like to purchase a license, contact the Riva Success Team to request the correct license file. License extensions and purchase licenses are delivered as a license file attached to an email and are always manually applied to Riva.

.jpg)
.jpg)
.jpg)
.jpg)


