This article applies to Riva On-Premise 2.4.47 or higher.
Riva On-Premise includes sync policy re-initialization options.
Contents:
User Management Tasks
This section applies to Riva On-Premise 2.4.47 or higher.
Use the tool bar to activate user management tasks. For information on an icon, click or tap it on the following screen shot.

-
 Edit Re-init Options: See How to re-initialize users.
-
 Save Changes: Saves options set to multiple users.
-
 User Advanced Options: Opens the Entity Advanced Options window, where advanced or custom options can be applied against specific users.
For tips and instructions on how to use the window, see Best practice.
-
 Save Selected: Saves the changes only to the users that are selected.
-
 Clear Next Sync & Save Selected: Removes the next scheduled sync value for the selected users. This is a quick way to force users to sync after the sync policy is saved.
-
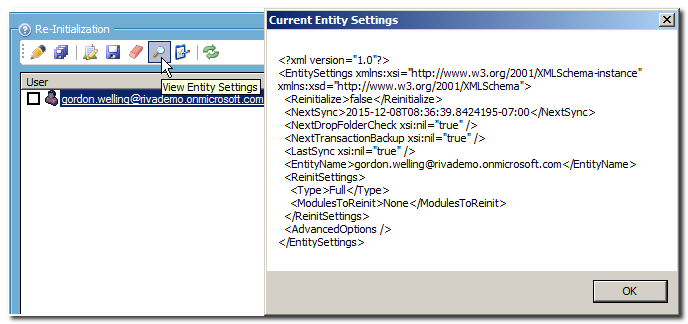
 View Entity Settings: Use this option to view the entity.settings file that confirms the next scheduled sync time, entity name (usually the email address), and re-init mode if set. This enables Riva admins to confirm the current entity settings for a specific user.
-
 Rename User: Use this option to properly rename a user in a sync policy. For more information, see How to rename a user.
-
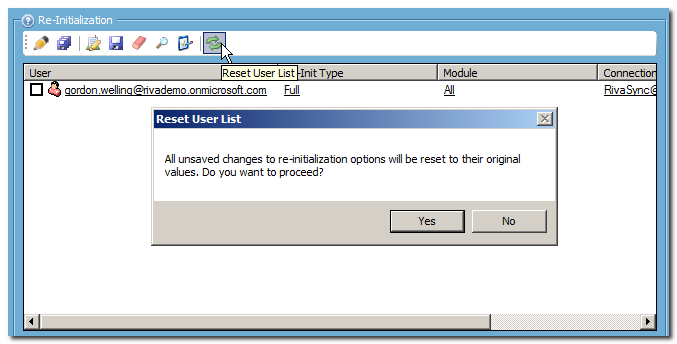
 Reset User List: Removes all of the options set against users on the list. This is really handy if a global mistake has been made.
Tip: If changes need to be set for a later time, do not use Reset User List. Instead, select the Run after selected time button.
 Select users from txt/csv file: Instead of selecting users one by one from the list of users, create a .txt or .csv file that contains all the users that you want to select.
Format: One email address per line.
What to do: When the file is ready, select this icon. In the Select File window that opens, navigate to the .txt or .csv file, select it, and click or tap Open.
Result: The users listed in the file are validated against the policy and selected.
What's next: You can now process the selected users.
How to Re-Initialize Users
This section applies to Riva 2.4.47 or higher.
What are re-initialization options?
To set the re-initialization options in Riva 2.4.47 or higher:
-
Start the Riva Manager application. On the menu bar, select Policies.
-
In the right pane, double-click the desired sync policy to edit it.
-
In the Edit CRM Synchronization Policy window that appears, select the Re-Initialize or Sync Start Time tab.
Note: In sync policies created in Riva 2.4.46 or higher, the Re-Initialize page replaces the Sync Start Time page.
-
In the large list box, select Load Users.
-
When the list of users appears, select one or more users by doing one of the following:
-
Above the list box, select to select users from a .txt or .csv file; or
-
In the list box, select the check box to the left of one or more users; or
-
Below the list box, select the Select All check box.
-
Select .
Result: The Re-Initialize Users window appears.
Re-Initialize Users
-
In the Re-Initialize Users window, fill out the fields as follows:
-
Modules: Select the syncing module to apply the re-init option to. To apply the re-init option to all syncing modules, select All.
-
Category: Select the category that the re-init option belongs to. If you do not know which category, select All.
-
Type: Select the desired option. For information on each option, see Types of re-initialization.
-
[Run buttons]: Indicate when the re-initialization is to take place.

-
Select OK to view the list of changes about to be made. Verify that they are correct.
Depending on which re-init option was selected, other actions may be required in the Edit CRM Synchronization Policy window before saving the policy.
Example: You may need to
set advanced options for the selected users.
Be sure to refer to the documentation that explains how to use that re-init option.
-
If other actions are required in the Edit CRM Synchronization Policy window and you have finished performing them, select Save.
-
Enable the policy.
Result: The re-initialization option is applied against every selected user. The timing depends on the selected Run button.
Applies to
- Riva On-Premise 2.4.47 or higher for Exchange, IBM Notes, and Google.
