Riva On-Premise now offers the ability to deploy a passive-passive fail-over Riva server to facilitate recovering from a crash of the Windows system that hosts a Riva On-Premise primary server. The Riva disaster recovery (DR) strategy requires enabling the DR features, implementing a backup schedule schedule for the primary Riva server, and using the Fail-over Riva server if the primary Riva server fails.
Contents:
Important Note: The DR feature
is not available for
Riva for GroupWise. To learn how to recover a Riva for GroupWise server or a Riva server that was not enabled for DR, see
Restoring Riva from a non-DR file backup.
What is Riva Disaster Recovery
The disaster recovery (DR) feature can be enabled on the primary Riva server. Once activated, the Primary Riva server is backed up to preserve the Riva server installation files and the data sync transaction records. If the primary Riva server suffers a non-recoverable crash of the Windows system that hosts the Riva server, Riva sync can be restored from the backup.
The DR feature includes custom options keys to enable CrmID tracking. After the options have been applied, the Riva sync service appends the Riva CrmID to each Exchange item that Riva syncs with corresponding data in the CRM.
When a DR-enabled Riva polls Exchange (or Notes) and the CRM for data, Riva checks all updates (new items, modified items, and deletions) for the existence of the Riva CrmID value:
Supported email platforms
Riva disaster recovery is supported for the following Riva On-Premise servers based on email platforms:
- Riva On-Premise for Exchange that uses Riva EWS connections. Riva MAPI connections and sync policies are not supported.
- Riva On-Premise for IBM Notes.
Required Riva version
Riva On-Premise release 2.4.38 or higher is required.
Riva Disaster Recovery Scenarios and Procedures
Three scenarios are available:
These scenarios can be combined if corporate disaster restoration policy requires a minimum of two parallel recovery options:
- Scenario 1 as the primary DR solution and Scenario 3 as the alternate.
- Scenario 2 as the primary DR solution and Scenario 3 as the alternate.
Scenario 1 - Replicating a mirror snapshot of the primary Riva server virtual machine to a different data centre
In this option, a hot mirror of the primary Riva server virtual machine is replicated to an alternate data center. The advantage of this solution is that a backup of the server can be created without stopping the Riva service; and the Riva server in the alternate data center can be started with minimum effort or time lost.
To implement the hot mirror server scenario:
- Enable DR options on the primary Riva server.
- Replicate a mirror snapshot VM.
- Restore Riva on the mirror snapshot VM.
- Enable daily backups of Riva on the mirror snapshot VM.
- Rebuild the primary Riva On-Premise server VM.
Step 1 of Scenario 1
To enable DR options on the primary Riva On-Premise server:
-
In the Riva Manager application, edit each sync policy to remove any inactive user that should not be synced by Riva again.
-
In the Riva CRM Service Monitor application, ensure that all users are syncing without serious errors. Resolve any errors. If you need assistance, contact the Riva Success Team.
-
Enable the DR options.
-
In the Riva CRM Service Monitor application, ensure that all users continue to sync without serious errors for at least two sync polls before replicating a mirror snapshot VM.
Step 2 of Scenario 1
To replicate a mirror snapshot VM:
-
Use the applicable procedures to enable replicating a mirror snapshot of the primary Riva server virtual machine (VM) to a fail-over data center in a different physical geographic location.
This creates a disabled (offline) passive fail-over Riva server VM that can be provisioned in the event of a failure of the primary Riva server VM.
Important Note: It is critical to ensure that the replicated mirror snapshot VM is disabled and not running while the primary Riva server is operational.
Step 3 of Scenario 1
To restore Riva on the mirror snapshot VM if the primary Riva server VM stops functioning:
-
Ensure that the primary Riva server is not operational.
-
In the alternate data center, start the passive fail-over Riva server VM.
-
On the passive fail-over Riva server, start the Riva Manager application and the CRM Service Monitor application.
-
In the Riva Manager application, on the menu bar, select Setup. Run connection tests for the CRM connection and all email connections. If connections fail, resolve network connectivity. Close and restart the Riva Manager application, and retest connections.
-
After the connection tests pass, on the menu bar, select Policies. Enable the sync policy with the fewest target users.
-
In the CRM Service Monitor application, start the service, and monitor user sync to ensure that it is restored.
Riva remaps previously synced data and handles new data items that do not have a corresponding crmID assigned to the mail item.
-
If significant data sync errors are observed, stop the service, and contact the Riva Success Team.
If data sync appears to be normal for users, do as follows: In the Riva Manager application, on the menu bar, select Policies, and enable the remaining sync policies. Monitor data sync for those users.
Step 4 of Scenario 1
To enable daily backups of Riva on the mirror snapshot VM:
Note: The passive fail-over Riva server can serve as the primary Riva server and is already DR-enabled.
- Take immediate action to
- Replicate a new mirror snapshot of the current operational Riva server virtual machine (VM) to a different data center in a different physical geographic location to create a new passive fail-over VM, or
- Implement a daily backup of the Riva folder and files to an offsite storage service.
Step 5 of Scenario 1
To rebuild the primary Riva On-Premise server VM:
-
If the passive fail-over Riva server has been syncing users for more than 24 hours and the plan is to restore the primary Riva server in the original data center, replicate a new mirror snapshot of the current operational Riva server virtual machine (VM) to the original data center or a new replacement data center to create a new primary Riva server VM.
-
On the operating fail-over Riva server, disable the sync policies, and stop and enable the Riva sync service.
-
To restore Riva data sync on the new primary Riva server, follow the steps of To restore Riva on the mirror snapshot VM.
-
Schedule the daily replication of a mirror snapshot of the primary Riva server virtual machine (VM) to a fail-over data center.
Scenario 2 - Daily backup of the primary Riva server to a disabled passive fail-over Riva server
In this option, we recommend a timed script that
- Stops the Riva service.
- Backs up the required files directly to the passive fail-over server, by overwriting the existing files.
- Restarts the primary Riva service.
This activity would normally be scheduled during the Riva blackout period.
The advantages of this solution are that
- It is easy to facilitate and schedule.
- It is less costly than replicating a mirror to a different data center.
- It requires minimal time to restore Riva data sync operations.
To set up a daily backup of the primary Riva server to a disabled passive fail-over Riva server:
- Enable DR options on the primary Riva Server.
- Build the passive fail-over Riva server.
- Schedule a daily backup of Riva data to the passive fail-over Riva server or to offsite storage.
- Restore data sync on the passive fail-over Riva server.
- Rebuild the primary Riva server.
Step 1 of Scenario 2
To enable DR options on the primary Riva server:
-
In the Riva Manager application, edit each sync policy to remove any inactive user that should not be synced by Riva again.
-
In the Riva CRM Service Monitor application, ensure that all users are syncing without serious errors. Resolve any errors. If you need assistance, contact the Riva Success Team.
-
Enable the DR options.
-
In the Riva CRM Service Monitor application, ensure that all users continue to sync without serious errors for at least two sync polls before building the passive fail-over Riva server.
Step 2 of Scenario 2
To build the passive fail-over Riva server in an alternate physical location or data center:
On the active primary Riva server, perform these steps.
Note: The changes will be copied to the passive DR Riva server.
-
Ensure that the DR features have been properly set and that Riva has synced all of the users at least once.
-
In the Riva CRM Service Monitor application, stop the service.
-
In the Riva Manager application, disable all sync policies, and close the Riva Manager application.
-
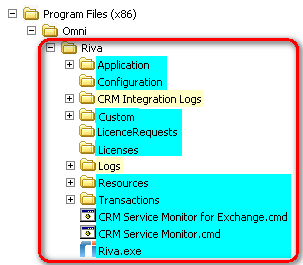
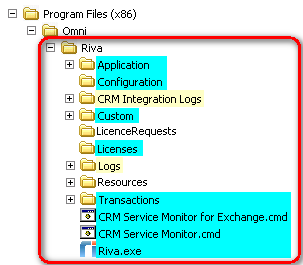
Create a RivaDR.ZIP file that contains the files and folders. The log folders are optional.
-
Copy the RivaDR.ZIP file to the Windows host of the passive DR Riva server.
-
In the Riva Manager application, enable the desired sync policies, and close the Riva Manager application.
-
In the Riva CRM Service Monitor application, start the service.
On the passive DR Riva server, perform these steps.
Note: The objective is to create a mirror copy of the primary Riva server and test connections. Do not install the Riva services.
-
Prepare a host Windows system (preferably in a different physical location from that of the primary Riva server) that meets the same system requirements as the primary Riva server.
Important Note: It is critical to ensure that the DR server system requirements are configured to be identical to those of the primary Riva server.
-
Extract the RivaDR.ZIP file to install the Riva server files. Do not install the Riva services.
-
Create desktop shortcuts for the CRM Service Monitor application and the Riva Manager application.
-
Start the Riva Manager application.
-
On the menu bar, select Setup. Double-click the CRM connection, and confirm that the DR custom options exist. Perform a connection test.
-
On the menu bar, select Setup. Double-click each Exchange or Notes connection, and perform a connection test.
-
Open Windows Services, look for Omni services, and disable all Omni windows services.
Step 3 of Scenario 2
To schedule a daily backup of Riva data to the passive fail-over Riva server or to offsite storage:
- On the primary Riva server, implement one of the following daily backup options:
- Option 1: Back up Riva files as a RIVA.ZIP or backup file set (if using backup software) to an offsite storage service.
- Option 2: Back up Riva files as a RIVA.ZIP or backup file set (if using backup software) to a folder share on the passive fail-over Riva server.
- Option 3: Back up Riva files directly to the passive fail-over Riva server, and overwrite the existing Riva files and folders.
Step 4 of Scenario 2
If you have to recover from a non-recoverable crash (loss of) the Windows system that hosts Riva, update the DR Riva server from the latest backup, install the services (if not installed), and enable sync.
To restore data sync on the passive fail-over Riva server:
Note: Steps 1 to 4 are not required if you used backup option 3.
-
If the passive Fail-over Riva server is hosted in a VM server, create a snapshot.
-
If the passive Fail-over Riva server virtual machine is off or paused, start the Windows server or VM that hosts the DR Riva server.
-
Download the latest primary Riva server backup file from offsite online data storage (if required).
-
Extract the latest primary Riva server backup file, and save and overwrite the existing Riva files and folders.
-
Start the Riva Manager application.
-
On the menu bar, select Setup. In the right pane, double-click the CRM connection, and confirm that the DR custom options have been set. Perform a connection test.
Several CRM connections (for example, Microsoft Dynamics XRM Connection) depend on the Omni SDK Connection Agent service to be installed. Start the CRM connection wizard, install the service, and close the wizard.
-
On the menu bar, select Setup. Double-click each Exchange or Notes connection, and perform a connection test.
The Notes connection depends on the Omni SDK Connection Agent service to be installed. Start the Notes connection wizard, install the service, and close the wizard.
-
On the menu bar, select Policies. Ensure that all sync policies are disabled. Edit a sync policy, and save the policy; no changes are required. Select Yes to install the Riva sync service.
If Riva does not prompt to install the service, that means that the service is already installed. Compare the version of Riva against the version of the service installed. A re-install of the service may be required. For assistance,
contact the Riva Success Team.
-
On the menu bar, select Policies. Enable the sync policy with the fewest target users.
-
In the CRM Service Monitor application, start the service, and monitor user sync to ensure that it is restored.
-
If significant data sync errors are observed, stop the service, and contact the Riva Success Team.
If data sync appears to be normal for users, do as follows: In the Riva Manager application, on the menu bar, select Policies, and enable the remaining sync policies. Monitor data sync for those users.
Step 5 of Scenario 2
To rebuild the primary Riva server, you use a copy of the operational fail-over Riva server.
Perform these steps on the operational fail-over Riva Server:
-
In the Riva CRM Service Monitor application, stop the service.
-
In the Riva Manager application, disable all sync policies, and close the Riva Manager application.
-
Create a RIVA.ZIP file that contains the files and folders. The log folders are optional.
-
Copy the RIVA.ZIP file to the Windows host for the rebuilt primary Riva server.
Note: From this point forward, this passive fail-over Riva server must remain disabled.
Perform these steps on the rebuilt primary Riva server:
Note: The objective is to re-create the primary Riva server by using the RIVA.ZIP from the recently disabled fail-over Riva server. Do not install the Riva services.
-
Prepare a host Windows system (preferably in a different physical location from the primary Riva server) that meets the same system requirements as the primary Riva server.
Important Note: It is critical to ensure that the DR server system requirements are configured to be identical to the primary Riva server system requirements.
-
Extract the RIVA.ZIP file to install the Riva server files. Do not install the Riva services.
-
Create desktop shortcuts for the CRM Service Monitor application and the Riva Manager application.
-
Start the Riva Manager application.
-
On the menu bar, select Setup. In the right pane, double-click the CRM connection, and confirm that the DR custom options have been set. Perform a connection test.
Several CRM connections (for example, Microsoft Dynamics XRM Connection) depend on the Omni SDK Connection Agent service to be installed. Start the CRM connection wizard, install the service, and close the wizard.
-
On the menu bar, select Setup. For each Exchange or Notes connection in the right pane, double-click it, and perform a connection test.
The Notes connection depends on the Omni SDK Connection Agent service to be installed. Start the Notes connection wizard, install the service, and close the wizard.
-
On the menu bar, select Policies, and ensure that all sync policies are disabled. Edit a sync policy, and save the policy; no changes are required. Select Yes to install the Riva sync service.
If Riva does not prompt to install the service, that means that the service is already installed. Compare the version of Riva against the version of the service installed. A re-install of the service may be required. For assistance,
contact the Riva Success Team.
-
On the menu bar, select Policies. Enable the sync policy with the fewest target users.
-
In the CRM Service Monitor application, start the service, and monitor user sync to ensure that it is restored.
-
If significant data sync errors are observed, stop the service, and contact the Riva Success Team.
If data sync appears to be normal for users, do as follows: In the Riva Manager application, on the menu bar, select Policies, and enable the remaining sync policies. Monitor data sync for those users.
Scenario 3 - Daily Backup of the Primary Riva Server to an Offsite Data Storage Location
This option is recommended if resources are not available for Scenarios 1 or 2. This scenario can also be implemented as a secondary DR procedure to Scenario 1 or 2. In this option, we recommend a timed script that
- Stops the Riva service.
- Backs up the required files to an off-site location.
- Restarts the Riva service.
This activity would normally be scheduled during the Riva blackout period. The advantages of this solution are that
- It is easy to facilitate.
- It offers the most flexibility to restore the Riva server to an alternate location once it has been established.
This option would require restoring the backup file set to an alternate Windows host and then starting the Riva server.
DR procedures for this scenario include:
- Enable DR Options on the primary Riva Server.
- Perform a daily backup of Riva data to offsite storage.
- Restore Riva.
Step 1 of Scenario 3
To enable the disaster recovery option on the primary Riva server:
-
In the Riva Manager application, edit each sync policy to remove any inactive user that should not be synced by Riva again.
-
In the Riva CRM Service Monitor application, ensure that all users are syncing without serious errors. Resolve any errors. If you need assistance, contact the Riva Success Team.
-
Enable the DR options.
-
In the Riva CRM Service Monitor application, ensure that all users continue to sync without serious errors for at least two sync polls before proceeding with step 2.
Step 2 of Scenario 3
To perform a daily backup of Riva data to offsite storage:
- From the primary Riva server, schedule a daily backup as a RIVA.ZIP or backup file set (if using backup software) to an offsite storage location.
Step 3 of Scenario 3
To restore Riva data sync to a Windows host server in an alternate location:
-
Prepare a host Windows system (preferably in a different physical location from the primary Riva server) that meets the same system requirements as the primary Riva server.
Important Note: It is critical to ensure that the DR server system requirements are configured to be identical to the primary Riva server system requirements.
-
Download the latest primary Riva server backup file from offsite online data storage (if required).
-
Extract the latest primary Riva server backup file, and save and overwrite the existing Riva files and folders.
-
Create desktop shortcuts for the Riva Manager application and the CRM Service Monitor for Exchange application.
-
Start the Riva Manager application.
-
On the menu bar, select Setup. In the right pane, double-click the CRM connection, and confirm that the DR custom options have been set. Perform a connection test.
Several CRM connections (for example, Microsoft Dynamics XRM Connection) depend on the Omni SDK Connection Agent service to be installed. Start the CRM connection wizard, install the service, and close the wizard.
-
On the menu bar, select Setup. For each Exchange or Notes connection, double-click it in the right pane, and perform a connection test.
The Notes connection depends on the Omni SDK Connection Agent service to be installed. Start the Notes connection wizard, install the service, and close the wizard.
-
On the menu bar, select Policies. Ensure that all sync policies are disabled. Edit a sync policy, and save the policy (no changes are required). Select Yes to install the Riva sync service.
If Riva does not prompt to install the service, that means that the service is already installed. Compare the version of Riva against the version of the service installed. A re-install of the service may be required. For assistance,
contact the Riva Success Team.
-
On the menu bar, select Policies. Enable the sync policy with the fewest target users.
-
In the CRM Service Monitor application, start the service, and monitor user sync to ensure that it is restored.
-
If significant data sync errors are observed, stop the service, and contact the Riva Success Team.
If data sync appears to be normal for users, do as follows: In the Riva Manager application, on the menu bar, select Policies, and enable the remaining sync policies. Monitor data sync for those users.
-
Configure a daily backup of the Riva files from this server to the offsite storage location.
This ensures that DR procedures are re-established.
Common Riva DR Procedures and Guidelines
These procedures and guidelines can be used in one or more of the DR scenarios identified above:
To configure the primary Riva server for disaster recovery:
-
Set the following DR custom options for the CRM connection(s):
Sync.Crm.AddCrmIdCustomField = true
Ex.AddCrmIdCustomFieldPostOp = true
Sync.Ex.LoadCrmIdPluginField = true
Sync.Crm.BlockCreatesOnItemsWithCrmIdPluginField = true
-
If the SyncForceUserExclusivity = True option key is set in the Omni.Riva.CrmAgentEx.exe.config file, modify that file so that it identifies the current primary active Riva server name (for example, "RivaFS1") and the passive DR Riva server name (for example, "RivaDR1") by adding the following additional key:
<add key="Sync.Crm.ReplacementRivaInstanceMachineId.[Source Riva server name]" value="[Target Riva server name]" />
For example:
<?xml version="1.0" encoding="utf-8"?>
<configuration>
<appSettings>
<add key="SyncForceUserExclusivity" value="True" />
<add key="Sync.Crm.ReplacementRivaInstanceMachineId.RivaFS1" value="RivaDR1" />
</appSettings>
</configuration>
-
In the Riva CRM Service Monitor, restart the service, and let Riva complete at least one full sync cycle of all syncing users.
Recommended daily backup guidelines for Riva disaster recovery
Standard backup utilities can be used to create and schedule the daily backup of the primary Riva server folder structure. We recommend the following backup strategy:
- Automatically perform a scheduled daily full backup and store it offsite.
- Schedule the backups to occur during the Riva blackout period (by default, between 11 pm and 5 am).
- Set up an automated backup sequence that
- performs a net stop on all Omni windows services,
- saves a full backup of the Riva files and folders, and
- performs a net start on all Omni windows services.
- Only the most recent three days of Riva backups need to be retained.
The backups must include these folders and optionally include these folders:
Backups should be checked daily to ensure that the backup files are valid and can be extracted.
If you are using Outlook Profile MAPI connections in Riva:
If you have created Riva Outlook Profile MAPI connections, consider exporting and storing the Outlook Profile that the Riva connection is using.
Document the Riva service settings:
Document the settings for Logon Identity and for Recovery Options.
To test the disaster recovery and data sync restoration procedures:
After the disaster recovery option has been initiated, Riva admins should document and test procedures for restoring data sync. The typical test scenario would involve:
-
On the primary Riva server, stop services, disable the Riva sync service, and shut down the host Windows system.
This simulates a crash of that server.
-
Ensure that users continue to perform normal tasks in their mailbox and CRM user account.
-
Restore the passive fail-over Riva server:
-
Scenario 1 - Activate the Mirror Snapshot Fail-over Riva server: Enable the Riva sync service, and monitor data sync. Riva should remap previously synced data and then start syncing new data.
-
Scenario 2 - Activate the Passive Fail-over Riva server: Restore the latest Riva backup into the passive Riva fail-over server. Enable the Riva sync service and sync policy or policies, and monitor data sync. Riva should remap previously synced data and then start syncing new data.
-
Scenario 3 - Build and Activate a Replacement Fail-over Riva server: Build a new Windows host system that meets the requirements. Restore the latest Riva backup onto the new Windows host system. Riva sync service, and monitor data sync. Riva should remap previously synced data and then start syncing new data.
-
After data sync has resumed and been confirmed, stop services, and disable the Riva sync service.
-
Discontinue the use of the fail-over or replacement Riva server. Ensure that the Riva sync policies are disabled and the sync service is stopped and disabled.
-
Ensure that users continue to perform normal tasks in their mailbox and CRM user account.
-
Start the Windows system that hosts the primary Riva server. Start the Riva sync service, enable the Riva sync policy or policies, and monitor data sync. Riva should remap previously synced data and start syncing new data.
-
Document any challenges with the disaster recovery and data sync restoration procedures.
-
If required, revise the procedures and schedule additional procedure tests.
Applies to
- Riva On-Premise for Exchange (EWS). Note: MAPI is not supported.
- Riva On-Premise for Notes / Domino.
