To sync Oracle Sales Cloud with your email system, the Riva connection to Oracle Sales Cloud requires the credentials of an admin account that can impersonate into the target CRM user accounts.
To create, test, and edit an Oracle Sales Cloud connection:
- Create an Oracle Sales Cloud connection.
- Test the connection.
- Edit the connection.
Step 1: Create an Oracle Sales Cloud CRM Connection
-
Ensure that you have followed the procedure Prepare Oracle Sales Cloud for Riva.
-
Create or modify the RivaApp.exe.config and Omni.Riva.CrmAgentEx.exe.config (Exchange or Notes) or Omni.Riva.CrmAgent.exe.config (GroupWise) app.setting files, and include the following line to enable the Oracle Sales Cloud connection:
<add key="OracleFusionConnection.Enabled" value="true"/>
For instructions, see Create or edit an App.Setting file to enable advanced options.
-
Close and restart the Riva Manager application. On the menu bar, select Setup.
-
In the left pane, select CRM: Oracle Sales Cloud to open the connection wizard.
Note: in older versions of Riva, you may need to select "CRM: Oracle Fusion".
-
On the Welcome page, select Next.
-
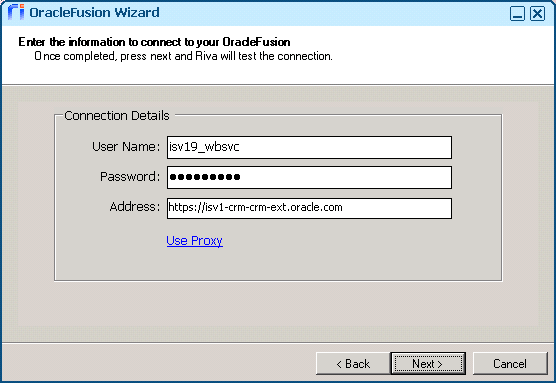
Provide the required information:
-
User Name: This must be an admin-level Oracle Sales Cloud user account that Riva will use to connect to the CRM system and impersonate into the target user accounts.
-
Password: Provide the password for the admin account.
-
Address: Provide the URL link to the Oracle Sales Cloud login screen for your CRM instance.
-
Use proxy: Specify a unique http or https proxy setting that will apply to this CRM connection.
-
Select Next.
-
(Riva 2.4.47 or higher.) On the Additional Connection Options page, optionally select the check box Is the connection user dedicated for synchronization: [user name]. For guidance, see Is the connection user dedicated for synchronization.
-
On the Successful Connection page, select Finish.
The Riva Manager application creates an Oracle Sales Cloud connection object.
Step 2: Test the Oracle Sales Cloud CRM Connection
To test the connection to confirm that user impersonation is working:
-
In the Riva Manager application, on the menu bar, select Setup, and double-click the Oracle Sales Cloud connection object to open the connection edit window.
-
Select the Connection Test tab, and select Run Test >>.
The CRM connection account is tested to ensure that the credentials are correct.
-
In the Test succeeded message box, select OK.
-
In the User E-mail field, enter the email address for a CRM target user, and select Run Test >>.
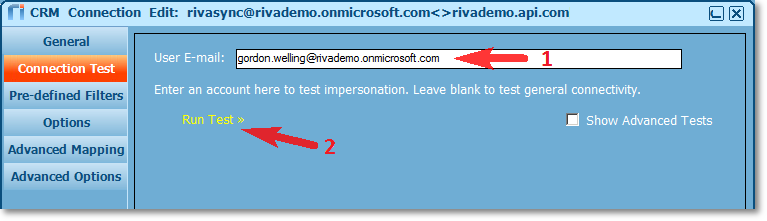
The system tests that the CRM connection account is able to impersonate into the CRM target user account.
-
In the Test succeeded message box, select OK.
-
In the CRM Connection Edit window, select Cancel to close the window.
Step 3: Edit the Oracle Sales Cloud Connection
-
In the Riva Manager application, on the menu bar, select Setup.
-
In the right pane, double-click the Oracle Sales Cloud connection to open the CRM Connection Edit window.
-
(Riva 2.4.46 or higher is required for this step.) Optional: On the General page, assign a user-friendly Display Name.
-
Save the connection.
