Customers report that after upgrading GroupWise 7 or 8 to GroupWise 2012, existing Riva applications including Riva for CRM Integration failed. Log files indicated issues with the existing GroupWise trusted application key assigned to the Riva connection to GroupWise.
Symptoms
Log files show errors similar to:
2012-02-20 14:06:51,606 ERROR [5428] [(null)] [CL: GwSoapException; M:ctor] [53364] Invalid key for trusted application
Omni.Connection.Gw.GwSoap.xc783af63b0e311fd: [53364] Invalid key for trusted application
Causes
The current Riva release 2.4.26 suffers from the following issues:
- Riva connection to GroupWise 2012 cannot use trusted keys created by the Riva create trusted key wizard for GroupWise 7 or 8.
- Attempts to manually generate a replacement key from an existing Riva connection to a GroupWise post office fail.
Resolution
Existing Riva connections to GroupWise 2012 can be modified to use a trusted application key that is created using ConsoleOne with GroupWise 12 snap-ins.
The basic steps are:
- Create a trusted application key using ConsoleOne.
- Assign the new trusted key to existing Riva connections to GroupWise.
- Test the GroupWise post office connections to confirm that the trusted key works.
Create a Trusted Application Key using ConsoleOne
Steps to create a new trusted application key using ConsoleOne and apply that key to Riva GroupWise connections are:
-
Before proceeding, STOP all “Omni” services in the Windows services applet.
-
Make a backup copy of the \Riva\Configuration folder.
-
In ConsoleOne with GroupWise 12 snap-ins, click on the GroupWise system object in the tree view pane.
-
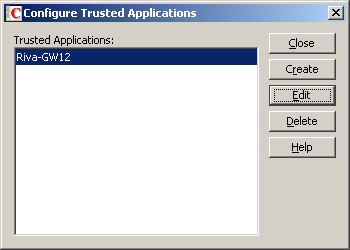
On the main menu, select “Tools” > “GroupWise System Operations” > “Trusted Applications …”.
-
In the “Configure Trusted Applications” window, click “Create”.
-
in the “Edit Trusted Application” window, complete the form.
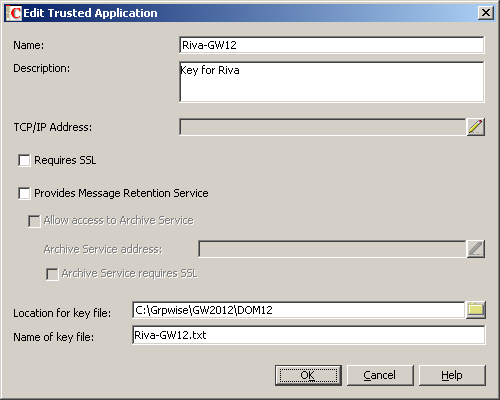
Make sure you specify a path and name for the key file as you will need to edit it.
-
Click “OK”. The “Configure Trusted Applications” window should display your new key.
-
Edit the key file file you just created …
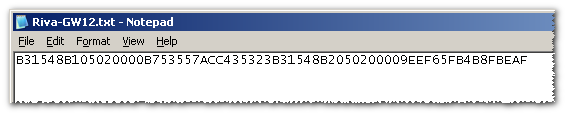
to show the key name and key value:

Assign GroupWise 2012 Key to Riva Connections to GroupWise
The next steps involve re-assigning the the new GroupWise 2012 key you generated using ConsoleOne:
-
In the Riva Manager application, under “Setup”, double-click the primary domain connection object.
-
In the “Connection Edit” window, under the “General” tab, provide the key name and key value from the text file created in step 8 above.
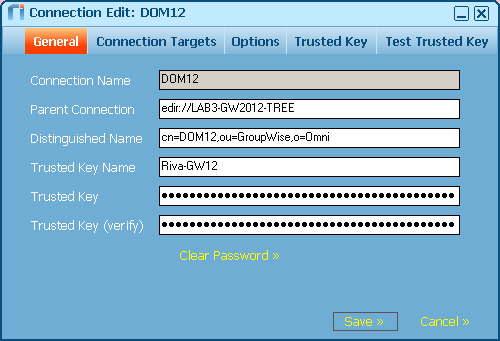
Click “Save >”.
-
Double-click the primary domain connection object and select the “Trusted Key” tab.
-
Use CTRL + click to select the post office connections and click the “Assign” button.
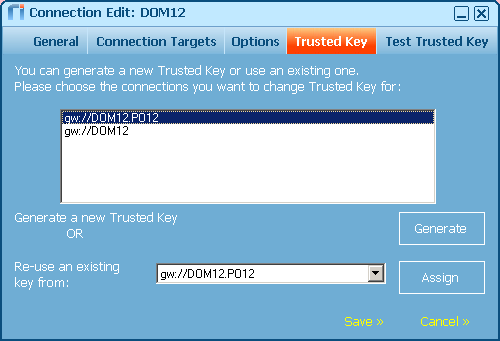
-
Click “OK” to close the “Success” window.
-
Click “Save” to save the assignments and close the Connection Edit window.
Test the Trusted Key in the Post Office Connections
You can now test the Post Office objects for the new trusted application key, and the tests should pass.
-
In the Riva Manager application, under “Setup”, double-clock a post office connection.
-
In the “Connection Edit” window, select the “Test Trusted Key” tab. The name of the new trusted key should be displayed.
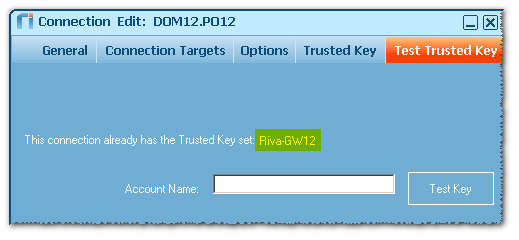
-
Enter a GroupWise user name from that post office and click “Test Key”.
-
Click “OK” to close the “Success” window.
-
Click “Cancel” to close the “Connection Edit” window.
Applies to
- Riva 2.4.26+
- Riva for GroupWise CRM Integration
- Riva for GroupWise Policies & Reports
- Riva for GroupWise Managed Applications
- Riva for GroupWise Identity Integration Server
