|
Article ID: 581
Last updated: 16 Sep, 2019
Riva synchronizes data between Sage CRM and several supported email systems. This article describes how to prepare a Sage CRM connection account and the Riva server to support a Riva impersonation connection to Sage CRM. The following versions of Sage CRM are supported:
To prepare Sage CRM for the Riva sync:
Step 1: Confirm Access to Sage CRMFrom the Windows system that hosts the Riva server, confirm that you can log in to the Sage CRM company account by using an admin account and a normal user account. Step 2: Prepare a Riva Connection Account in Sage CRMThe Riva connection user for the target organization must be configured to use the credentials of an administrator-level account. For Sage CRM On-Demand, choose one of the following options:
Enable Web ServicesThe "administrator" account provides the privileges necessary to impersonate each syncing user and make the necessary changes to records in the CRM for each syncing user. This connection account must be enabled for web services in Sage CRM. Assign the default territoryNew records created by Riva in Sage CRM will be defaulted to the home territory of the Riva connection account. To control the default territory of new records, set the home territory of the Riva connection account user to the desired default territory. To sync users from multiple territories, configure a separate Riva connection account for each default territory. Step 3: Prepare the Target User Accounts in Sage CRMThe primary email address for each target CRM user account must match the primary SMTP email address of the corresponding email system account. For example, if the Sage CRM email address for Ian Sample is iansample@mycompany.com, then the Exchange SMTP Reply-to email address value for the corresponding email account must also be iansample@mycompany.com. The Riva connection to Sage CRM uses the Enterprise impersonation model: When Riva creates new items in the CRM, it assigns ownership to the syncing user. Since Riva is now acting on behalf of the syncing user, all audit fields in the CRM record the syncing user as the user that created and modified the item. Riva uses the permissions of the CRM syncing user to create and modify items and data in the CRM. If the access permissions defined for the syncing user are not sufficient, the Riva server displays Access denied errors for each data change it tries to synchronize. Ensure that for each syncing user, permissions are assigned to create, modify, delete, import, and export datatypes that Riva will attempt to sync for that user. Step 4: Gather Information Required for Creating a Sage CRM ConnectionGather the following information that will be required when you create a Riva connection to the Sage CRM system:
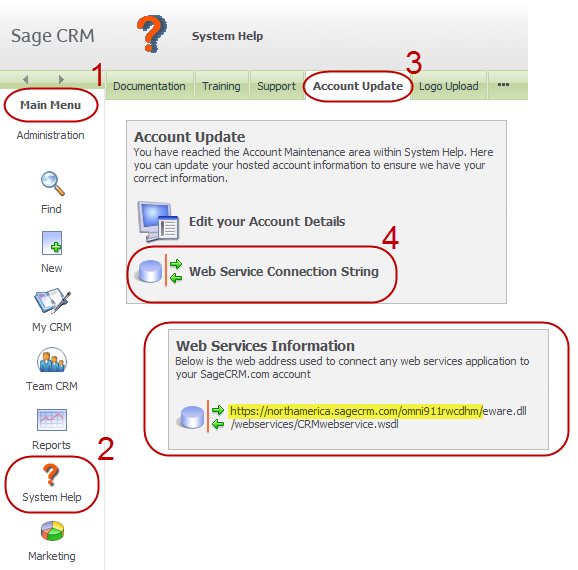
Step 5: Find the Sage CRM Web Service URLTo locate the proper Web Service URL for your organization, log in to your Sage CRM instance or ask your Sage CRM administrator. On SageCRM.com, you can find the URL to view the WSDL file by navigating to Main Menu | System Help | Account Update | Web Service Connection String The URL will look something like this: https://[region].sagecrm.com/[COMPANYID]/eware.dll/webservices/CRMwebservice.wsdl
Article ID: 581
Last updated: 16 Sep, 2019
Revision: 6
Views: 5959
|

