Riva supports data synchronization for Dynamics CRM user accounts. This article describes how to prepare a Riva connection account to support a Riva impersonation connection to Dynamics CRM.
To prepare Microsoft Dynamics CRM for Riva:
- Finish preparing the host Windows system.
- Prepare the Riva connection user in Dynamics CRM.
- Prepare the target users in Dynamics CRM.
- Meet the firewall requirements.
- Gather information required for creating a Dynamics CRM connection.
Step 1: Finish Preparing the Host Windows System
The Riva server can be installed on any Windows system that meets the system requirements. Confirm that you can log in with the Riva connection user account by using an admin account and a normal user account.
The latest connection between Riva On-Premise 2.4.42 or higher and the Microsoft Dynamics CRM 2011 or higher versions is dependent on .NET 4.5.2.
Step 2: Prepare the Riva Connection User in Dynamics CRM
The Riva connection user is a CRM service account that will be used in the Riva Manager application when creating the CRM connection object. The credentials of the Riva connection user are saved in the CRM connection and are used to provide Riva controlled access to the CRM.
The requirements for the Riva connection user for Dynamics CRM vary depending on the target Dynamics CRM system:
- Dynamics CRM XRM - 2016 / 2015 / 2013 / 2011 (On-Premises): Microsoft Dynamics CRM uses integrated Windows authentication to authenticate internal users. Integrated Windows authentication implements pass-through authentication functionality so that Microsoft Dynamics CRM users are not prompted to log on to Microsoft Dynamics CRM after their initial sign on to the Active Directory network.
- Dynamics CRM XRM - 2016 / 2015 / 2013 / 2011 (IFD): Microsoft Dynamics CRM 2011 configured for Internet access (IFD or Internet Facing Deployment) uses claims authentication to verify credentials of external users. When configured for IFD, integrated Windows authentication must remain in place for internal users.
- Dynamics CRM (Online): Microsoft Dynamics CRM 2011 configured for Internet access (IFD or Internet Facing Deployment) uses claims authentication to verify credentials of external users. When configured for IFD, integrated Windows authentication must remain in place for internal users.
ALL versions of Dynamics: The connection account must have permissions to query the system user in order to map the mailbox email address to the Dynamics target user that will be synchronized. Full administrator level access is recommended.
Dynamics CRM Online (Office 365 hosted)
The Riva connection is based on using Office 365 authentication. The Riva connection user connects to the CRM using the credentials of a CRM user account.
To prepare the user:
-
Create a CRM user (for example, rivasvc), and add it to the 'Delegate' role, which will grant the prvActOnBehalfOfAnotherUser privilege that is necessary to impersonate another CRM user. See Impersonate another user (Microsoft Technet). Another option is to use a CRM service user that is configured as a CRM administrator.
Note: If a password change policy forces credentials to expire, ensure that the credentials are updated in Riva at the same time.
-
Because Riva will connect using Windows Live Passport authentication, use the Windows Live (Passport) user name of the CRM connection account provided by the hosting provider.
Dynamics CRM 2016 / 2015 / 2013 / 2011 (On-Premises)
For Dynamics CRM configured with the internal On-Premises (or local) mode, the Riva connection is based on using Windows Integrated authentication. The Riva connection user connects to the CRM by using the credentials of a designated AD user account.
To prepare the CRM service account:
-
Create a normal AD user (for example, rivasvc) in the same AD domain as Dynamics CRM is installed.
Note: If a password change policy forces credentials to expire, ensure that the credentials are updated in Riva at the same time.
-
Add this AD user to the PrivUserGroup of the "Organization" for each Dynamics CRM instance installed in that AD domain.
Note: The Riva connection user does not need to be assigned to a CRM Role. The permissions inherited through the PrivUserGroup membership provide the necessary access to facilitate account delegation between the connection account and the target CRM accounts.
-
Because Riva will connect using Windows Integrated authentication against the AD account, use the UPN or NTLM credentials for that account in the Riva connection.
On-Premises IIS Security / Authentication Modes
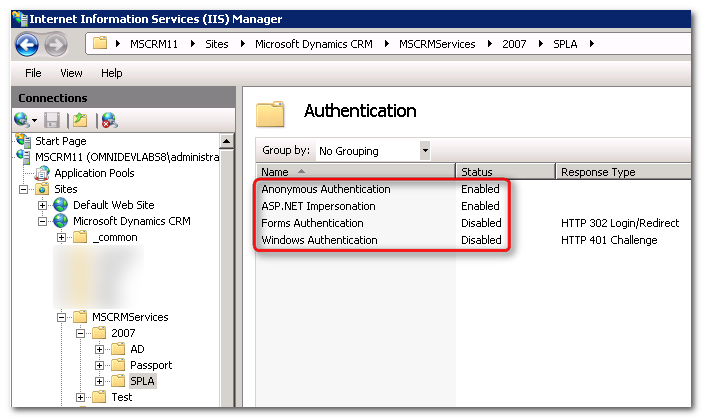
Ensure that the following settings are used on the IIS virtual directory: /MSCRMServices/2007/SPLA/
- Enable Basic and/or Windows Integrated authentication modes.
- Exclude the IIS virtual directory from third-party, multi-factor, or gated authentication methods.
Dynamics CRM 2011 or higher (IFD - Internet facing Deployment)
The Riva connection is based on Claims authentication. The Riva connection user connects to the CRM by using the credentials of a designated (CRM) user account.
To prepare the account:
-
Create a CRM user (for example, rivasvc), and add it to the Delegate role, which will grant the prvActOnBehalfOfAnotherUser privilege that is necessary to impersonate another CRM user. See Impersonate another user (Microsoft Technet). Another option is to use a CRM service user that is configured as a CRM administrator.
Note: If a password change policy forces credentials to expire, ensure that the credentials are updated in Riva at the same time.
On-Premises IIS Security / Authentication Modes
In IIS Manager, navigate to
Sites >
Microsoft Dynamics CRM >
MSCRMServices >
2007 >
SLPA, double-click
Authentication, and set the permissions as follows:

Step 3: Prepare the Target Users in Dynamics CRM
For every target CRM user, verify the following:
- Email address matching. The primary email address for each target CRM user must match the primary SMTP Reply-to email address of the corresponding email account. For example, if the Dynamics CRM email address for Ian Sample is iansample@mycompany.com, then the Exchange SMTP Reply-to email address value for the corresponding email account must also be iansample@mycompany.com.
- Security Role permissions. The Riva connection user uses the permissions assigned to the target user's security role. Security Role permissions must be set to permit the user to create, modify, and delete items. See Microsoft Dynamics CRM: Security role permissions.
- User email access settings for inbound email are set to none. See Microsoft Dynamics CRM: Access is Denied error.
The Riva connection to Microsoft Dynamics CRM uses the Enterprise Impersonation Model: When Riva creates new items in the CRM, it assigns ownership to the "target user". Because Riva is now acting on behalf of the target user, all audit fields in the CRM record the target user as the user that created and modified the item. Riva uses the permissions of the CRM target user to create and modify items and data in the CRM.
If the access permissions defined for the target user are not sufficient, the Riva server displays prv access denied errors for every data change it tries to synchronize. Ensure that for each target user, permissions are assigned to create, modify, delete, import, and export datatypes that Riva will attempt to sync for that user.
Step 4: Meet the Firewall Requirements
-
Dynamics CRM (On-Premises): The Riva connection to Dynamics CRM uses SOAP through HTTP and HTTPS to the base URL for the CRM portal as provided by the Dynamics CRM server. Internal firewalls must support Windows Integration authentication and SOAP on designated ports.
-
Dynamics CRM (Hosted): The Riva connection to Dynamics CRM uses SOAP through HTTP and HTTPS to the base URL for the CRM portal as provided by the Dynamics CRM server. Corporate firewalls must support Windows Claims based authentication and SOAP on ports 80/443 plus whichever SSL ports are defined for the Claims based authentication provider. Default: 444. Refer to AD FS 2.0 Manager.
-
Dynamics CRM Online: The Riva connection for Dynamics CRM Online uses Windows Office 365 authentication and SOAP through HTTPS to the base URL for the CRM portal as provided by the Dynamics CRM Online. The Dynamics CRM Online requires connections to different online services depending on the location of the hosted CRM service. For more information, see Microsoft Dynamics CRM online connection URL and Microsoft Dynamics CRM Online: Connection errors explained. Access through corporate firewalls must be enabled to permit SOAP on TCP port 443 between the Riva CRM host server and the Dynamics CRM Online server(s).
Step 5: Gather Information Required for Creating a Dynamics CRM Connection
Gather the information that will be required when you create the Riva connection to the Dynamics CRM system.
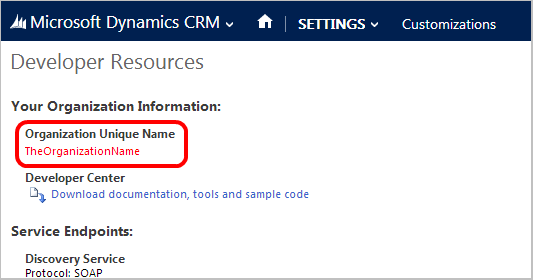
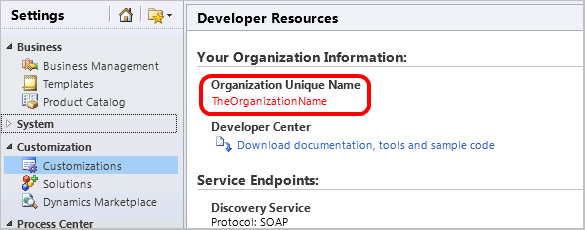
The following information will be required for creating a Microsoft Dynamics CRM 2011+ connection:


