Riva CRM Integration - Documentation and Knowledge Base

Create and Configure OAuth App in Azure

Article ID: 1718
Last updated: 27 Apr, 2022

(Riva 2.4.45 or higher.) When creating an OAuth connection to Office 365, follow these procedures in Microsoft Azure:

  1. Find the Directory ID.
  2. Create an App Registration.
  3. Grant Office 365 Exchange Online Permissions to the new App Registration.
  4. Limit the scope of mailboxes that the Riva app has access to
  5. Create the Connection in Riva.

Step a: Find the Directory ID

Applies to:

To find the Directory ID:

  1. In the Microsoft Azure Portal for your organization, navigate to Azure Active Directory and then to Properties.

  2. On the Properties page, locate the Directory ID, and copy it.

    It will be used as the Tenant ID in the connection.

Step b: Create an App Registration for an OAuth Connection

Applies to:

To create an App Registration for the connection:

  1. In the Microsoft Azure Portal for your organization, navigate to More services.

  2. In the All services search field, search for App registrations, and select App Registrations.

  3. On the App registrations page that appears, select + New registration.

  4. On the Register an application page that appears,


    set the following:

    • Name: Enter a name that is unique among all the other application registrations in your organization's Azure portal.

    • Supported account types: Use the default option, Accounts in this organizational directory only (Single tenant).

    • Redirect URL (optional):

      • In the drop-down list, select Web.

      • In the text box, enter a Redirect URL that is unique among all the other application registrations in your organization's Azure portal.

        Recommended: The Redirect URL should start with “https://”, without the quotation marks, but "http://" is also supported.

  5. At the bottom of the page, select Register.

    Result: An App Registration and its Application ID are created.

  6. Locate the Application (client) ID, and copy it.

    Note: It will be used as the Application ID in the connection.

  7. For Office 365 connections, remain in this window for the next procedure.

Step c: Grant Office 365 Exchange Online Permissions to the New App Registration

Applies to:

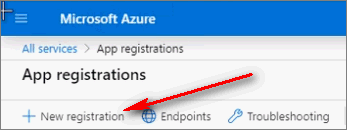
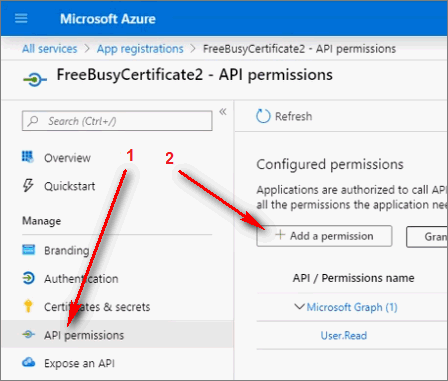
To grant Office 365 Exchange Online permissions to the new Application Registration:

  1. On the leftmost pane, select API Permissions. On the Configured permissions page that appears, select Add a permission.

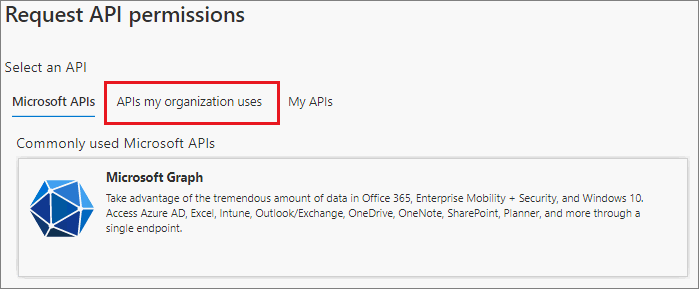
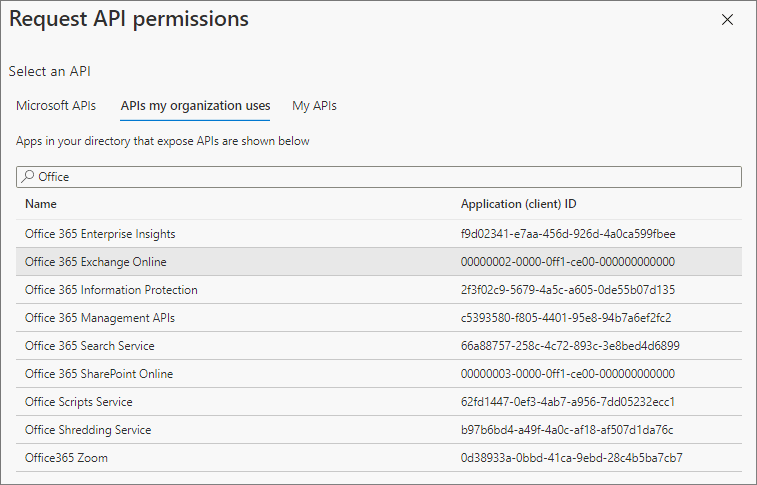
  2. On the Request API permissions pane that appears to the right, select APIs my organization uses.

  3. In the search field, enter Office, and select Office 365 Exchange Online.

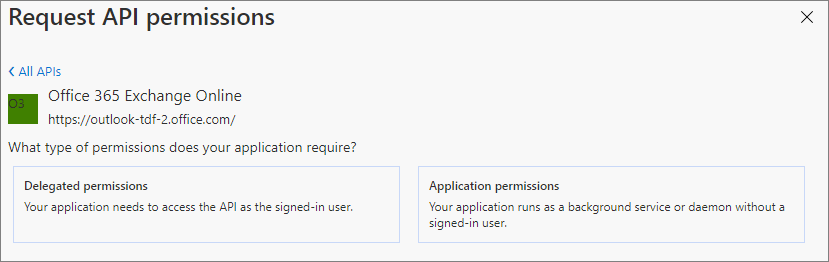
  4. Select the required type of permissions:

    • For a certificate-based connection:

      1. Select Application Permissions.

      2. Under Select permissions, expand Other permissions.

      3. Select the check box to the left of full_access_as_app and Use Exchange Web Services with full access to all mailboxes.

      4. At the bottom of the pane, select Add permissions.

    • For a client secret-based connection:

      1. Select Delegated Permissions.

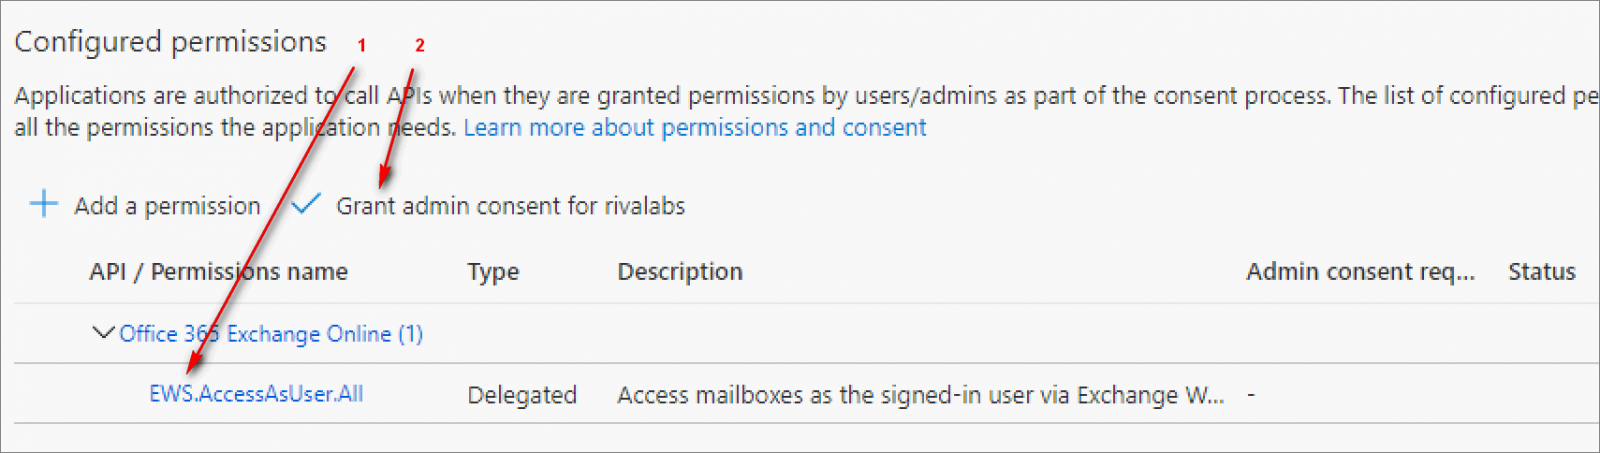
      2. Under Select permissions, expand EWS.

      3. Select the check box to the left of EWS.AccessAsUser.All and Access mailboxes as the signed-in user via Exchange Web Services.

      4. At the bottom of the pane, select Add permissions.

    Result: The rightmost pane disappears. The Configured permissions page appears and displays the item that you added permissions to.

  5. Select the app that you added permissions to, and then select Grant admin consent.

    For an example, the screen shot displays a delegated permission.

    Note: The right pane, Request API permissions, reappears.

  6. On the Office 365 login window that appears, log in as the same user as when you logged in to the Azure portal.

    Result: You are brought back to the right pane, Request API permissions.

  7. Close the right pane.

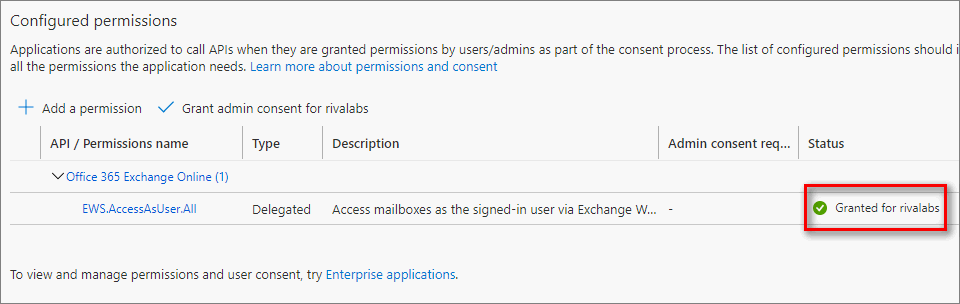
    Result: The Status column now displays "Granted for ...".

Step d: Limit the scope of mailboxes that the Riva app has access to

Depending on which use case applies to your organization, you may or may not need to add (assign) the users who will be using OAuth in the Riva connection to Office 365.

Use case Description Action to Take
#1 Impersonation is used - permissions are granted to a service account that is configured to have impersonation access to other mailboxes. Procedure to configure Impersonation.
#2 Impersonation is not used — permissions are granted on an application level and the application is limited to access only a subset of user mailboxes. Procedure to limit application access to specific mailboxes.

For use case #2.
Organizations can limit access to mailboxes for all users. 

  1. Follow instructions from https://docs.microsoft.com/en-us/graph/auth-limit-mailbox-access to limit access to all users and provide access to some users to the application. 
    1. Recommendation: Add the subset of users in a security group in the Azure Application and add it to the -PolicyScopeGroupId arguments. 
    2. Note: Changes to application access policies can take longer than 1 hour to take effect, even when Test-ApplicationAccessPolicy shows positive results.

Step e: Create the Connection in Riva

Do one of the following:

Use case Description Action to Take
#1 Impersonation is used - permissions are granted to a service account that is configured to have impersonation access to other mailboxes. Create a client secret-based Office 365 OAuth connection: In Riva, enter the OAuth client secret-based connection details.
#2 Impersonation is not used — permissions are granted on an application level and the application is limited to access only a subset of user mailboxes. Create a certificate-based OAuth connection to Office 365: In Riva, enter the OAuth certificate-based connection details

This article was:   Helpful | Not helpful
Report an issue
Article ID: 1718
Last updated: 27 Apr, 2022
Revision: 32
Views: 5082
Comments: 0