Riva CRM Integration - Documentation and Knowledge Base

Create and Test a Certificate-Based Office 365 OAuth Connection

Article ID: 1660
Last updated: 26 Apr, 2022

(Riva 2.4.45 or higher.)

To create and test an OAuth Certificate-based connection to Office 365:

  1. Ensure that you have prepared Office 365 for a Riva EWS connection.
  2. Generate a certificate.
  3. In Microsoft Azure, create and configure an Application Registration.
  4. In the Riva Manager application, enter the connection details.
  5. In Azure, add the Key Identifier to the Azure manifest.
  6. In the Riva Manager application, finish creating the connection.
  7. Test the connection.

Step 1: Ensure That You Have Prepared Office 365

Step 2: Generate a Certificate

Certificate requirement

A self-signed certificate is sufficient and recommended for this type of connection, unless your organization has a policy that bans the use of such certificates. (For example, your organization might believe that using self-signed certificates may lead to complacency and using many of them may be more expensive than using signed certificates. For more information, see The hidden costs of self-signed SSL certificates.)

However, if self-signed certificates are used judiciously, they are sufficient when an organization controls both ends of the connection, knows that both ends are secure, controls the connection, and knows that it is secure. For a Riva On-Premise connection to Office 365, that is the case.

  • Riva On-Premise is installed on your secure premises and protected from attacks.
  • Your organization is securely connected to Office 365.
  • The connection between Riva On-Premise and your Office 365 subscription relies on an Application Registration created in the Microsoft Azure portal for your organization.
     

Riva On-Premise and your Office 365 subscription are not strangers that need to establish trust through a certificate signed by a trusted third party: both ends of the connection are under your control and secure, and your organization can securely configure the connection; therefore, a self-signed certificate is sufficient for the connection.

Generating a certificate on Windows Server 2016

The Microsoft PowerShell New-SelfSignedCertificate cmdlet can be used on Windows Server 2016 to generate a self-signed certificate for the Riva connection to Office 365.

Microsoft documentation mentions that the cmdlet creates a self-signed certificate "for testing purposes". The real issue is not whether a self-signed certificate could be used for testing or production; it is whether the connection and both ends of the connection are securely under your control. As demonstrated in the Certificate requirement section, a self-signed certificate for a Riva On-Premise connection with Office 365 is secure and sufficient, and in this case, Microsoft's restriction "for testing purposes" does not apply.

We recommend generating, at a minimum, a 2048-bit certificate, based on the SHA256 hash algorithm. The following command is coded to do so.
 

To generate a certificate with New-SelfSignedCertificate:

  1. In PowerShell, log in as an administrator.

  2. Enter the following command, replacing {Certificate Name} with the name you want, for example RivaSyncOAuth. Be sure to use double quotation marks (") before and after the name.

    New-SelfSignedCertificate -Subject "{Certificate Name}" -CertStoreLocation "Cert:\LocalMachine" -KeyExportPolicy Exportable -KeySpec Signature -HashAlgorithm sha256 -KeyLength 2048

  3. Take note of the Certificate Name and Store Location. Those values will be used in the Riva OAuth connection to Office 365.

  4. Close Powershell.

Generating a certificate on Windows Server 2012

On Windows Server 2012, the Microsoft PowerShell New-SelfSignedCertificate cmdlet cannot be used to generate a self-signed certificate for the Riva OAuth connection to Office 365. Some of the required options are not available for the cmdlet on Windows Server 2012.

MakeCert can be used to generate the certificate.

Microsoft's webpage Certificate creation tool (Makecert.exe) mentions that MakeCert creates a self-signed certificate "for testing purposes". The real issue is not whether a self-signed certificate could be used for testing or production; it is whether the connection and both ends of the connection are securely under your control. As demonstrated in the Certificate requirement section, a self-signed certificate for a Riva On-Premise connection with Office 365 is secure and sufficient, and in this case, Microsoft's restriction "for testing purposes" does not apply.

  • For an important caution and more information, see Certificate creation tool (Makecert.exe).
  • We recommend generating, at a minimum, a 2048-bit certificate, based on the SHA256 hash algorithm. The following command is coded to do so.

To generate a certificate with MakeCert:

  • On the command line, issue the following command, replacing {Certificate Name} with the name you want, for example RivaSyncOAuth. Be sure to use double quotation marks (") before CN= and after the name.

    makecert -r -pe -n "CN={Certificate Name}" -ss my -sr LocalMachine -sky Signature -len 2048 -a sha256

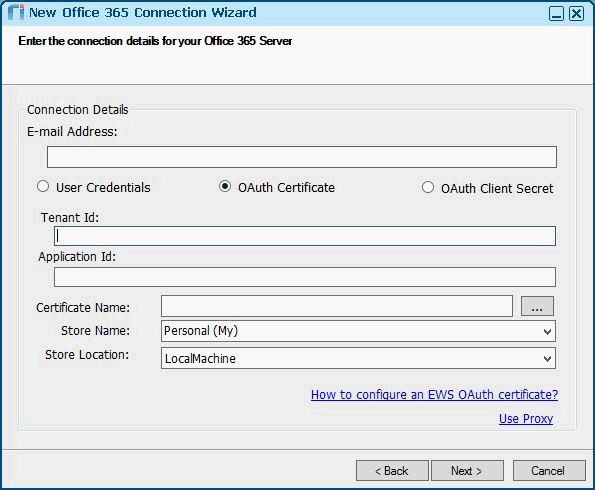
The command generates a certificate with the default validity period: from the day the certificate is generated until and including Dec. 31, 2039 11:59:59 GMT. To specify different dates, use the -b and -e extended options. For more information, see https://msdn.microsoft.com/en-us/library/bfsktky3(vs.80).aspx#Extended%20Options.

Take note of the Certificate Name, Store Name, and Store Location. Those values will be used in the Riva OAuth connection to Office 365.

Step 3: In Azure, Create and Configure an Application Registration

Step 4: In Riva, Enter the OAuth Certificate-Based Connection Details

  1. In the Riva Manager application, on the menu bar, select Setup.

  2. In the left pane, under Connection Wizards, select Microsoft Office 365.

  3. On the wizard's Welcome page, select Next.

  4. On the Connection Details page that appears, select OAuth Certificate.

  5. Enter the connection details required by the OAuth Certificate-based connection.

    • E-mail Address: The primary email address for the Riva connection account.

      • Note: This can be for any users that have been granted access during set-up. Changes to application access policies can take longer than 1 hour to take effect, even when Test-ApplicationAccessPolicy shows positive results.

    • Tenant ID: The Directory ID obtained from Azure.

    • Application ID: The ID of the Azure Application Registration that was created for the connection.

    • Store Name: The name of the Certificate Store that contains the certificate used by the connection for OAuth authentication into Office 365.

    • Store Location: The default value is LocalMachine. This is because the Riva Sync Service is installed by default to execute as "Local System", which does not have access to the CurrentUser store. In order to use the CurrentUser store, the "Log On As" of the Windows Service must be configured to have access to the certificate. At a minimum, both the "Log On As" service user and the user managing Riva would need to have the certificate installed in the CurrentUser store in order to manage Riva. This additional complexity is error-prone and effectively requires that all users that access the server must use the same user identity to manage Riva.

    • Certificate Name:

      • The name of the certificate that is used by the connection for OAuth authentication into Office 365.

      • Select [...]. In the Windows Security window that appears, select the certificate name.

    • Use Proxy: Required only if you need to deploy proxy services. For more information, see Configure "Use Proxy" settings in email connections.
       

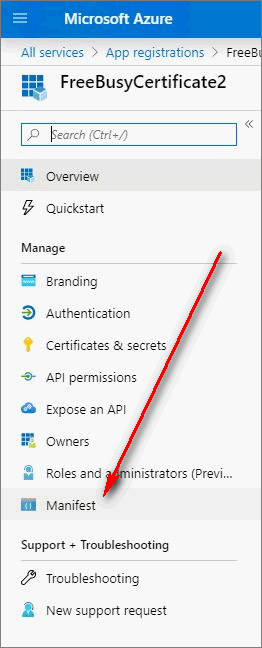
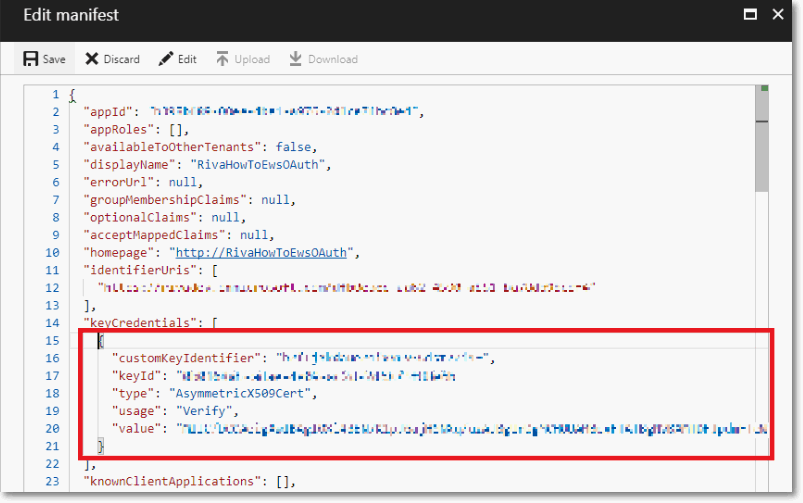
Step 5: Create the Key Identifier and Add it to the Azure OAuth Configuration

  1. In the Office 365 Connection wizard, on the Connection Details page, select Next.

    The wizard generates the Key Identifier and displays it in the Key Identifier window.

  2. In the Key Identifier window, select Copy Text.

    The Key Identifier (also known as the manifest value) is copied to the clipboard.

    A message box appears.
     

    Warning: Do NOT select ok yet. Wait until instructed to do so.

  3. In Azure, add the Key Identifier to the Azure OAuth configuration as follows:

    1. In the Microsoft Azure Portal for your organization, navigate to More services and then to App registrations.

    2. In the App Registrations pane, select the App registration that was created.

    3. In the application pane, on the left side menu, select Manifest.

    4. On the Edit manifest page that appears, paste the Key Identifier information into the KeyCredentials section.

    5. Save the manifest.
       

Note: The Azure Application Registration uses the X509 self-signed certificate as a secret key, which basically functions as a complex password.

Step 6: In Riva, Finish Creating the Connection

  1. In the Riva Manager application, in the Key Identifier message box, select OK.

    The system creates the connection.

  2. If the Office 365 connection has been successfully created, select Finish. If not, contact the Riva Success Team.

Step 7: Test the Connection

For instructions, see Testing the Office 365 connection.

This article was:   Helpful | Not helpful
Report an issue
Article ID: 1660
Last updated: 26 Apr, 2022
Revision: 33
Views: 6470
Comments: 0