Applies to Riva 2.4.47 or higher for Office 365 and Exchange.
The Manage Master Category List window is where it is possible to control the sync of custom categories to the Master Category List of all synced users:
Other contents:
Access the Manage Master Category List Window
To open the Manage Master Category List window:
-
In the Riva Manager application, on the menu bar, select Policies.
-
In the right pane, double-click the policy to edit it.
-
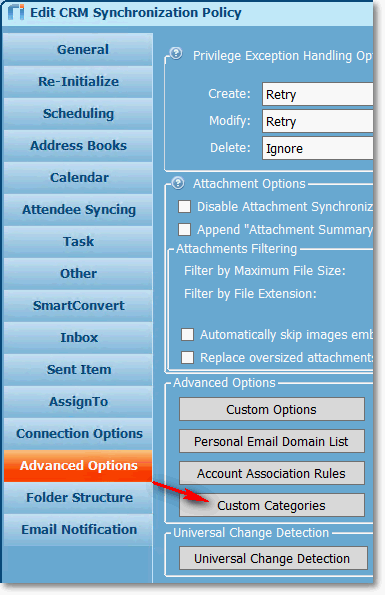
In the policy, select the Advanced Options tab. In the right pane, select Custom Categories.
Result: In the Manage Master Category List window that appears, it is possible to
Add, Edit, Remove, or Restore Custom Categories
In the Manage Master Category List window, it is possible to control the sync of custom categories to the Master Category List of all synced users:
To add a category to the Master Category List:
-
Access the Manage Master Category List window.
-
To the right of the list box, select Add New.
-
Near the bottom of the window, enter the new category's Name and Color.
-
Select OK.
Result: The category is added to the Master Category List the next time the sync updates the Master Category List.
To edit the colour of a category and update it to the Master Category List:
-
Access the Manage Master Category List window.
-
In the list box, select the category.
-
Near the bottom of the window, edit the Color.
Tip: In this version of Riva, do not edit the Name. Instead, add a category with the new name, and remove the category that has the old name. — If you edit the Name, a new category would be created and added to the Master Category List the next time the sync updates the Master Category List. The category with the old name would be retained in the Master Category List, but would not be visible in the Manage Master Category List window. To use Riva to delete the old category, you would have to re-add it in the Manage window and flag it for removal.
-
Select OK.
Result: If only the colour is edited and the Allow users to change color check box is not selected, the category is updated on the Master Category List the next time the sync updates the Master Category List.
To remove a category from the Master Category List of the synced users:
-
Access the Manage Master Category List window.
-
In the list box, select the category.
-
Near the bottom of the window, select the Flag for removal check box.
Result: In the list box, in the Remove column, the word Yes appears in the category's row.
-
Select OK.
Results:
To restore a category from the Manage window to the Master Category List of the synced users:
Note: Restoring a category to the Master Category List after removing it can be done only if the category has not been deleted from the Manage window.
-
Access the Manage Master Category List window.
-
In the list box, select the category.
-
Near the bottom of the window, clear the Flag for removal check box.
Result: In the list box, in the Remove column, the word No appears in the category's row.
-
Select OK.
Result: The category is restored to the Master Category List the next time the sync updates the Master Category List.
Allow Users to Change the Color of the Riva-Synced Custom Categories
-
Access the Manage Master Category List window.
-
Under the list box, select the Allow users to change color check box.
-
Select OK.
Result: The colours of Riva-synced custom categories are no longer synced to the Master Category List of synced users. When those users change a category colour, it will not be affected by the Riva sync.
When Is the Master Category List Updated
By default, the changes are synced to the Master Category List of the synced users once every 24 hours counting from the last time the Riva sync service was started.
To make the changes effective in the next available sync cycle:
Delete Categories from the Manage Master Category List Window
If you delete a category from the Manage Master Category List window, it cannot be restored from the window to the Master Category List.
To delete a category from the Manage Master Category List window:
-
In the list box, select the category.
-
To the right of the list box, select Delete.
Results: The category disappears immediately from the list box. This does not affect the synced users' Master Category List. To remove the category from the Master Category List, see remove.
