In Riva 2.4.46 or higher, the Calendar: Date Filter Configuration window makes it easier to configure up to four date filters to determine which calendar items to sync from the email system to the CRM. In previous versions of Riva, the use of advanced options was required. If any of those advanced options has been set, it overrides the corresponding setting in the configuration window and that setting cannot be selected in the window.
Overview: The Date Filters
Date filters are used to prevent various calendar items from being synced. If more than one filter is configured, a calendar item is synced only if it passes through all the configured filters.
-
Start date in the past: (Optional filter.) If an item started earlier than a calculated date, the item is not synced. The date is calculated by counting a configurable number of days backwards from the day the sync occurs.
-
Start date in the future: (Optional filter.) If an item will start later than a calculated date, the item is not synced. The date is calculated by counting a configurable number of days forwards from the day the sync occurs.
-
Last modified date: The optional filter is based on a fixed date. If the last modification of a calendar item took place before that date, the item is not synced.
- Create date: The optional filter is based on one of these:
- A fixed date or
- A configurable number of days.
If a calendar item was created before the fixed date or more than the specified number of days before the sync takes place, it is not synced.
Detailed descriptions of the settings.
To Configure Date Filter Settings
-
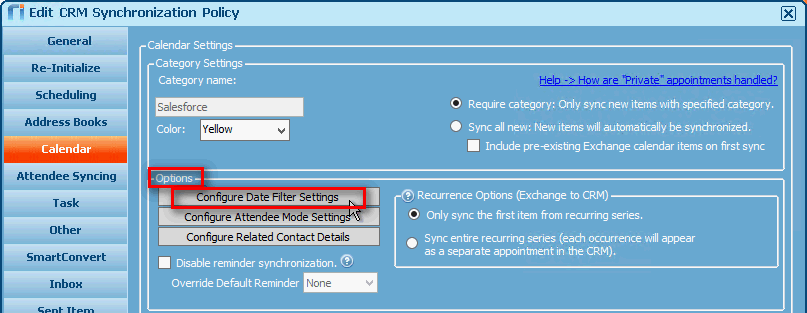
In the Riva Manager application, on the menu bar, select Policies.
-
In the right pane, double-click the policy that needs date filtering for calendar items.
-
In the Edit CRM Synchronization Policy window that appears, select the Calendar tab.
-
On the Calendar page, under Options, select Configure Data Filter Settings.
-
In the Calendar: Date Filter Configuration window that appears, configure the date filter settings.
Date Filter Settings
If more than one filter is configured, a calendar item is synced only if it passes through all the configured filters.
If a setting has already been configured with one or more advanced options, the advanced options override the setting in the configuration window and that setting cannot be selected in the window.
At any time while configuring the date filters, it is possible to preview the effects of the current settings.
Rolling Start Date Filters
The start date filters are said to be rolling because the filters' calculated boundary start dates increment by one day every calendar day.
-
Apply a rolling start date filter and specify the number of days to sync into the past: (Default: [Selected]; 45 days.) When this check box is selected, the date filter is active. At sync time, the specified number of days is used to calculate the boundary start date. If an item has an older start date than that, it is not synced.
-
Block updates and deletes on older items but still allow newly created items to sync: (Default: [Not selected].) When this check box is selected, the date filter is active. At sync time, the specified number of days is used to calculate the boundary start date. If items earlier than the calculated boundary start date are updated or deleted, the changes are not synced; and items created after the boundary date are synced if they pass through all the other configured filters. Note: In Riva 2.4.46 through Riva 2.4.55, there was no check box to specify a number of days. The number of days used to calculate the boundary start date was the same number of days as for the parent check box, Apply a rolling start date filter and specify the number of days to sync into the past.
-
Apply a rolling start date filter and specify the number of days to sync into the future: (Default: [Selected]; 400 days.) When this check box is selected, the date filter is active. At sync time, the specified number of days is used to calculate the boundary start date. If an item has a later start date than that, it is not synced.
Fixed Modified Date Filter
- Apply a modified date filter: (Default: [Not selected.] If the last modification of a calendar item took place before the date specified here, the item is not synced.
Create Date Filter
- No create date filter: (This is the default selection.) If this button is selected, the creation date of a calendar item has no effect on whether or not the item is synced.
- Apply a fixed created date filter: If this button is selected and if a calendar item was created before the fixed date specified here, the item is not synced.
- Apply a create date filter based on the onboarding date using this many days in the past: Selecting this button activates the filter. At sync time, the specified number of days is used to calculate the boundary creation date. If a calendar item was created before that, it is not synced. This option may be useful when a new syncing user is onboarded. (See also Automate the onboarding process.)
If more than one filter is configured, a calendar item is synced only if it passes through all the configured filters.
Preview the Expected Results
At any time while configuring the date filters, it is possible to preview the effects of the current settings.
To preview the effects:
-
In the Calendar - Date Filter Configuration window, in the bottom left corner, select Preview Changes.
The Expected Results window displays two sets of results: what would happen if these settings are applied to the sync
- today and
- in 90 days from today.
-
Select OK to close the Expected Results window.
Note: The configured settings are not saved yet.
-
In the Calendar: Date Filter Configuration window,
