Riva CRM Integration - Documentation and Knowledge Base

Create and Test an Enterprise GroupWise 2014 Connection

Article ID: 1149
Last updated: 02 Mar, 2016

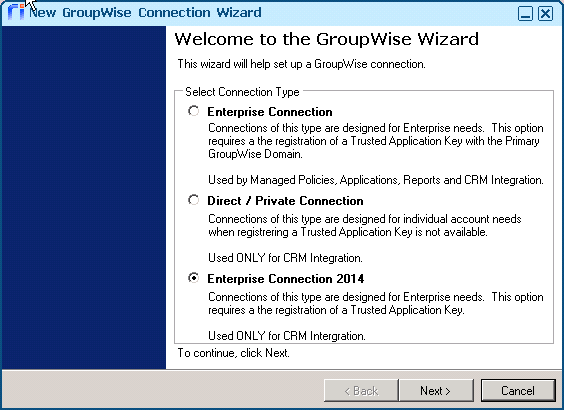
GroupWise 2014 has removed the dependency upon eDirectory.  The Riva Enterprise Connection type will not work with GroupWise 2014.  Riva now includes an Enterprise Connection 2014 connection type in the GroupWise connection wizard.

This article describes how to create and test an Enterprise Connection for GroupWise 2014 in Riva.  This type of connection uses a GroupWise 2014 generated trusted application key to provide admin level access to impersonate into the "target" user mailbox accounts:

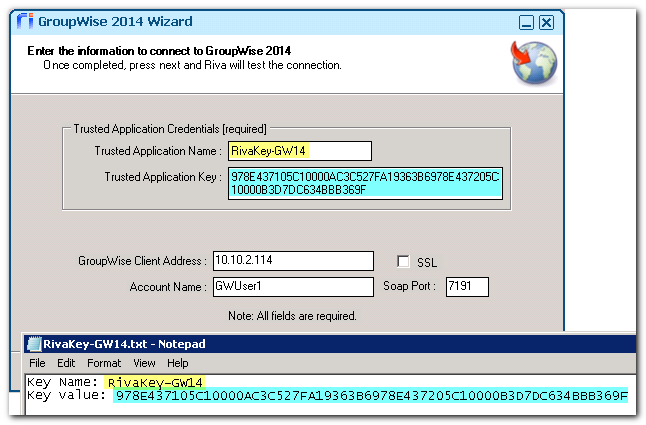
Note:  Riva includes a "Create trusted application key" wizard that is not GroupWise 2014 compatible. 

Riva administrators must manually create a GroupWise 2014 trusted application key.  The steps in this article are based on using a manually generated GroupWise trusted application key.

For those Riva servers that attempt to connect to an upgraded GroupWise 2014 server, the Enterprise Connection type will fail.  Riva administrators need to remove and recreate connections for those domains and post offices that have been upgraded to GroupWise 2014. 

System Requirements

Before creating an Enterprise connection to GroupWise 2014, ensure that all of the system requirement preparations have been completed.

Prepare the Riva Manager Application

The Riva Manager application needs to be configured to display the new Enterprise connection for GroupWise 2014:

  1. Create or modify the App.Setting file named RivaApp.exe.config. Add to the file the following option key and value:

    "<add key="GroupWise2014Connection.Enabled" value="TRUE" />"

    The RivaApp.exe.config file must be saved in the \Riva\Application\Base or \Riva\Application\<version number> folder.

  2. Create or modify the App.Setting file named Omni.Riva.CrmAgent.exe.config. Add to the file the following option key and value:

    "<add key="GroupWise2014Connection.Enabled" value="TRUE" />"

    The Omni.Riva.CrmAgent.exe.config file must be saved in the \Riva\Application\Base or \Riva\Application\<version number> folder.

  3. Close and re-launch the Riva Manager application.

Steps to Create an "Enterprise" Riva Connection to GroupWise 2014

These steps describe how to create a Riva connection to GroupWise by manually providing the GroupWise trusted application key value:

  1. In the Riva Manager application, in the Setup tab, select the Novell GroupWise connection wizard.

  2. On the Welcome to the GroupWise Wizard page, select Enterprise Connection 2014 option, and select Next.

  3. On the GroupWise 2014 Wizard page, select Next.

  4. On the Edit the information to connect to GroupWise 2014 page, provide the trusted key name and key value from the key information file you saved. (See GroupWise 2014 trusted application key value.) Add the IP address, TCP port, and any GroupWise user name in that post office.

  5. Select Next.

  6. On the GroupWise 2014 Wizard complete page, select Finish.

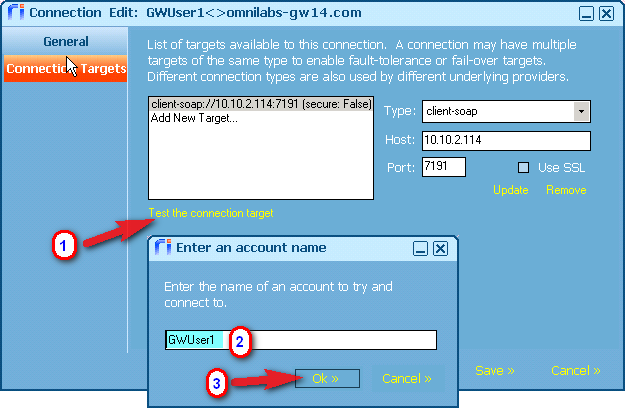
Test the Trusted Key in the GroupWise 2014 Connection

You can now test the Post Office objects for the new trusted application key, and the tests should pass.

  1. In the Riva Manager application, in the Setup tab, double-select a GroupWise connection object.

  2. In the Connection Edit window, select the Connection Targets tab to view the name of the new trusted key.

  3. Highlight the client-soap:// connection, and select Test the connection target.

  4. In the Connection Successful message box, select Ok.

  5. Select Cancel to close the Connection Edit window.

Applies to

  • Riva 2.4.38+
  • Riva for GroupWise CRM Integration

Article ID: 1149
Last updated: 02 Mar, 2016
Revision: 3
Views: 4791