Riva CRM Integration - Documentation and Knowledge Base

Create and configure 'Riva Connector' application

Article ID: 952
Last updated: 24 Jun, 2016

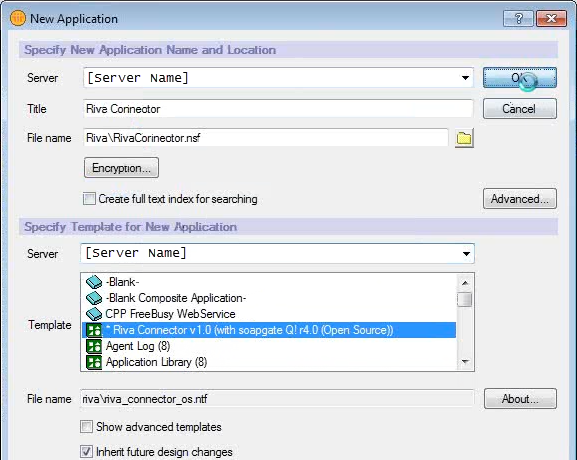
To create and configure the Riva Connector application:

  1. Add a new application based on the Riva Connector template.

  2. Verify that the Riva Connector application was successfully added by browsing to the file.

  3. Grant access for administration and for the "Service User" access to the Riva Connector application

    Add the following entries:

    1. "LocalDomainAdmins"
      • User type: Person Group
    2. "LocalDomainServers"
      • User type: Person Group
    3. "Riva Sync Connector User"
      • User type: Person

    For the '-Default-' access, set 'No Access'.

    All entries except the default should have:

    • Access: Manager.
    • Delete documents: Yes.
    • Replicate or copy documents: Yes.
    • Roles: Admin, Authenticated, ProfileManager.
       

  4. Configure the base Riva Sync Connector application settings.

    1. As a user listed with the 'Admin Profile' above, open the new Riva Sync Connector application.
    2. On the menu bar, select Actions, and drill down to Administration > Edit Config Profile.
    3. Ensure that the following settings are configured and saved:
      • Debugging Level: Errors Only.
      • Database Access Control: ACL only (ignore existing Database Profiles).
      • Base64 Encoding: Use Domino 8.5.3+ compatible mode (fase).
      • Richtext Rendering: <<leave unchecked>>.
      • Technical User / Password: <<leave blank>>.
      • Force HTTPS: <<leave unchecked>>.
      • DateTime Format: ISO8601. (Deprecated. New versions do not show this.)

This article was:   Helpful | Not helpful
Report an issue
Article ID: 952
Last updated: 24 Jun, 2016
Revision: 3
Views: 5305
Comments: 0