DOCUMENTATION NOTICE
This document is intended as a reference for clients who are working with our professional services team. Follow the instructions with care.
This applies to Riva for Domino/Lotus Notes.
- Ensure that the system requirements are met.
- Deploy the Riva Connector to the Domino infrastructure.
Step 1
To ensure that the system requirements are met
-
On the Riva Domino Server (the Domino Server that will host the Riva Connector for Notes), check the current Server Document for concurrent web requests.
-
On the Notes Domino Server (the Domino Mail Server that hosts the mail files of the target syncing users), check the current Server Document. Ensure that the Trusted Servers includes the Riva Domino Server.
Verify the inter-server trusts on remote mail server documents. The server from where the Riva Sync Connector will be installed must be listed or be a member of the server group listed.
-
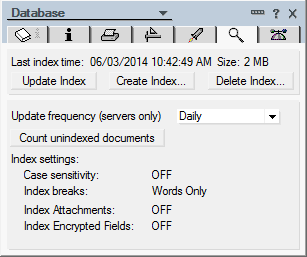
On the Riva Domino Server, ensure that names.nsf has indexing enabled. (You can tell that indexing is enabled when you see that Last index time has a value.) Confirm that Update frequency (servers only) is set to Daily.
-
Replicate names.nsf to the Riva and Notes Domino Servers.
-
On the Riva Domino Server, execute HTTP Service Restart: tell http restart.
-
Ensure that from a browser, the Riva Domino Server's local names.nsf can be accessed.
Example: http://server-hosting-riva-connector.domain.com/names.nsf
Step 2
To deploy the Riva Connector to the Domino infrastructure
-
Contact the Riva Success Team for a link to download the application template, riva_connector.ntf, and download the template.
-
Save the template to the Domino data directory on the server that will host the Riva Sync Connector.
Example: D:\Lotus\Domino\Data\riva\
-
Perform a template fix-up (database consistency check).
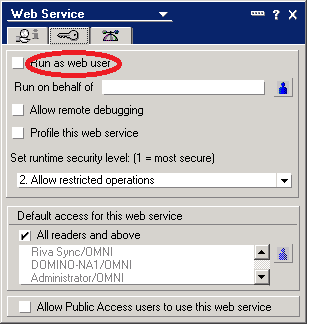
SmartCloud Notes Only: (For Riva Connector before Version 12.) Using the Domino Designer, edit the template to ensure that the Web Service Properties dialog box does not use the web user. You may need to restart the web services, if the option was selected previously.
-
Sign the template database.
SmartCloud Notes: Ensure that the Server ID is used when signing.
-
Create the Domino 'Connector Service User'.
On the Riva Sync Connector Domino server document, set Programmability to include the new 'Connector Service User'.
Because the “Connection Service User” executes Lotus Script found in the Riva Connection Application/Database, on the Domino server that hosts the Riva Connector, the “Connection Service User” should be listed in the list of users that are allowed to run Lotus Script on the server.
-
Create and configure a new application based on the Riva Connector template.
From the Windows server that will host the Riva On-Premise server, verify HTTP access to Riva Connector application.
Example: http://server-hosting-riva-connector.domain.com/riva/rivaconnector.nsf
-
For Domino on-premise, assign per-user mail file permissions to the 'Connector Service User'.
SmartCloud Notes: Instead of assigning permissions to the 'Connector Service User', assign the permissions to the mail file by using the server (for example RivaServer/Servers/MyCompany) that hosts the Riva Connector. There are two ways to do this:
To adjust the Delegate Access
-
Sign in to the Notes client as the target user.
-
Navigate to File, Preference, Calendar and To Do, Access and Delegation, then Add.
-
Enter the appropriate person or group.
-
For Access, select Read, edit, create, delete and send, enabled out-of-office.
-
Select OK.
-
Confirm that the added permissions appear on the Access Control List for the target user. This may take a few minutes.
