Enabling the first sync policy for the first time is the test that confirms a successful deployment of a Riva server.
Contents:
Monitor the Initial Sync Cycle
-
Ensure that you start the Riva Service Monitor application before enabling the sync policy.
-
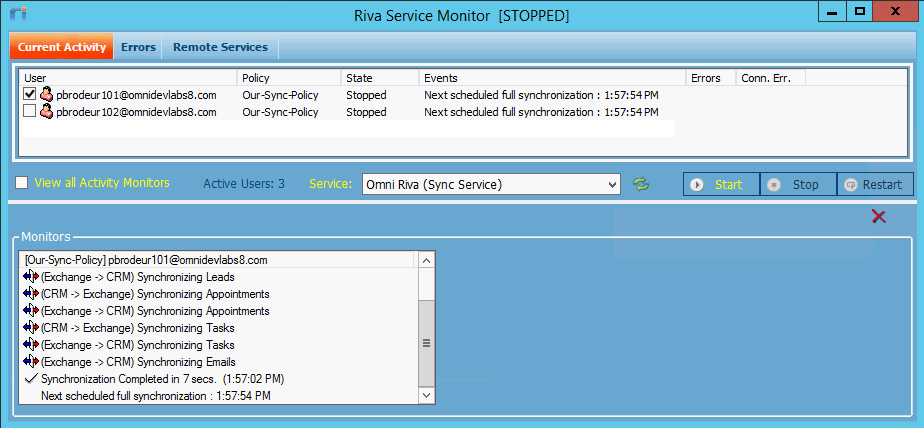
If this is the initial sync for five or fewer users, select the View all Activity Monitors check box.

-
In the Riva Manager application, on the menu, select Policies.
-
On the right pane, right-click the sync policy object, and select Enable.
Result: The initial sync begins shortly. The Monitor's top list box displays the users in the sync queue. If in the Monitor you selected the View all Activity Monitors check box, an activity monitor window appears for every user and displays that it is initializing the user.
-
If you clear the View All Activity Monitors check box, select the check box to the left of the user(s) you want to monitor, and the application opens an activity monitor panel for every selected user.
Note: The following screen shot is generic. The activity monitor displays something different for the initial sync.

What the Riva sync does
-
If there are many items in the CRM, it may take several minutes to initialize each user before proceeding. Do not interrupt the initial sync. Let it continue.
-
After completing its initializing activity, the system starts to synchronize data for each mailbox.
-
Depending on how the sync policy is configured, data is created in every mailbox (that is to be synced by Riva) in the following order:
- Contacts and leads are added to the syncing user's address book.
- Appointments, phone calls, and service call events are added to the syncing user's calendar.
- Tasks are added to the syncing user's task list.
- The email sync and drop folder structure is created in the syncing user's mailbox.
- Opportunities, cases, etc. are added to the email drop folder structure in the syncing user's mailbox.
-
After finishing the initial sync for a syncing user, the Riva Service Monitor displays that status and indicates when the next full sync cycle is scheduled to start.
-
The Omni Riva sync service performs the scheduled full-sync and/or drop-folder-check sync cycles, depending on the configuration.
Note: In earlier versions of Riva, the service was named "Omni Riva (CRM Agent) service" or "Omni Riva (CRM Agent for Exchange)".
Confirm the Initial Sync in Outlook
The following steps are designed to confirm that the initial sync cycle was successful for each syncing user who uses the email client. The steps may vary, depending on what you have configured in your sync policy.


