Riva CRM Integration - Documentation and Knowledge Base

Enable Riva for SSO and Test the Salesforce Target User(s)

Article ID: 556
Last updated: 13 May, 2016
WARNING: The Riva for Salesforce Single Sign-On connection strategy described in this article is not supported for new Riva On-Premise installations.

New Riva On-Premise installations include a new strategy to provide impersonation access into Salesforce: the Standard Impersonation Model. For instructions on implementing the Standard Impersonation Model, see Prepare Salesforce for Riva and Create and test a Salesforce connection.

For current Riva On-Premise installations that use Salesforce Single Sign-On, administrators are encouraged to upgrade their Riva for Salesforce connection setup to the Standard Impersonation Model. For assistance, contact the Riva Success Team.

The procedures in the following article have been deprecated. The information is being retained for clients who have not yet converted to the new Standard Impersonation Model.

These steps will enable the Riva server for SSO. Recommended best practices include:

  • Do not add target users that were synced previously by Riva through a dedicated single-user sync policy.

  • We strongly recommend testing Riva against one or two test target accounts until the desired sync policy settings have been determined and confirmed. Riva supports configuring and testing SSO against Sandbox accounts.

  • Do not add real target user accounts until you are satisfied that Riva is syncing data between Exchange and Salesforce in an expected manner using one or more test accounts.

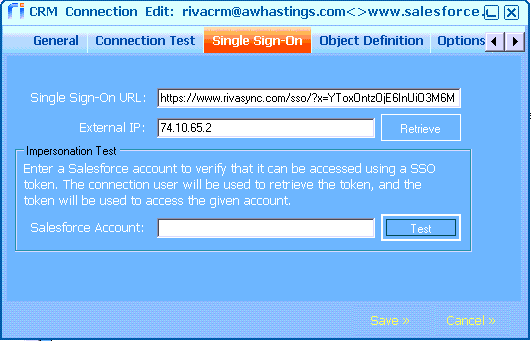
This procedure requires that the Riva connection to Salesforce for SSO be created and tested.  This article will refer to that connection as the "Riva SF SSO connection".

Steps to configure Riva for SSO for test target users

Steps required to enable Riva for Single Sign-On include:

  1. Configure Salesforce to fully enable SSO (for Hosted Riva SSO Provider Service), OR
    Configure Salesforce to fully enable SSO (for On-Premise Riva SSO Provider Server)

  2. Enable the target users in Salesforce (for Salesforce.com Enterprise and Unlimited)

  3. Enable the Riva SF SSO connection for Single Sign-On

  4. Enable "Use Impersonation" in the Sync Policy

Configure Salesforce to fully enable SSO (for Hosted Riva SSO Provider service)

These steps apply to those Riva server deployments that use the Hosted Riva SSO Provider service:

  1. Generate a SSO URL on the hosted Riva SSO Provider service.

  2. Test target user authentication through the hosted Riva SSO Provider service.

  3. Configure the Delegated Authentication Gateway URL in Salesforce.

Configure Salesforce to fully enable SSO (for On-Premise Riva SSO Provider Server)

These steps will be completed during the installation of the On-Premise Riva SSO Provider server by Riva support staff.

Enable the target users in Salesforce

In Salesforce, assign one or two test target users to a SSO-enabled user profile or a SSO-enabled permission set (Salesforce.com Enterprise and Unlimited only).

Enable the Riva SF SSO connection for Single Sign-On

  1. In Riva, double-click the “Riva SF SSO connection” to edit the connection. 

  2. Under "Single Sign-On" add the Salesforce Delegated Authentication Gateway URL and add the external IP address of the Riva On-Premise server. If the Retrieve button does not provide an IP address, use http://whatismyip.com to determine the IP address and manually add the value.

  3. Save the connection.

  4. Double-click the “Riva SF SSO connection” to edit the connection.  Under "Single Sign-On" perform an "Impersonation Test" for the test Salesforce target user accounts.

  5. If the test succeeds, then SSO is properly configured and enabled in Salesforce and the Riva SF SSO connection.  If the test fails, refer to Riva SSO-Enabled Salesforce Connection Target User Impersonation Test Fails for troubleshooting steps.

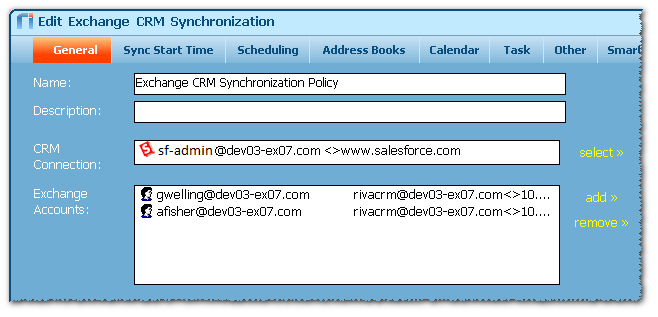
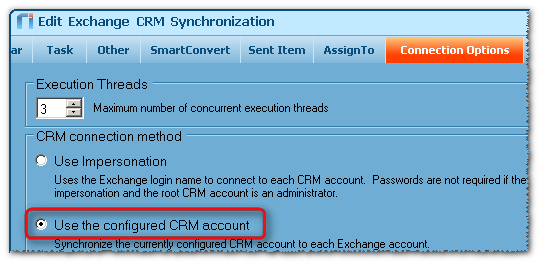
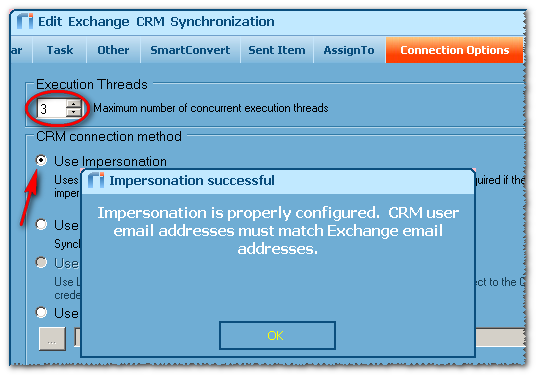
Note – adding users to an SSO-enabled user profile will change how those users access Salesforce:

When the user opens a browser to Salesforce, they will need to authenticate to Salesforce using their Active Directory/Exchange password.  Salesforce will no longer use the Salesfroce username, password and security token for those users.  Changing their Salesforce password will be disabled.

Enable "Use Impersonation" in the Sync Policy

The Riva sync policy that was previously created for SSO needs to be enabled:

  1. Double-click the "Riva SF SSO-Enabled Sync Policy" to edit the policy.

  2. Under "General" ensure that the correct target Exchange users are listed.

  3. Ensure that the Enabled checkbox is not checked.

  4. Select the Connection Options tab.  For "CRM Connection Method" the Use configured CRM account is currently selected.


    Select the Use Impersonation option.


    If SSO is properly configured, the "Impersonation successful" window will open.  Click OK.

    Set the value for Maximum execution threads to indicate the number of users that Riva can sync concurrently.

  5. Save the sync policy.

Article ID: 556
Last updated: 13 May, 2016
Revision: 3
Views: 8441
Also listed in