Requirement: a connection to Infor CRM (formerly Saleslogix) that uses the credentials of an admin account that can impersonate into the target CRM user accounts.
- Create the Infor CRM (Saleslogix) connection.
- Test the connection.
- Edit the connection.
Step 1: Create the Infor CRM (Saleslogix) Connection
-
Ensure that you have followed the procedure Prepare Infor CRM (Saleslogix) for Riva.
-
Start the Riva Manager application. On the menu bar, select Setup. In the left pane, select CRM: Infor CRM (SLX) to start the connection wizard.
-
On the wizard's Welcome page, select Next.
-
Provide the required information.
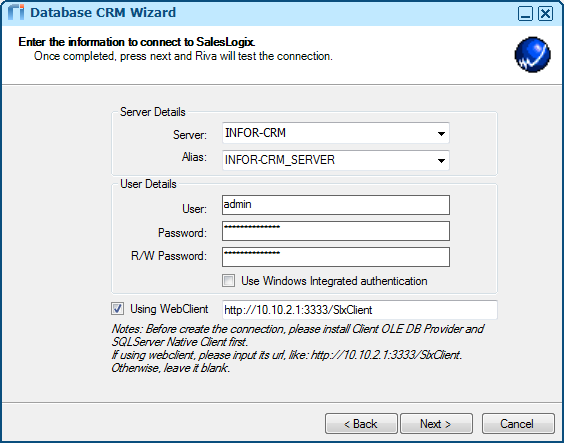
Server Details:
-
Server: Select the correct server from the drop-down list. Note: If the drop-down list is empty, enter the server name and tab to the Alias field. The Alias field will be auto-populated. That indicates that the connection is working as expected.
-
Alias: Select the correct server alias from the drop down list.
User Details: Connect with a user name and password or with Windows Integrated authentication.
-
User: This must be an admin-level CRM user account that Riva will use to connect to the CRM system and impersonate into the target user accounts.
-
Password: Provide the password for the admin account.
-
R/W Password: Provide the read/write password for the admin account (if configured).
OR
-
Use Windows Integrated authentication: This option does not use user names and passwords. If you select this check box, the User, Password, and R/W Password fields become unavailable.
Web Client
-
Using Web Client: (Recommended.) If the web services are deployed, select this option to allow Riva to sync emails with the ConnectBar, which provides links back to items in Infor CRM (Saleslogix) through the web client interface.
-
Web Client URL: Provide the website URL to log in to the Infor CRM (Saleslogix) web client for your system, for example, https://10.10.2.1:3333/SlxClient/.
-
Select Next.
-
(Riva 2.4.47 or higher.) On the Additional Connection Options page, optionally select the check box Is the connection user dedicated for synchronization: [user name]. For guidance, see Is the connection user dedicated for synchronization.
-
On the Successful Connection page, select Finish.
The Riva Manager application creates an Infor CRM (Saleslogix) connection object.
Step 2: Test the Infor CRM (Saleslogix) Connection
To confirm that user impersonation is working:
-
Double-click the Infor CRM connection object to open the CRM Connection Edit window.
-
Select the Connection Test tab, and select Run Test.
The CRM connection account is tested to ensure that the credentials are correct.
-
In the Test succeeded message box, select OK.
-
In the User E-mail field, enter the email address for a CRM target user, and select Run Test.
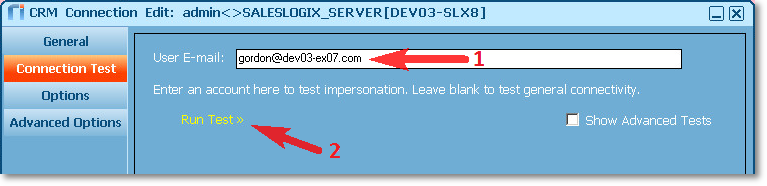
The system tests that the Riva connection account is able to impersonate into the CRM target user account.
-
In the Test succeeded message box, select OK.
-
In the CRM Connection Edit window, select Cancel to close the window.
Step 3: Edit the Infor CRM (Saleslogix) Connection
-
Double-click the Infor CRM connection object to open the CRM Connection Edit window.
-
(This step requires Riva 2.4.46 or higher.) Optional: Assign a user-friendly Display Name.
