Applies to Riva Cloud and Riva On-Premise.
Microsoft retired the Regional Discovery Service for Dynamics CRM on March 1, 2021. It will not be available for connection and integration with Riva after May 17, 2021 (depending on your region).
Riva now connects to the new Global Discovery Service; Dynamics connections in Riva need to be re-configured with the instructions below.
Notes:
- For Riva Cloud, you will need to use Modern Authentication (OAuth) to connect to the new Global Discovery Service. Basic Authentication will not be supported for the new service.
- Basic Authentication may be used for Riva On-Premise Dynamics connections, if the Dynamics instance is on-premises also.
Procedures:
Procedure for Riva Cloud
To update your Dynamics CRM connection to Modern Authentication (OAuth):
-
Log in to https://www.rivacloud.com/beta to access your policy admin account.
-
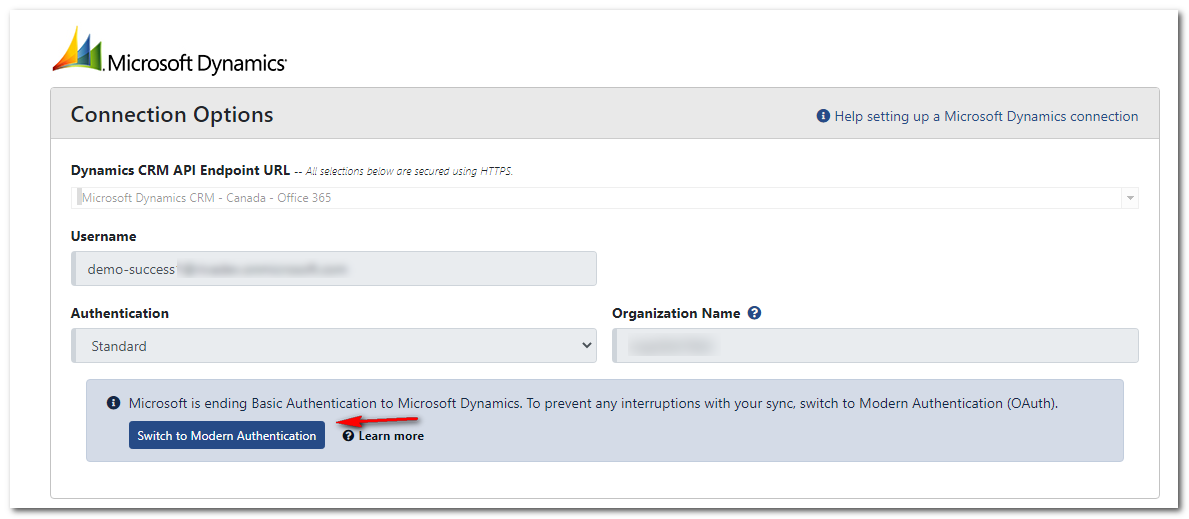
On the Dashboard, select the Microsoft Dynamics connection.
-
Select Switch to Modern Authentication.
-
Log in with the Dynamics connection user credentials (user name and password).
-
Click OK.
Result: The Dynamics connection is now ready for use with the Global Discovery Service.
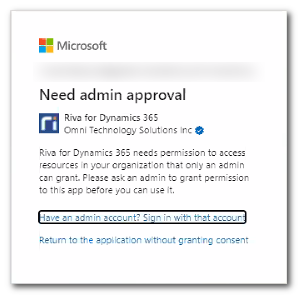
Note: If the Dynamics connection user is a non-admin user and a message related to “admin approval” is displayed (as shown below), you can enable the option “Users can consent to apps accessing company data on their behalf” in Azure Active Directory Admin Center. For more information, see
Configure how end-users consent to applications.
There are further options for the approval process workflow, and it is also possible to limit the approval for apps based on user groups. For more information, see the following Microsoft documentation:
Procedure for Riva On-Premise
- Upgrade Riva On-Premise.
- Create an App Registration.
- Create a Global Discovery Connection.
- Copy the old connections Customs to the new Global Discovery Connection.
- Connect your existing policy to the Global Discovery connection.
Step 1: Upgrade Riva On-Premise
Requirement: Riva On-Premise 2021.1.7.7431 or higher.
-
Determine which Riva On-Premise version is installed.
-
Do one of the following:
Step 2: Create an App Registration
Follow the directions at Create an App registration for Microsoft Dynamics.
Step 3. Create a Global Discovery Connection
Follow the directions at Create and test a client secret-based Dynamics CRM OAuth connection.
Step 4. Copy the Old Connections Customs to the New Global Discovery Connection
Note: Contact Riva Success for assistance from the Client Engagement team before attempting the following two procedures.
-
Close the Riva Manager application.
-
In Windows Explorer, navigate to the Riva\Customs folder, and locate the custom folder for your regional Dynamics connection.
Note: The folder is named as in the following example format: Riva\Custom\srv_rivasynctest_crm$com$orgd9c7aa3d$bcguat$api$crm$dynamics$com
-
Within the connection folder, locate and copy the en folder.
-
Go back to the list of connections in the custom folder, and locate the newly created Global Connection folder. Within the folder, replace the en folder with the one copied in the previous step. Re-open the Riva Manager application.
-
Open your new Dynamics Global connection, select the Advanced Options tab, and then select the Edit custom options link at the top of the page.
-
If you see any values on keys in the following format, @file=~\Custom\srv_rivasynctest_crm$com$orgd9c7aa3d$bcguat$api$crm$dynamics$com\en\schema\Schema.xml, update the connection name in the Value cell to point to the new connection.
Example:
@file=~\Custom\<old$connection$name$in$custom$folder>\en\schema\Schema.xml is renamed to
@file=~\Custom\<new$connection$name$in$custom$folder>\en\schema\Schema.xml .
-
Select OK, and save the connection. Close and re-open the Riva Manager application.
Step 5. Connect Your Existing Policy to the Global Discovery Connection
-
In the Riva Service Monitor, select Stop.
-
In Windows Explorer, navigate to the Riva\Configuration folder. Locate your .policy file, create a backup copy of the file, and rename the backup copy to backup.policy.
-
Open the Riva Manager application, and open your sync policy. Beside the Microsoft Dynamics CRM connection name, click Select, and then click the newly created Global connection. Save the policy, and close the Riva Manager application.
-
Navigate to the Riva installation folder. Locate the .policy file, and open it with an ASCII text editor, such as Notepad. Do not use a word processor program.
-
Open the backup.policy file created earlier with an ASCII text editor. From the backup.policy file, copy all lines between the <Settings> and </Settings> tags.
-
In your original .policy file, delete the lines between the <Settings> and </Settings> tags. Paste the lines from the backup.policy file, and save the file.
-
Open the Riva Manager application. Verify that the necessary modules for sync are enabled and that your advanced and/or custom options are in place on the Advanced Options tab of the policy.
-
Enable the sync for one user, and verify that the sync runs as expected.
