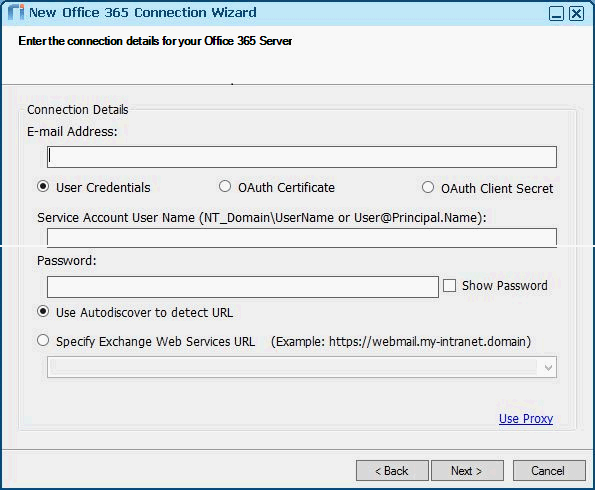
To create and test a user credentials-based Office 365 connection:
-
Ensure that you have prepared Office 365 for a Riva EWS connection.
-
In the Riva Manager application, on the menu bar, select Setup.
-
In the left pane, under Connection Wizards, select Microsoft Office 365.
-
On the wizard's Welcome page, select Next.
-
On the Connection Details page that appears, select User Credentials.

-
Enter the connection details required by the User Credentials connection:
-
Email Address: The primary SMTP email address for the connection account.
-
Service Account User Name: The AD user credentials for the Exchange user account that has been selected as the Riva connection account. This account must be configured with the Full Access or Impersonate permissions to the target Exchange accounts that will be synchronized with the target CRM system.
Note: AD login credentials may not be the same as the Exchange email address for the same account. Ensure that if the UPN is used, it is the AD UPN for the connection user. You can use either:
- domain name\username (NTLM), for example, OMNIDEVLABS\rivacrm; or
- user principal name (UPN), for example, rivacrm@omnidevlabs.com
-
Password: Provide the AD password for the connection account.
-
Host: Select one of the following:
-
Use Autodiscovery to detect URL; or
-
Specify Exchange Web Services URL: If Autodiscovery is not enabled or does not work, select this option and specify the URL path to your Office 365 Server.
To determine the correct URL, log in to Office 365 as the Riva connection account and switch to Outlook Web Access. Copy the base URL from the browser, for example, https://pod12345.outlook.com. Ensure that the delegated access permissions have been properly set for the Riva connection account. For detailed information, see Prepare the Riva connection account for Office 365 - Exchange Online.
-
Use Proxy: Required only if you need to deploy proxy services. For more information, see Configure "Use Proxy" settings in email connections.
-
Select Next and Finish.
This creates a Microsoft Exchange connection.

-
Test the connection.


