Note: This article applies to Riva On-Premise 2.4.41.
In Riva On-Premise 2.4.41, remote management capabilities allow the service monitor to remotely manage multiple synchronization services from a single console.
- This article describes how to configure the remote management monitor for Riva On-Premise 2.4.41.
- For a description of the remote management capabilities and how to use them, see Remote management functionality.
To enable the Remote Management capabilities in Riva On-Premise 2.4.41:
- Configure the Riva Service.
- Optional: Enable sync statistics.
- Configure the Remote Monitor.
Step 1: Configure the Riva Service
The following procedure enables a remote Riva Service Monitor to remotely monitor as well as manage certain aspects of the synchronization.
To enable remote management capabilities:
-
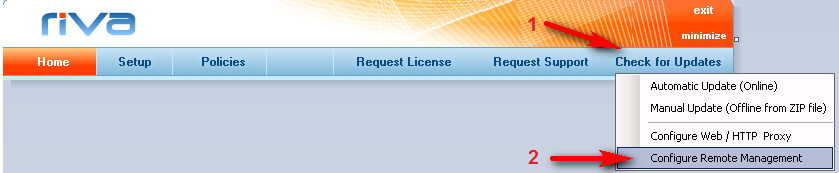
Start the Riva Manager application. On the menu bar, select Check for Updates, and then choose Configure Remote Management.
-
Configure the Remote Management as follows.
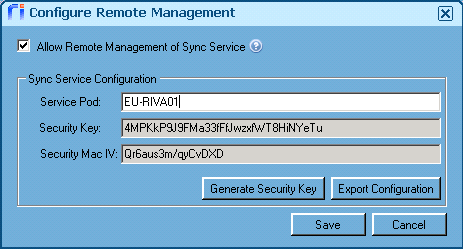
- Select Allow Remote Management of Sync Service.
- Service Pod: Enter the dedicated service pod. Do not insert spaces. This name should uniquely describe this instance of Riva.
- Select Generate Security Key.
- Select Export Configuration. Save the file in a secure location, because these keys are used to access the service remotely and should not be made publicly available.
Step 2: Enable Sync Statistics
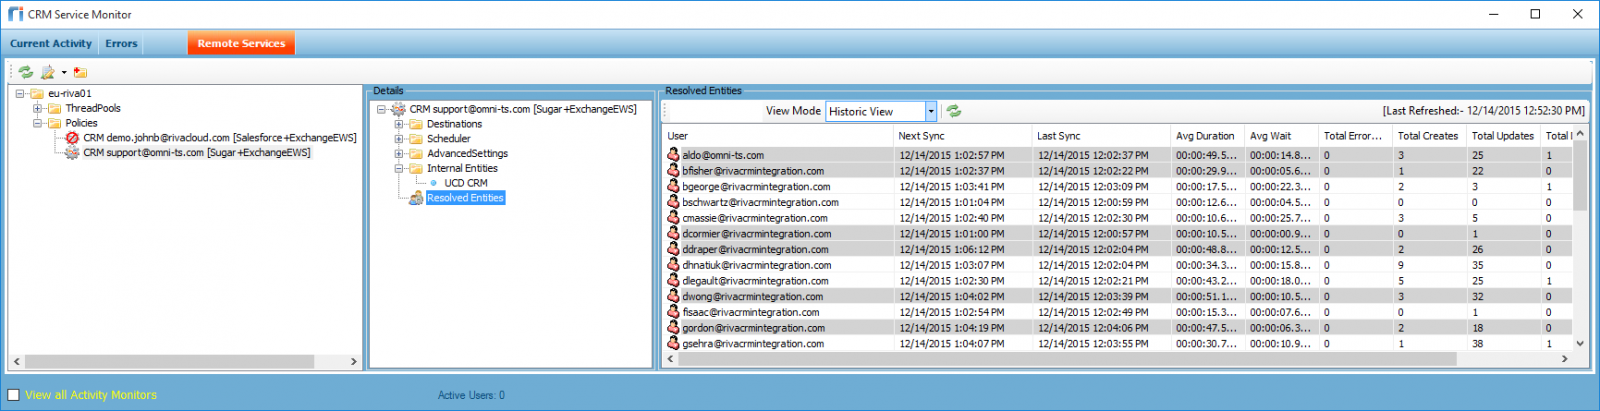
This is optional. If you enable sync statistics, then when you view resolved entities, the informational list view displays the number of operations (creates, updates, and deletes), the CPU duration, and the processors.
To enable sync statistics:
Step 3: Configure the Remote Monitor in Riva On-Premise 2.4.41
-
Start the Riva Service Monitor.
-
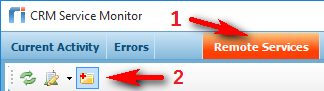
On the menu bar, select Remote Services, and select the icon with the “plus” to add a new remote service.
-
Complete the Service Connection Configuration form as follows.
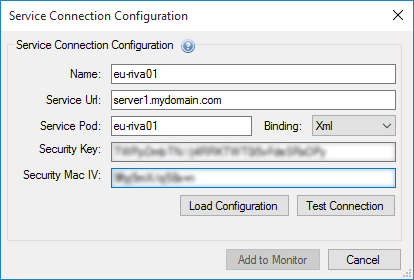
- Near the bottom, select Load Configuration to load the Name, Service Pod, and Security keys from the exported configuration file.
- Service Url: Use the server's remote IP address.
- Binding: Adjust as required.
-
Select Test Connection to verify remote connectivity. If the test fails, confirm that the details work on the local server, then check any firewall or networking rules to confirm remote connectivity.
-
When the test is successful, select Add to Monitor.
-
Verify that you see a new node that represents the remote sync service.