First-time deployments of Riva On-Premise and trial subscriptions for Riva Cloud include a 15-day license period. Most sync policy features are enabled for the trial period. This article discusses the basics about how to use a structured test plan to make best use of the trial period to confirm how Riva syncs email and CRM data for users:
At the bottom of this article, we have included a link to a sample test plan you can download and use for your evaluation.
Reason 1: A test plan allows members of a test team to confirm that Riva is syncing data between user CRM accounts and mailbox accounts in the manner desired by the end users.
Reason 2: It also provides an opportunity for the Riva administrators to learn and practice common Riva admin tasks.
Reason 3: After testing has been completed and Riva is deployed to production, test team members can train production members.
Understanding How Riva Syncs Data (and What to Include in Your Testing)
Riva is a highly extensible and customizable solution. Only the default options used by 80% of customers are exposed as sync policy option settings in the Riva Manager application. The general purpose of informal testing is to provide the test team members the opportunity to learn how Riva On-Premise server or Riva Cloud syncs data between the customer's CRM and email services based on default sync policy option settings.
Watch and Learn.
What does Riva do?
Riva Sync for Contacts and Leads.
Riva Sync for Calendar and Tasks
Riva Sync for Email, Opportunities and Support Cases
Review the Sync Policy Documentation. We recommend that, after watching those video series, test team members conduct a thorough review of the Riva sync policy documentation:
Generally speaking, tests confirm that Riva can do the following when it syncs (assuming bi-directional sync and that the required options have been set):
Data Module
CRM ► Email
Email ► CRM
Address Books (Contacts and Leads)
Creating, modifying, and deleting contacts and leads
Syncing leads as contact records (categorized as leads)
Adding a related account name to a contact record Company field
Filtering contacts by visibility (all), ownership, organic, or custom filters
Creating and modifying contacts.
Notes:
Contact deletions are not normally synced to the CRM.
Modifying the Company field is not synced to the CRM.
Riva can either autosync new contacts or require a manual assignment of a category to the contact. (This works differently in GroupWise. For information, contact the Riva Success Team: Riva Cloud; Riva On-Premise.)
If a related account cannot be matched based on the website or email domain name, Riva creates a related account record in the CRM.
Calendar
Creating appointments, meetings, and recurring events (with recipients and/or related contacts). Riva syncs those to the user's email calendar.
Syncing calendar items created in opportunity, case, and other CRM modules.
Syncing the following calendar event changes: updates, rescheduling, reassigning the organizer, and deletions.
Creating appointments, meetings and recurring events (with recipients and/or related contacts). Riva syncs those to the user's CRM calendar.
Creating (by default) calendar items in the CRM user's matched primary calendar and in the CRM contacts activity history.
Syncing the updating, rescheduling, and deleting of calendar events.
Because each supported email platform handles calendar sync slightly differently, we recommend watching the Riva training videos to learn more about how Riva syncs calendar items.
Tasks
Creating, modifying, assigning, completing or deleting tasks in a user to-do list, or in a case or opportunity or other module that allows creating task items. Riva syncs CRM tasks to the user's Tasks to-do list.
Creating a task (which Riva syncs to the user's CRM to-do list), modifying, completing, or deleting tasks. Riva syncs updates to the corresponding CRM tasks.
Email Sync
Riva does not sync email from the CRM.
Riva syncs email only from the email system to the CRM. For some CRMs, an email or message item is created. For other CRMs, Riva saves the email as a completed task item in the activity history. The email is related to CRM users and contacts (by default) and can be related to leads. Various options control the matching of email recipients to CRM users or contacts and what to do if a recipient is not matched. Riva supports:
Manual sync: User drags and drops an email into a Create New drop folder that Riva has created in the user's mailbox. Riva attempts to sync and create an email item in the CRM.
Sync email to opportunities, cases, projects (or other modules): Users can drag and drop an email into a drop folder for specific cases or opportunities (or other module items). Riva attempts to archive the email against that case or opportunity item. The email will appear in the activity history of the item and in the matched CRM contact and account activity histories.
Automated Sync: (Available for Exchange and IBM Notes only.) Riva can be configured to automatically sync email from the Inbox or Sent Item folders.
Opportunity, Case, and Other Module Summary Information
Riva syncs a summary email for each active opportunity, case (or other supported module) to the root Opportunities, Cases, or other module folder in the user's mailbox. Each summary email contains information about that CRM item and, in most cases, includes links or buttons to open the item in the CRM in either view or edit mode.
Not applicable
Types of Testing
Riva testing and evaluation generally falls into two models:
Informal testing: Used to confirm how Riva syncs data using default sync policy settings and to build a list of specific tests for a structured test plan.
Structured testing: Used to confirm specific sync policy settings, custom options, and data sync filters
Informal testing
Initially, we expect customers to do some informal "discovery" type testing to learn what Riva can do.
Start with basic sync testing. The general purpose of informal testing is to provide the test team members the opportunity to learn how Riva On-Premise server or Riva Cloud syncs data between their CRM and email services based on default sync policy option settings. Test team members can then formulate a plan for basic testing that is designed to
Provide training and practical experience to those team members conducting sync tests;
Confirm data sync and identify any sync concerns or special requirements; and
Prepare a more comprehensive structured test plan to confirm if and how Riva can satisfy data sync requirements for normal business users.
Desired Output. Informal testing should lead to
A go or no-go decision to continue with further testing;
A list of specific test items to be included in a thorough structured test plan;
A list of sync requirements that Riva must meet; and
A list of questions to ask the Riva success team to confirm sync policy option settings that should be used during the structured tests
Contact the Riva Success Team. Before proceeding with a structured test, contact the Riva Success Team to schedule a meeting to discuss the next steps.
Structured testing
During informal sync testing, customers can identify additional specific sync requirements that will depend on adding custom options to a Riva sync policy or policies and/or Riva - CRM connections, adding customizations to the Riva server, or adding custom filters. Structured testing uses specific data sync tests that will confirm that Riva syncs data in the desired manner after options, customizations, and filters have been added.
Create and Use a Structured Test Plan
A Riva test plan includes a set of data sync objectives and a set of module-based sync tests to confirm data sync.
Key components of a test plan
Test plans usually evolve into a dynamic document that changes throughout the test and retest stages. A Riva test plan can include the following:
Cover Page that identifies:
Vendor and version of email and CRM systems.
Version of Riva.
Introductory or in-depth testing.
Dates of testing.
Sync policy settings. These should include screen shots of all Riva sync policy pages, including advanced options and custom options.
Email connection settings. These should include screen shots of all Riva email connection pages, including advanced options and custom options.
CRM connection settings. These should include screen shots of all Riva - CRM connection pages, including advanced options and custom options.
List of modules to be tested.
Module Tests: A table or spreadsheet that contains a collection of all unique tests to be performed for each module. You may have 10 to 30 or more unique sync tests per module. Riva modules include:
Address Book (contacts and leads) sync.
Calendar sync.
Task sync.
Email sync.
Email sync to CRM modules; for example opportunities, cases, projects, or contracts. The availability of modules depends on the CRM vendor.
Automated email sync (Inbox and Sent Items).
Documenting module-level tests
Each unique test should identify the following:
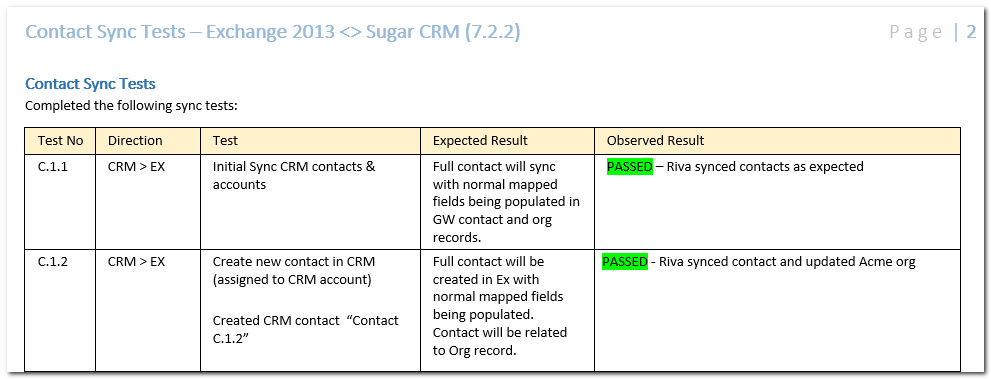
Unique Test Number: For example, C.1.3.1. In this example, the leading character is a code for the module: "C" is for contacts, while "T" is for tasks. You can devise any coding system that meets your requirements.
Sync Direction: For example, CRM ► Email, or Email ► CRM, or Email ► CRM ► Email (for multidirection test sequences).
Test: Describe the test, including steps. For example, "Create new contact in CRM named 'Contact C.1.3.1' and fill in all fields." If appropriate, also include:
Conditions: Identify specific option setting, filter, or custom option that is being tested.
Exact steps for the test: Especially important if the test involves modifying the record in the CRM and then modifying the corresponding record in email to confirm that updates sync in both directions.
Expected result: Describe what the expected end state result is after Riva completes the sync.
Observed result: Once the test is complete, record the actual result, whether the test is a PASS or FAIL, and any additional action if required, like changing an option setting and re-running a second test, reporting a bug, etc.
Best practices for sync tests
Best Practices Tips: Here are best practices to ensure successful sync tests:
Tip #1: Configure the sync policy for one test user. This isolates the sync to a single user.
Tip #2: Configure the sync policy to enable only the module you are testing. For example, if you are running contact sync tests, disable lead, task, calendar, and email sync options. This reduces the time it takes Riva to complete a sync cycle and isolates the sync to only the module being tested. Logs will be easier to read and follow as you review sync results and analyze results.
Tip #3: Configure the sync policy "Sync Schedule" so that Peak sync frequency is Every two hours, and clear the Check drop folders on fast sync schedule check box. This ensures that Riva does not attempt to start a second sync shortly after completing the first sync.
Tip #4: Run only one sync test per sync cycle. Riva will produce a sync log for that specific sync test.
Tip #5: Ensure each test has a unique "test number", for example, C.1.2.
Tip #6: Use the test number in the name of the item being synced. For example, for a test to create a new contact that has a test number of C.1.3.1, create the contact so that the first name is Contact and the last name is C.1.3.1. That makes it easier for the tester to relate data items back to a corresponding unique test and makes it quicker to locate the item in the CRM and the email client.
Tip #7: Stop the sync service between each sync test. This gives the tester time to review results, record information, and reset the environment for the next sync test.
In the CRM or in the email client, perform the activity required by the unique sync test. For example, create a contact record, and fully populate the fields of the contact record.
In the Riva Service Monitor application, start the service.
Watch the activity pane for the user, and observe the sync activity. Ensure that Riva completes the sync cycle.
In the Riva Service Monitor application, stop the service.
In the target environment (email client or CRM), check and record the results of that sync cycle.
What to do with the results
After the structured testing is complete and the test team has analyzed what items need to be addressed:
If your structured tests confirm that you are ready to proceed with a Pilot or Production deployment of Riva, contact the Riva Success Team to make the necessary arrangements.
If your structured tests confirm that you need additional assistance, contact the Riva Success Team to schedule a consultation with our Professional Services Team.