In Riva 2.4.45 or higher, three security methods are supported for an Office 365 connection:
- User Credentials,
- an OAuth Certificate, or
- an OAuth Client Secret.
To create, test, and edit an Office 365 connection:
- Create the connection.
- Test the connection.
- Edit the connection.
Step 1: Create the Office 365 Connection
The procedure used to create the connection varies depending on the security method. For the appropriate procedure, select the security method that will be used:
Step 2: Test the Office 365 Connection in Riva 2.4.45 or Higher
The connection is tested in the same way regardless of the security method used for the connection.
To test the connection:
-
In the Riva Manager application, on the menu bar, select Setup. In the right pane, double-click the Microsoft Exchange / Office 365 Connection object.
-
Confirm that the connection credentials look correct.
Note: If the Riva connection user mailbox was granted Exchange ApplicationImpersonation Role access to the target user mailboxes
(optional but recommended for Office 365 E subscriptions), change the Impersonation Method to
Impersonation - Recommended for Office 365 and Exchange 2010+.
Exchange 2010+: Configure Exchange API Impersonation (using Exchange Management Shell)
.
-
Test the connection as follows: On the Test page, leave the User E-mail field empty, and select Run Test.
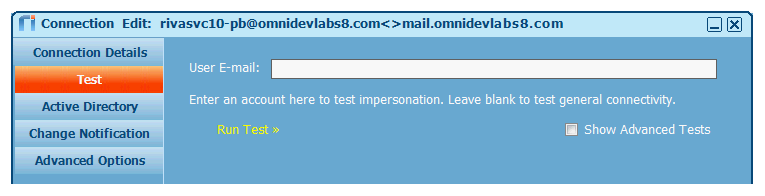
This verifies whether the credentials configured for this connection are working correctly. If so, a Connection Test Succeeded message box appears.
-
Test impersonation access as follows. On the Test page, provide the login credentials (username@email.domain) for one of the Exchange accounts that will be synchronized with the target CRM, and select Run Test.
This test passes
-
if "EWS Impersonation" has been set as the Authentication Type and Exchange ApplicationImpersonation Role permissions have been assigned; OR
-
if "Delegate Full Access" has been set as the Authentication Type and Delegate Full Access permissions have been assigned.
-
If the Connection Test Succeeded message box appears, select OK, and then select Cancel.
If the Connection Test Failed message box appears, select OK, and then select Cancel:
- Full Access Delegate impersonation method: If the connection uses the "Full Access Delegate" impersonation method, take measures to correct the “full access” permissions assigned to the Riva connection user. Repeat the test until it is successful.
Note: Riva tends to cache connection test results. If changes are made to Delegate Full Access permissions, close the Riva Manager application and wait five to ten minutes before restarting the Riva Manager application and running the test again.
- EWS Impersonation method: If the connection uses the "EWS Impersonation" method, a failed test result can be ignored.
Step 3: Edit the Office 365 Connection
-
In the Riva Manager application, on the menu bar, select Setup.
-
In the right pane, double-click the Office 365 connection to open the CRM Connection Edit window.
-
(Riva 2.4.46 or higher is required for this step.) Optional: On the General page, assign a user-friendly Display Name.
-
Save the connection.
