Applies to Riva Cloud in order to synchronize CRM data and G Suite accounts (paid subscriptions).
Prerequisites
If you are using a free Gmail account, see Connect a free Gmail account to Riva Cloud.
To configure Riva for G Suite, the following logins and passwords are required:
- Riva Cloud account;
- G Suite admin account;
- CRM account (either as the CRM administrator if multiple accounts are to be used or as a user if configuring a single account).
Create a Riva Connection to a Paid G Suite Subscription
Follow these steps:
-
Log in to Riva Cloud (www.rivacloud.com).
-
If you have not yet configured your CRM, do so now. See Create your CRM connection.
-
On the Get Started page, select Configure your email.
-
Select the Google logo.
-
Because you are configuring a G Suite account, select Domain-Wide, and select Continue.
-
In the G Suite for Domain-Wide Authorization window, follow Steps 1 through 4 to configure the account.
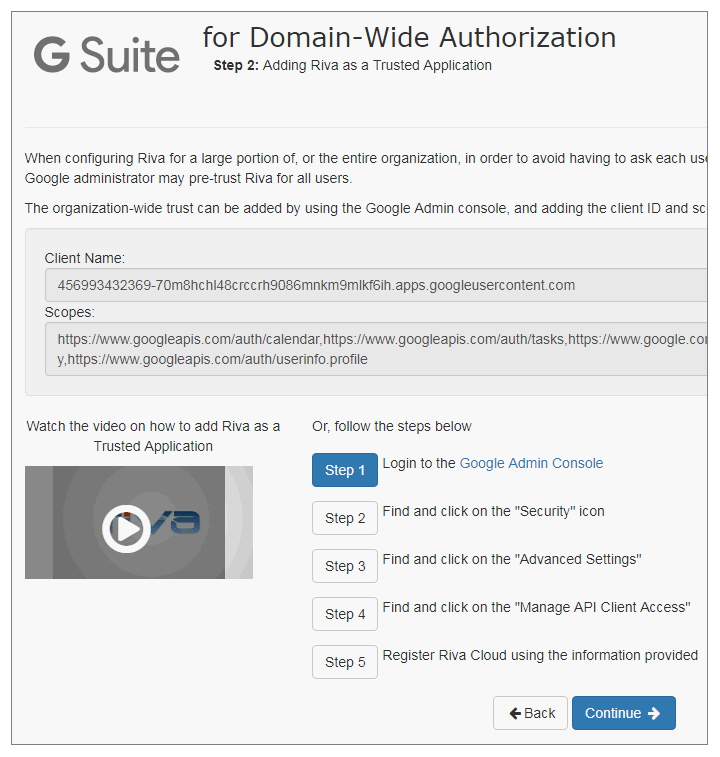
Step 4, illustrated above, initiates a set of configuration options to register Riva as a Trusted application for all users in your organization.
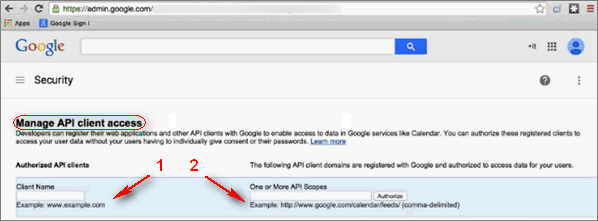
You will see the Manage API client access window.
-
In the Client Name field, copy and paste the following Riva registered API Client Name:
456993432369-70m8hchl48crccrh9086mnkm9mlkf6ih.apps.googleusercontent.com
-
In the One or More API Scopes field, copy and paste the following, as is, on a single line, with no spaces after the commas:
https://www.googleapis.com/auth/calendar,https://www.googleapis.com/auth/tasks,https://www.google.com/m8/feeds,https://www.googleapis.com/auth/gmail.modify,https://www.googleapis.com/auth/userinfo.profile
For your convenience to look at the five scopes, here they are, one per line:
- https://www.googleapis.com/auth/calendar
- https://www.googleapis.com/auth/tasks
- https://www.google.com/m8/feeds
- https://www.googleapis.com/auth/gmail.modify
- https://www.googleapis.com/auth/userinfo.profile
-
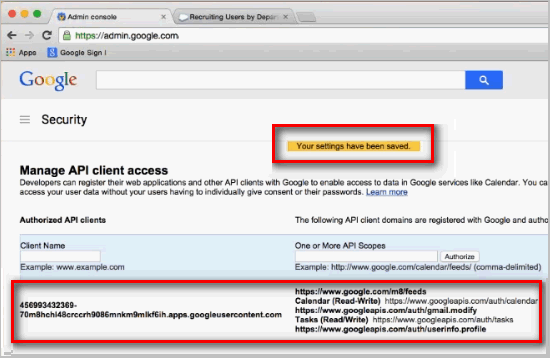
Select Authorize to save the changes and view the update information:
-
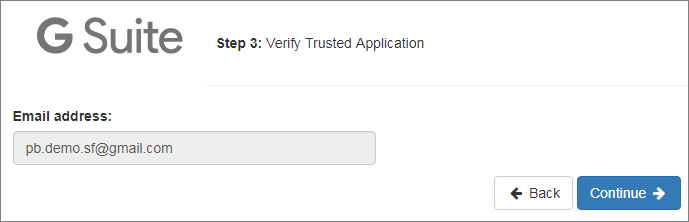
Return to the Riva Cloud browser tab, and select Continue.
-
Enter the G Suite admin email address, and select Continue.
-
Do one of the following:
- If you see that the connection has been configured successfully or Riva has been accepted as a trusted application by your G Suite account domain, select OK. Upon return to the Get Started page, configure the sync policy on behalf of your users.
- If you experience an issue, contact the Riva Success Team.
