The default Riva connection to Salesforce is designed to use standard impersonation.
To create, test, and edit a Salesforce connection in Riva 2.4.54 or earlier:
- Ensure that the system requirements are met.
- Create the Riva connection to Salesforce:
- Authentication method:
- Address:
- Test the Riva connection.
- Optional: Assign a user-friendly Display Name.
- Configure the connection options.
- Configure pre-defined filters including support for "Team Selling";
- Learn about support for custom audit fields.
Step 1: Ensure That the System Requirements Are Met
Step 2: Create the Riva Connection to Salesforce
-
Start the Riva Manager application.
-
If the menu bar displays Setup, select Setup. In the left pane, select Connecting Wizards, and select CRM: Salesforce.com to start the Salesforce.com CRM wizard.
-
On the wizard's Welcome page, select Next.
-
Under Connection Details, configure the authentication settings.
-
In Riva 2.4.46 or earlier, you can configure only user credentials. Provide the Salesforce user name and password for the target Salesforce user account. And now, select an Address.
-
In Riva 2.4.47 or higher, select one of the following:

-
User Credentials: Provide the following:
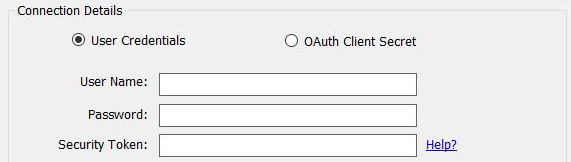
- Salesforce User Name and Password for the target Salesforce user account.
- Salesforce Security Token. Depending on how your Salesforce instance is configured, the Riva sync may require the setting of a security token. See Obtain a Salesforce security token.
Note: The Salesforce administrator can choose to set up trusted network access, so that Salesforce user security tokens are not required. For instructions, see Enable trusted network access for Riva On-Premise.
- or -
-
OAuth Client Secret: Provide the following settings from the Salesforce connected app that was defined when enabling Riva to authenticate to Salesforce with OAuth:
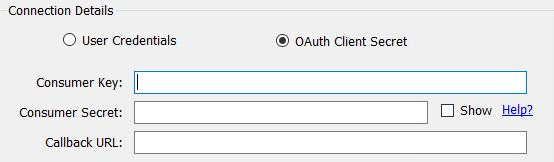
- Consumer Key.
- Consumer Secret.
- Callback URL.
-
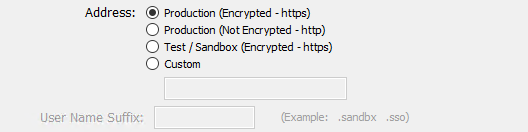
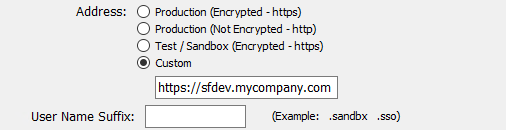
Select an Address.
-
Production. Whether the production address is encrypted (HTTPS) or not (HTTP), Riva connects to login.salesforce.com for authentication.
-
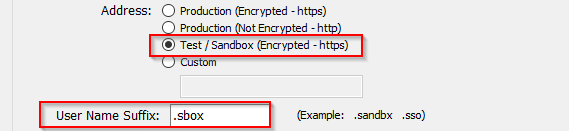
Test / Sandbox. Riva can connect to Sandbox instances or environments. Provide the applicable User Name Suffix.
For authentication, Riva connects to test.salesforce.com.
-
Custom. Riva supports connecting to custom URLs provided by Salesforce.
Specify the URL that the Riva connection must use for authentication. This includes configurations that use CipherCloud or similar applications.
-
Optionally configure one or more of the following:
-
Select Next.
-
(Riva 2.4.47 or higher.) On the Additional Connection Options page, optionally select the check box Is the connection user dedicated for synchronization: [user name]. For guidance, see Is the connection user dedicated for synchronization.
-
On the wizard's ConnectBar Security Options page, ensure that Use Existing Browser Session is selected, and select Next.
-
Take note of the Salesforce modules that Riva is able to sync to, and select Finish.

Step 3: Test the Riva Connection
You can perform the following procedure at any time.
To test that Riva can connect to the target Salesforce organization when using the credentials of the target Salesforce user:
-
Start the Riva Manager application.
-
If the menu bar displays Setup, select Setup.
-
In the right pane, double-click the Riva connection to Salesforce to edit it.
-
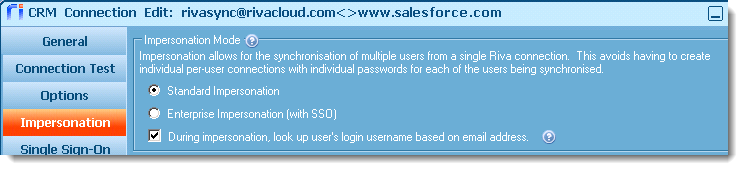
Select Impersonation. Ensure that both these options are selected: Standard Impersonation and "During impersonation, look up user's login username based on email address".
-
Save the connection.
-
Double-click the Riva connection to Salesforce to edit it again.
-
In the CRM Connection Edit window, select the Connection Test tab.
-
Leave the Account field blank. Select Run Test >>. In the Test succeeded message box, select OK.
If the connection test fails, see Salesforce connection error: INVALID_LOGIN.
-
Add the Salesforce login user name of a target Salesforce user account, and select Run Test >> again.
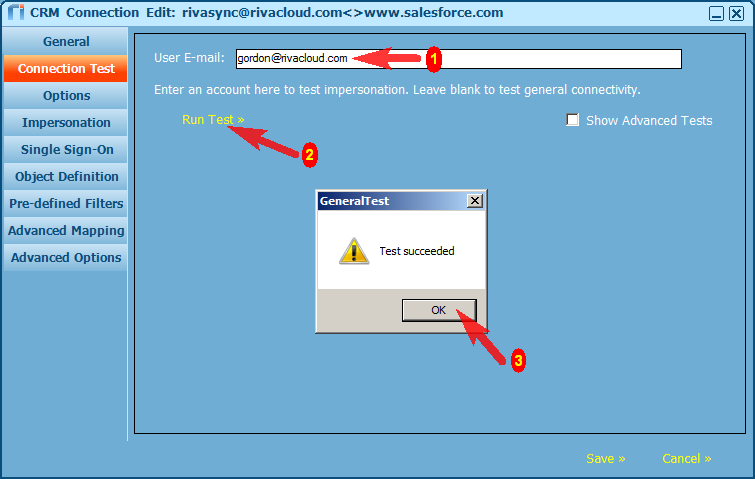
In the Test succeeded message box, select OK.
If the impersonation test fails, verify that the Riva connection account is a member of the Salesforce System Administrator role.
Step 4: (Optional.) Assign a User-Friendly Display Name
(The Display Name is supported in Riva 2.4.46 or higher.)
-
Start the Riva Manager application.
-
If the menu bar displays Setup, select Setup.
-
In the right pane, double-click the Salesforce connection to open the CRM Connection Edit window.
-
On the General page, assign a user-friendly Display Name.
-
Save the connection.
Step 5: Configure the Connection Options
To configure the common connection options:
-
Start the Riva Manager application.
-
If the menu bar displays Setup, select Setup.
-
In the right pane, double-click the Salesforce connection to open the CRM Connection Edit window.
-
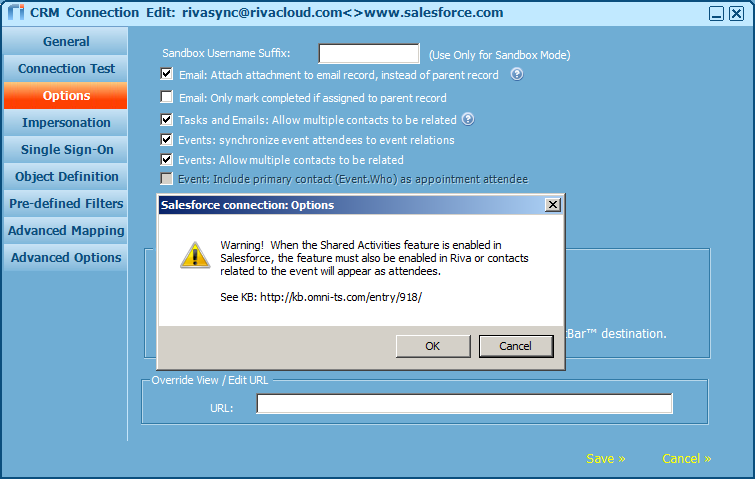
Select Options.
-
Configure the following options:
-
Sandbox Username Suffix: Use only for Sandbox Mode. Examples: ".sandbx", ".sbox".
-
Email: Sync email to Salesforce as enhanced email: For information, see Salesforce enhanced email feature.
-
Email: Attach attachment to email record, instead of parent record:
-
When this option is selected, email attachments are attached to the task item created for that email.
-
This option is unavailable if email is synced to Salesforce as enhanced email. For Salesforce enhanced email, attachments are always attached to the email record.
-
If the check box is cleared, the attachment is attached to the matched contact or CRM user. For more information, see Making attachments visible on an email in Salesforce.
-
Email: Only mark completed if assigned to parent record: Email is synced as tasks to Salesforce, unless you selected the Email: Sync email to Salesforce as enhanced email check box. Riva cannot inject email into the Salesforce email datastore. Select this option so that if an email is matched to a Salesforce contact, it appears as a completed task in the Activity History of the matched contact. If an email cannot be matched to a Salesforce contact, Riva creates the email as an uncompleted task in the Activity History of the syncing CRM user.
-
Tasks and Emails: Allow multiple contacts and users to be related: Select this option to allow Riva to match all recipients of emails to CRM users, contacts, or leads. Shared activities must be enabled in the Salesforce organization for this option to be available. If the check box is cleared (or if Salesforce Shared Activities are not enabled), Riva matches the email to only the first CRM contact that can be resolved against the email recipients.
-
Events: synchronize event attendees to event relations:
-
If the check box is cleared, Riva adds the meeting as an appointment to the first CRM contact that it can match a meeting attendee to.
-
If Salesforce Shared Activities are enabled AND this option is selected AND the Events: Allow multiple contacts to be related option is selected, Riva creates a single meeting item in Salesforce and adds all attendees as invitees to the Salesforce event record.
-
If Salesforce Shared Activities are not enabled and this option is selected, Riva creates an event item in the calendar for each matched CRM user or contact. All of those event records are related to the same Salesforce Global ID, so that changes made in one event update all other related events. If a user deletes the event in the email client, Riva syncs the deletion to Salesforce, removing all of the related events, and then Riva syncs the deletion to the remaining attendees email accounts.
-
Events: allow multiple contacts to be related: Select this option to ensure that event relations work correctly when Salesforce Shared Activities are enabled and the Events: synchronize event attendees to event relations option is selected.
-
Events: Include primary contact (Event.Who) as appointment attendee: When this option is selected, Riva adds the primary contact of the Salesforce appointment or event as an attendee to the calendar item that Riva creates in Exchange. This option is available only if Salesforce Shared Activities are not enabled or if the Events: Synchronize event attendees to event relations check box is cleared.
-
Platform encryption enabled: For information, see Salesforce shield encryption supported by Riva.
-
Upload attachments as Chatter Files. (*** Not recommended for Group Activities. ***) (Riva 2.4.44.37360 or higher.)
- Maximum file size: 36 Mb.
- Requirements in Salesforce:
- Location of the uploaded file: My Files or a library, depending on the version of Riva.
- In Riva 2.4.44 through 2.4.51, if the uploaded file ownership can be transferred from the Riva connection user to the end user, the file appears under the end user's My Files in the Files tab. (Otherwise, it appears in the Riva connection user's My Files.)
- In Riva 2.4.52 or higher,
- By default, the uploaded file appears in the place described above.
- It is possible to configure Riva to upload the file to a library. If there is no content workspace, a library is created and the end user is designated as the workspace administrator for the library.
To upload attachments as Chatter files to a library:
- Configure one or more of the following advanced options for the Salesforce connection:
Required: Crm.Salesforce.SyncChatterFilesToPrivateLibrary = true (Default: false.) Allows Chatter files to be synced privately for a user without losing the ability to version files.
Optional: Crm.Salesforce.SyncChatterFilesToPrivateLibrary.ContentWorkspacePermissionIdOverride = [ID], where [ID] is the ID for the permission to set the user so that the Riva sync does not need to query Salesforce for it.
Optional: Crm.Salesforce.ChatterFileLibraryNameSuffix = [Name]. Default: [user name]--Riva Synced Files. The [Name] specified in this advanced option overrides the Riva Synced Files portion of the default name.
- Versioning:
- When an attachment is uploaded as a Chatter file (whether to My Files or a library), the Riva sync creates a new version of a file that is attached to the parent document that contains every version of that file. Older versions are not overridden. A new version is uploaded.
- Some limitations apply.
- Limitations:
- Uploading attachments as Chatter files is not recommended for Group Activities.
- It is not possible to link a specific version of a file to a record. The link is made to the most recent version of the file.
- If a successfully uploaded file fails to transfer ownership to the end user, the file remains in the Riva connection user's My Files.
- If a successfully uploaded file that has transferred ownership to the end user fails to link to the record, the file still exists in the end user’s My Files, even though it is not linked to the record.
- When an event owns the attachment, the Chatter file is not visible from the event, regardless of the permissions that are applied to the file. Any file uploaded to an event is not visible to the other users connected to the event. If the file is made public by sharing it company-wide, then the file is visible to any user but still hidden in the event.
- During a sync to Exchange:
- Only the latest version of a Chatter file is synced to Exchange.
- Adding a file to an appointment in Salesforce does not cause an update to the item in Salesforce; therefore, the sync process does not detect the new file, and the new file is not synced to Exchange.
-
Deleted Items Sync Method. (*** Advanced users only.***) Determines how the Riva sync detects item deletion in Salesforce. Choose one of the following:
-
GetDeleted: Uses QueryAll to retrieve the items by ID that have IsDeleted set to true. This is always more optimal than the GetItems method, and for a certain number of IDs is better than the IsDeleted method. If the number of items is below GetDeletedMethodThreshold, this method should always be used.
-
IsDeleted: (Default.) Uses QueryAll to query for items that have been modified after X date/time and have the IsDeleted flag set to true.
-
GetItems: Retrieves all items by ID and compares them with the delete list. Any missing items are considered deleted.
-
GetItemsWithIsDeleted: Searches for deleted items in specific ids.
-
Enable inactive user sync: (Riva 2.4.44 or higher.)
-
ConnectBar Options: Ensure that Use Existing Browser Session is selected.
-
Override View / Edit URL: It is possible to incorporate SAML or Single Sign-on (SSO) or "My Domain" methods for users to authenticate to Salesforce. In those cases, the URLs that Riva links to the ConnectBar View and Edit buttons may not be correct. Use this field to specify the correct parent URL. The correct URL parent may be in the format https://<companyname>.salesforce.com, for example rivacloud.salesforce.com.
Step 6: Configure Pre-Defined Filters Including Support for Team Selling
In Riva 2.4.36, support was added for extra contact filtering options in addition to Salesforce Team Selling filters. If Salesforce Team Selling is enabled, the applicable Team Selling filter must be assigned; otherwise, select the desired filter and one or more applicable license matching filters.
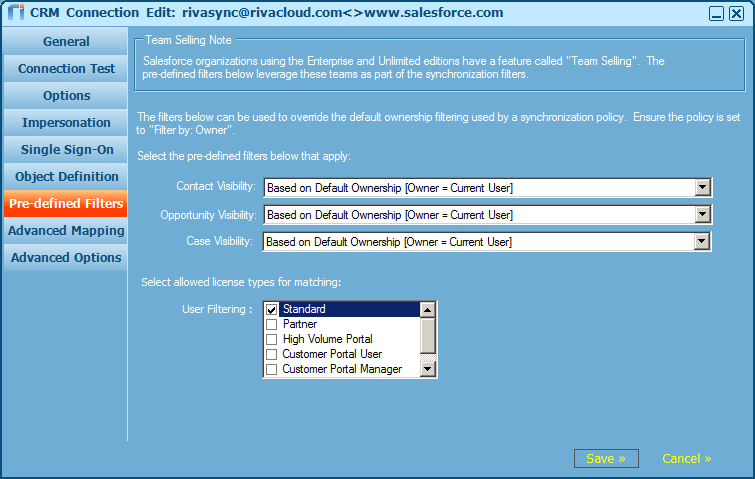
Important Note: To use a filter option, the sync policy Filter by option for that module must be set to Must be owner. See Contact sync filters and Setting email sync filters for opportunities and cases. When configured properly, Riva syncs items based on team membership including items owned by users who are members of that team.
On the Pre-Defined Filters page, select one or more filter options that match the data sync requirements:
-
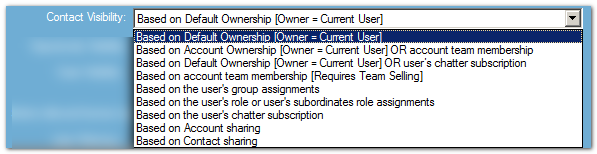
Contacts: Select the appropriate filter from the drop-down list:
-
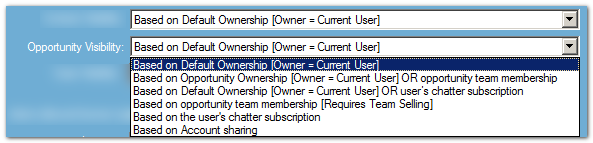
Opportunities: Select the appropriate filter from the drop-down list:
-
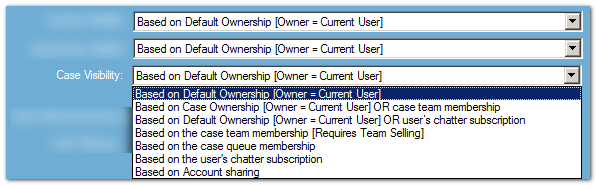
Cases: Select the appropriate filter from the drop-down list:
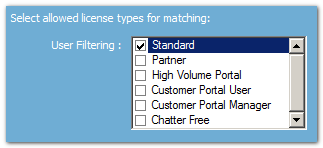
License Type Filtering: Matching to CRM users can be filtered by license type. By default, Riva matches Standard users, but additional license types can be selected.
Step 7: Learn About Support for Custom Audit Fields
When Riva is configured to use standard impersonation, all items that Riva creates or modifies in Salesforce are displayed as being created and saved by the Salesforce user that Riva connects with (step 2 above). Riva supports the use of custom Salesforce fields to enable granular audit reporting that can identify the owners of items that Riva created or modified. For more information, see Using custom audit fields with standard impersonation.
