|
Article ID: 605
Last updated: 17 Jun, 2021
Riva Cloud Corporate requires a CRM connection to NetSuite using an administrator-level account that can impersonate target user CRM accounts. Riva Cloud supports customers with public internet access who use:
These instructions are specific to preparing for Riva Cloud Corporate CRM connections to NetSuite. Complete the following preparations:
Step 1: Enable NetSuite Web ServicesRiva requires the NetSuite free SuiteFlex Web Services Feature enabled:
Step 2: Optionally License SuiteCloud Plus Web ServicesRiva supports web services enabled in NetSuite roles offered in default NetSuite subscriptions. For large, enterprise NetSuite environments, Riva supports NetSuite accounts that are subscribed to SuiteCloud Plus licenses: Step 3: Prepare a Riva Connection Account in NetSuiteThe Riva connection account to NetSuite can be any standard NetSuite account that is assigned to a default role that has sufficient permissions to create, edit, remove, export, and import data that will be synced by Riva. Most of our clients create or use an existing user that is assigned to the Administrator role and configure that role as the default web services role for the NetSuite account. See Prepare a Riva connection user for NetSuite. For clients who employ custom roles that trigger workflow processes, and Riva synced data needs to trigger the same workflows, then the Riva connection account can use a custom role with sufficient permissions for the required workflow processes. There are two ways to accomplish this:
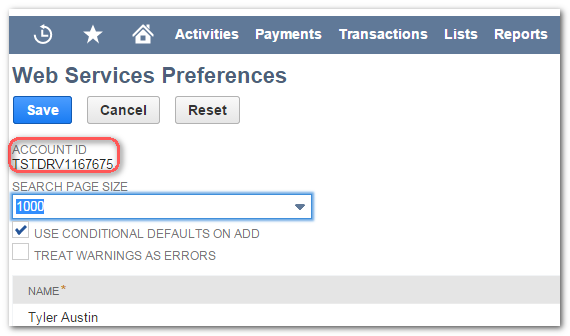
For instructions, see Prepare a Riva connection user for NetSuite. Step 4: Prepare the Target User Accounts in NetSuiteThe email address for each target CRM user account must match the primary SMTP email address of the corresponding email system account. For example, if the Netsuite email address for Ian Sample is iansample@mycompany.com, then the Exchange SMTP Reply-to email address value for the corresponding email account must also be iansample@mycompany.com. Step 5: Gather Information for Creating the Riva NetSuite ConnectionGather the following information. It is required when you create a Riva connection to the NetSuite system:
This article was:
Helpful |
Not helpful
Report an issue
Article ID: 605
Last updated: 17 Jun, 2021
Revision: 5
Views: 5500
Comments: 0
|

.png)