|
|
Create & Configure a Sync Policy for GroupWise
Article ID: 480
Last updated: 20 Dec, 2016
Recent modifications to features and enhancements to Riva have resulted in changes to the layout of most of the CRM sync policy settings tabs with additional options being made available. Please refer to this document when creating a CRM sync policy for GroupWise and CRM connections.
Creating a Sync Policy
Configure the Sync Policy
The following policy settings tabs are available:
- General - Policy name, target CRM connection name, and target GroupWise users.
- Sync Start Time - Setting for the historic item filter for address book, calendar and task items.
- Scheduling - Settings to control full and quick drop folder sync frequencies.
- Address Books - Settings to control the sync of contacts and leads.
- Calendar - Settings to control the sync of calendar appointments, tasks and phone calls.
- Other - List of modules to enable for SmartConvert and AssignTo.
- SmartConvert - Settings to enable and configure how email items can be converted into CRM items.
- AssignTo - Settings to enable and configure creating and using drop folders for modules enabled in the Other tab (the tab named Other).
- Connection Options - Settings to select the CRM connection method.
- Advanced Options - Settings to handle advanced options.
Once the CRM sync policy has been completely configured, the policy can be saved and the Riva CRM Agent Service can be installed. Certain sync policy options will be locked down to prevent sync errors in the future.
Creating a CRM Sync Policy for GroupWise
Before creating a Riva CRM sync policy for GroupWise connections, ensure that the following tasks have been completed:
- a Riva connection to the target CRM has been created and tested.
- a Riva connection to the target GroupWise system has been created and tested.
- a trial or purchase license has been requested and activated.
Types of Synchronization
With respect to this article, Riva performs three types of data synchronization:
- Initial Sync - After a target user has been added to a CRM sync policy, Riva reads all of the policy filter settings and sync data from the CRM to the target user's GroupWise mailbox. The initial sync normally makes the following changes to the GroupWise mailbox (which will be reflected in the user's GroupWise client):
- Contacts and leads are copied from the CRM to the user's Address Book into the Contacts or Leads contact book.
- Appointments and phone calls are copied to the user's child calendar that Riva creates and assigned a colour.
- Tasks are copied to the user's task list and assigned a colour.
- If SmartConvert is enabled, a set of Create New email sync drop folders are created.
- If AssignTo is enabled, a set of AssignTo folders are created with corresponding unique email sync drop folders by module type.
- Full Sync - Normal scheduled sync of all new and modified data for enabled modules.
- Re-initialize Sync - If data sync has stopped, become unlinked, or corrupted, the administration can re-initialize all or selected target user accounts. For more information, see Re-initialization Options for GroupWise Accounts.
Recommended Best Practises for Creating New Riva CRM Sync Policies
The goal is to create a CRM sync policy that can be configured and tested against the target systems with minimal disruption to the target systems or users. These best practises should be followed for evaluation and production deployments:
- Ensure that you DO NOT select the SAVE button on a sync policy until all of the policy options have been configured; otherwise, the category names and folder names could be locked in before you have the opportunity to modify them.
- When creating a CRM sync policy, always ensure that the policy is disabled. This permits installing and configuring the Riva Sync Service without having to attempt to sync individual users.
- Select one or two target users to limit testing and mitigate the impact on the target systems. Actively involve those target users in the testing of Riva syncing of CRM and GroupWise data.
- Configure the CRM sync policy to meet expected requirements of the target users.
- Enable the CRM sync policy and confirm that initial synchronization is successful and at least two complete data sync cycles are completed.
- Tweak the CRM sync policy settings to better meet the needs and expectations of the target users; confirm the results of changes.
- Once the CRM sync policy settings are finalized and tested, add the remaining target users. Confirm that the initial synchronization is successful and at least two complete data sync cycles are completed for each new target user added to the policy.
To start creating a new Riva CRM sync policy
-
Launch the Riva Manager application.
- Select the Policies tab. In the Enterprise CRM Integration policies list, select GroupWise CRM Synchronization.
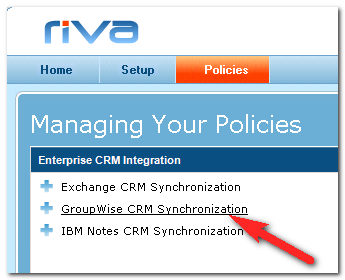
The Edit GroupWise CRM Synchronization window displays settings in the General tab.

-
In the lower left corner, clear the Enabled check box. This ensures that, after you have locked in the category names and folder names by clicking Save, you can still tweak the non-locked-in settings and save the policy multiple times and Riva will not attempt to sync defined target users until the policy is enabled.

Configure the CRM Sync Policy Settings
The next task is to configure the CRM sync policy. DO NOT select SAVE to save the CRM sync policy until the various policy settings have been configured. Saving the policy early would lock in the category names and folder names and prevent them from being modified. To modify the locked settings, you would need to reinitialize everything as follows: In the General tab, select the Select All check box; and in the Type drop-down list, select Full - Delete all Mailbox data and re-poll from CRM.
The General tab
The General tab is used to:
In the General tab of the sync policy:
-
Modify the policy name as desired. Optionally provide a description.

-
Add the CRM connection as follows. Select the select >> link. If only one CRM connection exists, the connection is added. If there are multiple CRM connections, select the desired connection, and select Ok.
-
Add the target GroupWise account(s) as follows. To the right of the GroupWise Accounts list box, select Add:
- For Enterprise GroupWise connections - Add target users
- For Direct GroupWise connections - Add target users
-
Confirm that the target or targets have been added to the list.
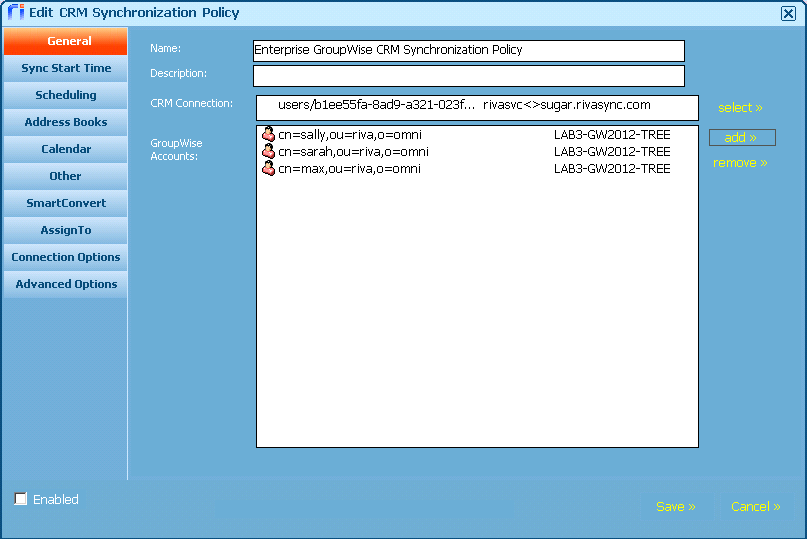
Notice that only the target GroupWise accounts are identified. When Riva syncs to the CRM, Riva links to a CRM account with the primary email value that is identical to the primary SMTP email address value of the corresponding target GroupWise user identified in this list.
Note: It is common for some CRM accounts to be configured with the same primary email address value. This is often done for a CRM user who is also the administrator; both the admin account and the individual's CRM account are configured with the same email address value. Because Riva cannot differentiate between multiple CRM accounts with the same email address value, Riva reports that as a sync error and will not sync data for that user.
-
DO NOT CLICK SAVE. Proceed with setting the Sync Start Date/Time settings.
The Sync Start Time tab
-
Select the Sync Start Time tab. This setting creates a historic item filter and defines which items to copy from the CRM to the target user's GroupWise account during the initial sync.
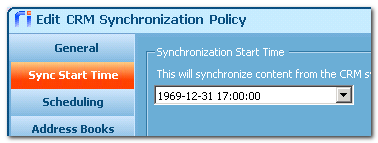
-
Modify the Synchronization Start Time by typing the desired values.
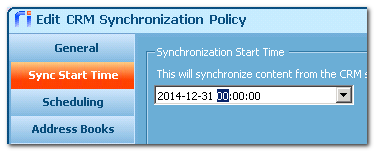
When Riva performs the initial sync, Riva selects contacts and leads, calendar items (appointments, phone calls, meetings, etc.) and uncompleted tasks that were created or last modified on or after the defined synchronization start time value provided.
-
DO NOT CLICK SAVE. Proceed with setting the Sync Schedule options
Important Note
During the first sync cycle, Riva syncs items from the CRM to GroupWise as follows:
- Appointments whose “Start Date/Time” is the same as or later than the specified “Synchronization Start Time”.
- Tasks whose "Due Date" is the same as or later than the specified “Synchronization Start Time”; otherwise, if no “Due Date” is specified, Riva syncs active tasks.
- Items from all other modules when the items' “Modified Date” is the same as or later than the specified “Synchronization Start Time”.
The Scheduling tab
How does Riva handle long running synchronizations?
When synchronizing a user's content, if the synchronization cycle lasts longer than the defined interval, Riva delays the scheduling of the next cycle until after the current synchronization cycle has been completed.
This tab is used to:
To set the scheduling of the sync policy:.
-
Select the Scheduling tab.
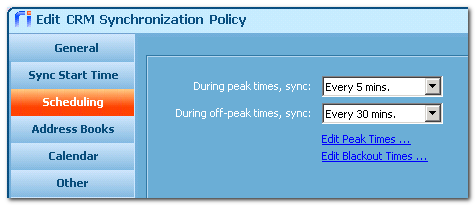
By default, Riva schedules each target user for a full sync every 5 minutes during peak times and every 30 minutes during off-peak times. Additionally, Riva is configured to perform drop folder checks at a faster frequency than full syncs and will dynamically schedule drop folder checks based on the number of target users and the full sync schedules.
-
Make adjustments to the full sync frequency values.
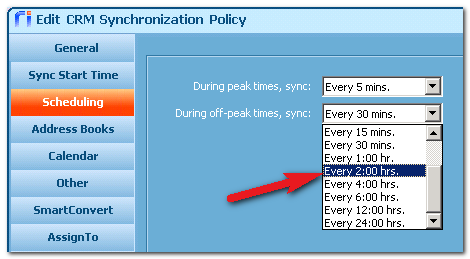
Adjust the peak and off-peak full sync frequency to best match the number or target users, which modules are enabled, the expected number of changes to data in the CRM or in GroupWise, and whether the CRM is on-premise or is hosted.
-
Select Edit Peak Times to adjust the parameters that define "peak" times.
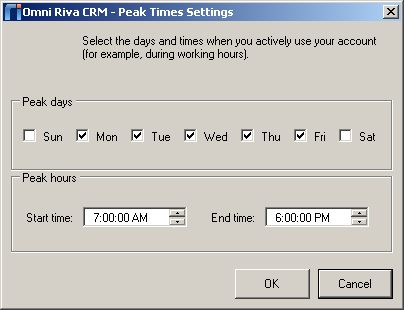
By default, Riva has "peak" times configured as Monday to Friday, 7 am to 6 pm; Riva uses the GroupWise server configured time. Make adjustments to these values to accommodate users who work from different time zones.
-
Select Edit Blackout Times to adjust the parameters that define "blackout" times when Riva will not sync data.
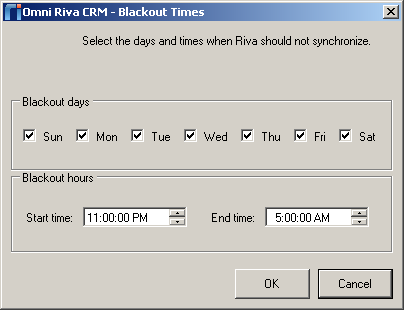
By default, Riva has "blackout" times configured as Sunday to Saturday, 11 p.m. to 5 a.m.; Riva uses the GroupWise server configured time. Make adjustments to these values to accommodate users who work from different time zones and scheduled maintenance routines for on-premise GroupWise and CRM servers.
The Address Books tab
The Address Books tab is used to:
To configure address book synchronization:
-
Select the Address Books tab.
.png)
This tab displays the default settings for contact and lead synchronization.
-
Make the desired changes to the Address Books options.
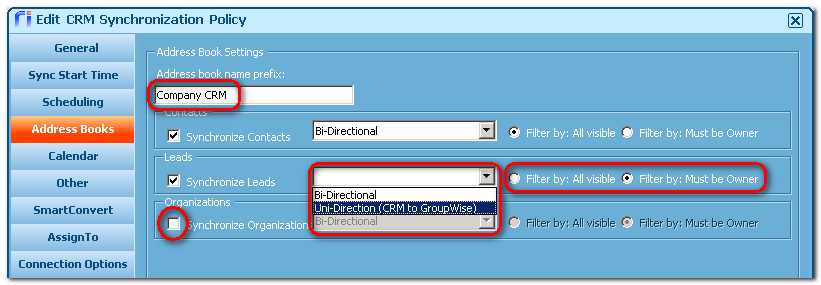
Address Book Name Prefix: When Riva performs an initial sync, if either Contacts or Leads are enabled, Riva creates new contact books using the Address Book Name Prefix, for example Company CRM | Contacts and Company CRM | Leads
Address Book options to consider
-
Synchronize Contacts - To disable contact sync, clear this check box.
-
Synchronize Leads - To disable lead sync, clear this check box.
-
Synchronize Organizations - If this check box is checked, Riva creates organization objects in the GroupWise contact books to match the Account of the owning contact or the Company Name of the owning lead. To disable syncing organization objects, clear this check box.
-
Sync Direction - For each item type, choose Bi-Directional (default - Riva syncs new items and changes made in GroupWise and the CRM); or Uni-Directional (CRM to GroupWise) - Riva syncs read-only copies of items from the CRM to GroupWise. If a user modifies the item in GroupWise, it remains changed until someone modifies the same item in the CRM, after which Riva syncs a new copy of the item to GroupWise and overwrites the user's previously changed item.
-
Filter by: All visible – (Default.) Contact and leads are synchronized on the basis of visibility.
- Salesforce, NetSuite, and Oracle On Demand use the Standard Impersonation mode. This filter option syncs all CRM contacts that are visible to the Riva connection user specified in the Riva connection to the CRM.
- GoldMine, 1CRM (formerly known as info@hand), intelecrm, Microsoft Dynamics CRM, Sage CRM, infor CRM (formerly known as Saleslogix), and Sugar use Enterprise Impersonation mode. This filter option syncs all CRM contacts that are visible to the target CRM user.
-
Filter by ownership – Contacts and leads are synchronized on the basis of ownership (assignment to the target CRM user). Only those contacts and leads that are ‘assigned’ to the user are synchronized from CRM to GroupWise.
The Calendar tab
The Calendar tab is used to:
By default, Riva syncs appointments, non-completed tasks, and phone calls from the target user's CRM calendar to a new child calendar in their GroupWise calendar:
-
Click the Calendar tab.

This tab displays the default settings for calendar synchronization.
-
Make the desired changes to the Calendar options.

When a calendar type item is configured to sync and Riva performs its initial sync, Riva creates a child calendar using the Calendar name value. All CRM appointments, tasks and phone calls are synced to that child calendar. By default, Riva displays a calendar name value that matches the target CRM. If the CRM sync policy has not been saved for the first time, the value for the calendar name can be modified. Once the CRM sync policy is saved for the first time, the value of the calendar name is locked and grayed out.
Calendar options to consider
-
Synchronize Appointments - To disable appointment/activity/meeting sync, clear this check box.
-
Synchronize Tasks - If this check box is checked, Riva syncs only non-completed tasks. Once a task is completed, Riva no longer syncs any changes to the task. To disable task sync, clear this check box.
-
Synchronize Phone Calls - To disable phone calls sync, clear this check box.
-
Sync Direction - For each item type, choose Bi-Directional (default - Riva syncs new items and changes made in GroupWise and the CRM); or Uni-Directional (CRM to GroupWise) - Riva syncs read-only copies of items from the CRM to GroupWise. If a user modifies the item in GroupWise, it remains changed until someone modifies the same item in the CRM, after which Riva syncs a new copy of the item to GroupWise and overwrites the user's previously changed item.
The Other tab
The Other tab is used to:
Different CRMs have different modules available. Your options may be different depending on the CRM.
-
Click the Other tab.

-
Three configurations can be adjusted in the Other tab:

Parent Folder for Module Content: If either SmartConvert or AssignTo are enabled, Riva's initial sync creates a parent folder to contain the email sync drop folder structure. By default, Riva displays a parent folder name that matches the target CRM. If the CRM sync policy has not been saved for the first time, the value for the parent folder name can be modified. Once the CRM sync policy is saved for the first time, the value of the parent folder name is locked and grayed out.
Enable Modules: By default, email sync support is not enabled for any modules. The modules list varies depending on the type of CRM that the sync policy is connecting to. Checking a module check box enables email sync support for that module and creates a corresponding set of folders inside the parent folder (see above). During the initial sync, Riva creates a parent folder structure that matches the enabled modules. These folders are created and managed by Riva. If a user moves or deletes a Riva-managed folder, Riva recreates the folder. Here is an example of a created folder structure:
Company CRM
Cases
Opportunities
Filters: Filters affect the email drop folders and connect email items that Riva syncs to the CRM. If the Opportunities module is enabled, Riva creates drop folders for the most current opportunities based on these filters and the filter settings in the AssignTo page.
(1) If Filter by: All Visible is selected, Riva creates drop folders and connects to email items for the most current opportunities that are visible in the CRM. This may be a good option for supervisors, team leaders and managers who need to see opportunities, cases, quotes, etc. they do not own.
- Salesforce, NetSuite, and Oracle On Demand use the Standard Impersonation mode. This filter option syncs all items (opportunities, cases, etc.) that are visible to the Riva connection user specified in the Riva connection to the CRM.
- GoldMine, 1CRM (info@hand), intelecrm, Microsoft Dynamics CRM, Sage CRM, Infor CRM (Saleslogix), and Sugar use the Enterprise Impersonation mode. This filter option syncs all items (opportunities, cases, etc.) that are visible to the target CRM user.
(2) If Filter by: Must be Owner is selected, Riva creates drop folders and connects to email items for the most current opportunities that are assigned to the target user in the CRM. This may be more appropriate for account executives and sales reps with defined opportunities who need to see only the opportunities they own.
The SmartConvert tab
SmartConvert is Riva's method to sync a copy of an email from GroupWise to the CRM.
The SmartConvert tab is used to:
To configure SmartConvert:
-
Select the SmartConvert tab.
-
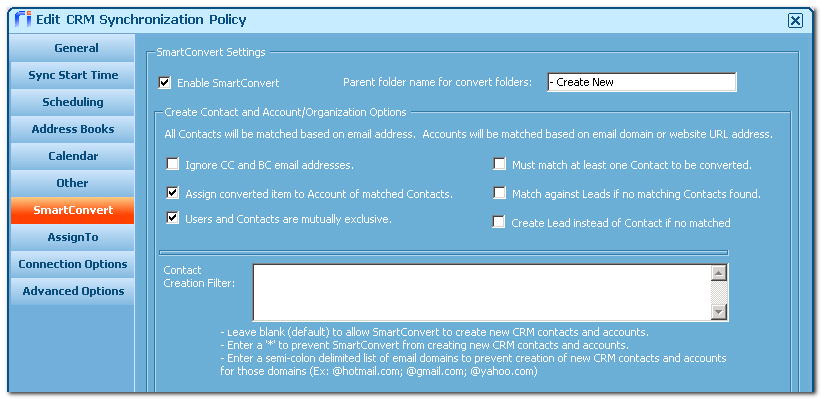
At the top of the SmartConvert tab, configure the Enable SmartConvert setting and the parent folder name as follows:

Enable SmartConvert: (Checked by default.) To disable SmartConvert for the target users, clear this check box.
Parent folder name for convert folders: This identifies the prefix for all of the email sync drop folders.
-
If modules are not enabled in the Other tab, this setting adds a Create New Email drop folder immediately below the CRM sync parent folder.
-
If modules are enabled in the Other tab, this adds Create New <type> folders throughout the CRM sync folder structure.
Tip: To ensure that the Create New <type> drop folders appear at the top of their parent folders, insert a - (hyphen) before the words Create New. This causes Riva's initial sync to add "- Create New" folders into the folder structure created by the Other tab settings. For example:
CompanyCRM
Create New Email
Cases
Create New Cases
Opportunities
Create New Opportunities
Using SmartConvert to Create Cases, Opportunities, Quotes or Projects. When a user places an email in a "- Create New <type>" drop folder, Riva creates the new item in the CRM. The following example of creating a new opportunity illustrates the process common to creating new opportunities, cases, quotes, projects, or any object types enabled in the Other tab.
(1) Riva attempts to match the recipient email address to CRM contact and account matches. If Riva does not find a match in the CRM, it creates the new CRM account(s) and contact(s) as required. New CRM contacts and accounts are assigned to the CRM user that converts the email using SmartConvert.
(2) Riva creates a new opportunity. The Subj: of the email is used as the name of the new opportunity. This opportunity is created in the target CRM account, and the target CRM contacts are added to the new opportunity. The new opportunity is assigned to the CRM user that converts the email using SmartConvert.
(3) Riva creates a copy of the email in the email store of the CRM and links it to the opportunity and to the assigned CRM contact(s) and CRM account.
(4) Riva manages the processed email item and either deletes it from the "- Create New Opportunities" drop folder or returns it to the Inbox, depending on the configured option.
-
Set the Contact and Account/Organization Creation Options.
When a user places an email into a Create New drop folder, Riva reads the addressees in the header of the email and attempts to find a matching CRM user (referred to as the "system user" in the Riva logs), contact and/or lead in the CRM for each addressee. Syncing (creating a copy of) the email into the CRM is handled in accordance with the contact and account/organization (and email item handling) option settings.
To enable an option, check the corresponding check box:

Ignore CC and BC email addresses: (Default: not enabled.) If checked, Riva does not attempt to match the CC and BC email addressees against users, contacts or leads in the CRM.
Must match at least one Contact to be converted: (Default: not enabled.) If checked, before Riva can create a copy of an email in the CRM, it must match one email addressee to a CRM contact. Riva does not consider a CRM user (system user) to be the same as a contact. If this option is enabled, the option “Match against Leads if no matching Contacts found” does not work.
When creating a new Contact, if no Account is matched, create new Account: (Default: enabled.) This is a default action that takes place if Riva creates a new CRM contact and cannot match it to an existing CRM account.
Explanation:
The way the email addressee is identified also makes a difference. If the email addressee is identified
-
by only an email address, for example johnd@mycompany.com, then the email address itself is used as the name of the new CRM contact, for example johnd@mycompany.com.
-
by both a name and an email address, for example John Doe <johnd@mycompany.com>,
-
Riva creates a new CRM contact with the same name as the addressee, for example John Doe
-
If a new CRM account is created, it receives the name of the email address domain name, for example mycompany.com.
Assign converted item to Account of matched Contacts: (Default: not enabled.) When Riva syncs an email into the CRM, it creates a copy of the email item in the CRM's email store and creates a link for the email item in the activity history of the matching contact(s).
-
If this check box is checked, Riva also creates a link for the email item in the activity history of the CRM account of the matching contact(s).
-
If this check box is cleared, the newly created item is listed only in the activity history of the matching contact(s).
Match against Leads if no matching contact is found: (Default: not enabled.) If this check box is checked and there is no corresponding matching CRM contact, Riva attempts to match email addressees against CRM leads. For this option to work, the "Must match at least one contact to be converted" check box must not be checked.
Users and Contacts are mutually exclusive: (Default: enabled.)
-
When this check box is checked, Riva looks up the recipient email addressees and compares them to CRM users (system users).
-
If Riva matches an email recipient with a system user, it archives that email to the CRM user account.
-
If it does not match, Riva creates a contact for each email recipient.
-
When this check box is cleared, Riva does not compare email addressees against CRM users. If Riva cannot find a matching contact or lead for an internal user, Riva creates a contact for internal users. As a result, emails synced to the CRM by Riva are linked to contacts created by Riva instead of the CRM account that the user would log into the CRM with.
-
Regardless of the setting for this option, Riva creates a CRM contact for internal employees that do not have a CRM user account, unless a creation filter blocking the company email domain exists; see Step 4.
Create Lead instead of contact if not matched: (Default: not enabled.) If this check box is checked and if no matching CRM contact or lead is discovered, Riva creates a lead instead of a contact or account. For this option to work, the "Must match at least one contact to be converted" check box must not be checked.
-
Set the Contact Creation Filter setting.

Be sure to read the information in the above screenshot.
Tip: Most companies insert their own email domain(s) as a filter to prevent Riva from creating CRM contacts for their own company employees.
The AssignTo tab
AssignTo is Riva's method of creating drop folders to archive items to the CRM modules enabled in the Other tab.
The AssignTo tab is used to:
To configure AssignTo:
-
Select the AssignTo tab.
-
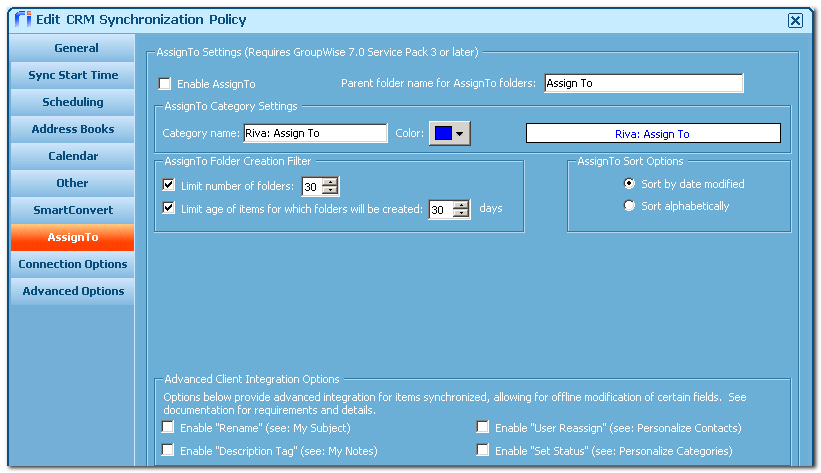
At the top of the AssignTo tab, configure the Enable AssignTo setting, the parent folder name, and the category name as follows:

Enable AssignTo: (Default: disabled.) To enable AssignTo for the target users, check this check box.
Parent folder name for AssignTo folders: This identifies the parent folder for all of the email sync unique item drop folders. If modules are not enabled in the Other tab, this setting has no effect. If modules are enabled in the Other tab, this setting adds Assign To folders throughout the CRM sync folder structure: one for each module type. During the initial sync, Riva adds Assign To folders into the folder structure created by the Other tab settings. Riva adds a separate drop folder for each active item type. For example, a drop folder is created for each open case and active opportunity assigned to the target user. Here is an example of a Riva-created folder structure:
CompanyCRM
Create New Email
Cases
Create New Cases
Riva: Assign To
Drop folder for an open case (uses name for the case)
Drop folder for an open case (uses name for the case)
Drop folder for an open case (uses name for the case)
Opportunities
Create New Opportunities
Riva: Assign To
Drop folder for an active opportunity (uses name for the opportunity)
Drop folder for an active opportunity (uses name for the opportunity)
Drop folder for an active opportunity (uses name for the opportunity)
Category name: This is the GroupWise category assigned to an email item placed in an individual Assign To item drop folder. When Riva performs a sync, the category name instructs Riva to sync a copy of the email to the applicable item (case, opportunity, etc.) in the CRM. There is no need to change the category name.
-
Configure the AssignTo Folder Creation Filters. Up to two filters can be applied:

Limit the number of folders: (Default: enabled. Default value: 30.)
-
If this filter is enabled, Riva creates a maximum number of drop folders per module, for example a maximum of 30 individual case drop folders or 30 opportunity drop folders. If the maximum number of folders exists and a new object (opportunity or case) is created or modified in the CRM, Riva removes the oldest drop folder to add the newest drop folder. During the initial sync, Riva creates individual drop folders for the most current items based on the last created or modified date for the item.
Tip: If a drop folder does not exist for an open or active item, you can force Riva to add a drop folder by opening that item in the CRM and saving it. The item does not need to be modified; all you need to do is to save it. That modifies the date last modified, and Riva sees it as the most current item and syncs an individual drop folder for the item.
-
If this filter is not enabled, Riva creates an individual drop folder for every active item in the CRM that is assigned to the user (based on the security filter applied for that module in the Other tab.
Limit the age of items for which drop folders will be created: (Default: enabled. Default value: 30.) If this filter is enabled, Riva automatically removes an item drop folder when it becomes stale based on the number of days that the item has not been updated in the CRM. Activity against an item includes changes made to the item in the CRM and any emails that are synced to the item through the corresponding AssignTo item drop folder.
Tips
- If enabling this filter, set its value to the average length for sales cycles or case resolutions cycles.
- If the "Limit the number of folders" filter is not enabled, this filter should be enabled to reduce the total number of item folders that Riva has to check each sync cycle and quick folder check.
-
Configure the AssignTo Sort Options. Two options are available:
Sort by date modified: (Default.) The AssignTo folders display the item drop folders in descending order by date/time last modified, with the most current folder at the top of the list.
Sort alphabetically: Users with many AssignTo drop folders may find a drop folder more easily in an alphabetical list.
-
Configure the Advanced Client Integration Options. To enable an advanced integration option, check the corresponding check box:

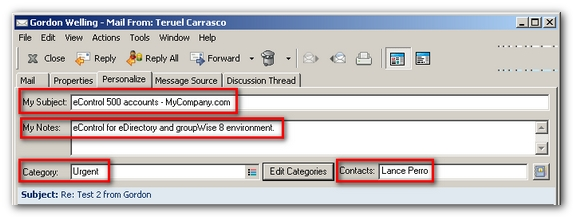
The advanced client integration options apply to the following items in the Personalize tab of a specific email assigned to a case, quote, opportunity, etc.:
-
Enable “Rename” – Permits a user to change the item's subject title to match the My Subject value.
-
Enable “Description Tag” – Permits a user to add the value of My Notes to the description of the item to be assigned.
-
Enable “User Reassign” – Permits a user to reassign the item being assigned to a different CRM user using Contacts.
-
Enable “Set Status” – Permits a user to set the status of the item being assigned, provided that the Category being selected matches the status values in the CRM.
The Connection Options tab
The Connection Options tab is used to:
-
Select the Connection Options tab.
-
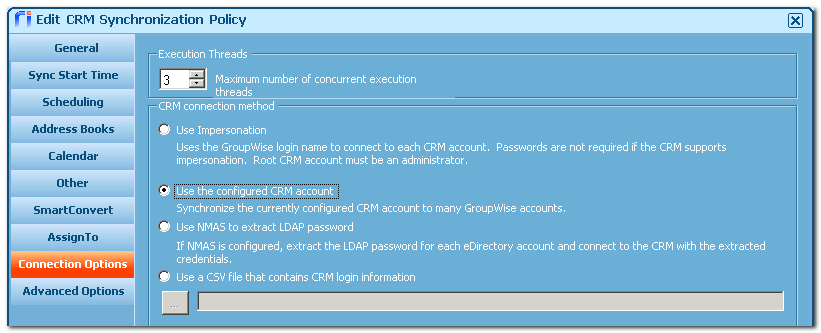
Execution Threads: Each target user consumes one execution thread per sync cycle. If the Execution Threads setting is set to "3", Riva can sync three users concurrently. Set this value to best match your environment. This option is used to throttle the processor load on the GroupWise and CRM systems. For initial sync cycles for small systems, the recommended settings are:
(1) between 2 and 3 threads for hosted CRM services, or
(2) between 3 and 5 threads for on-premise CRM servers.
(3) for normal user sync cycles, set to best match the performance parameters of the Riva host server and the target systems.
If multiple sync policies will be enabled, see control the maximum number of concurrent execution threads consumed by the CRM Agent service.
For more information and recommendations for large systems, see Calculating Riva CRM Server Requirements for Scalability.
-
CRM Connection Method: There are four connection methods. Specify the correct method:
Use Impersonation (Primary Method) - (preferred): Uses the credentials of the Riva connection accounts to the CRM to impersonate each CRM user that matches the GroupWise target users specified in the General tab. This is the most secure, scalable and preferred option. Not all CRM solutions are supported. Some CRM systems need special configuration. This method is normally set by default.
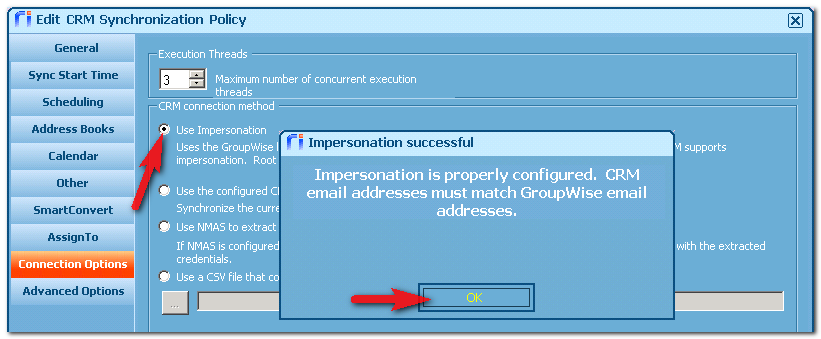
If not selected and Use Impersonation is desired for the CRM connection, select this option. Riva will open a window to confirm that the impersonation will work using the CRM connection selected in the General tab. If the impersonation check passes, select OK. If the connection fails, refer to the Riva system requirements for your CRM and ensure that those requirements are met. Try selecting Use Impersonation again. If it continues to fail, contact Riva support.
Use the configured CRM account (Tertiary method) - Used when you want to synchronize a single CRM account to many GroupWise accounts. This method can also be used to synchronize single user accounts, but it requires creating a unique CRM connection and Riva sync policy for each target user. If multiple target GroupWise users are specified in the General tab, Riva syncs data from each of those GroupWise users to the single CRM user specified in the Riva connection to the CRM.
Use NMAS to extract LDAP password (Secondary method) – If LDAP authentication is set up, this method uses NMAS usernames and passwords to authenticate to target CRM accounts. NMAS usernames and passwords must match CRM usernames and passwords. This method requires special configuration of eDirectory and GroupWise. To implement the NMAS connection method, contact Riva support.
Use a CSV file that contains CRM login information – Uses a CSV file that contains the email address, CRM username and password. This is the least secure option. This option is used when email addresses for target accounts in the CRM do not match the corresponding target account inGroupWise and email addresses cannot be modified; or when no other option works with the target CRM. This is the required connection method for syncing to GoldMine 8 and 8.5.
The Advanced Options tab
The Advanced Options tab is used to configure attachment filter options that are specific to this policy.
-
Select the Advanced Options tab.

-
Configure the Attachment Filter Options, which control synching attachments of emails and calendar items to the CRM.

Attachment Filtering - Maximum File Size (MB): (Default: 0). Specify the maximum size value for attachments. ("0" actually means "unlimited".) This filter applies against any attachment that Riva attempts to sync to the CRM.
Attachment Filtering - File Extensions: (Default is blank.) Specify a comma-separated list of file extensions for this filter.
(1) Inclusive Filter: To make this filter inclusive, select Synchronize attachments with specified extensions. Only attachments matching the file extensions listed above and equal to or less than the maximum file size listed above will be synced from GroupWise to the CRM.
(2) Exclusive Filter: To make the filter exclusive, select Do not synchronize attachments with specified extensions . Riva will not sync attachments matching the file extensions listed above.
Saving the Policy File and Installing the Service
A new CRM sync policy can be saved at any time. The very first time the very first CRM sync policy is saved, Riva opens a window to ask if it can install the CRM Agent Service. If the CRM sync policy is not enabled and Yes is selected, the service is installed and started. If there are no enabled policies (the best practice is to disable new policies when you create them), no data will be synched between the CRM and GroupWise.
-
Select Save to save the policy. Since the Riva CRM Agent Service is not installed, Riva will prompt to install the service.
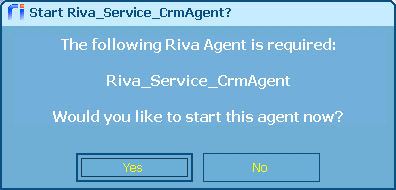
Select Yes or No:
Selecting Yes installs and starts the Riva CRM Agent Service. Since the policy is disabled, the service will start, but it will not attempt to sync data to the target users.
Selecting No causes the Riva CRM Agent Service not to be installed. Riva will display this prompt each time the CRM sync policy is saved until Yes is selected and the service is installed.
-
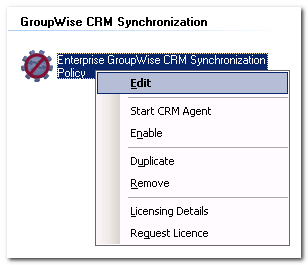
Once the policy is saved, the policy object appears in the Riva application's Policies tab. Any policy can be opened by double-selecting the policy object, or by right-clicking the policy object and selecting Edit.
How Saving a Sync Policy Changes the Policy
Two significant changes occur when a new CRM sync policy is saved:
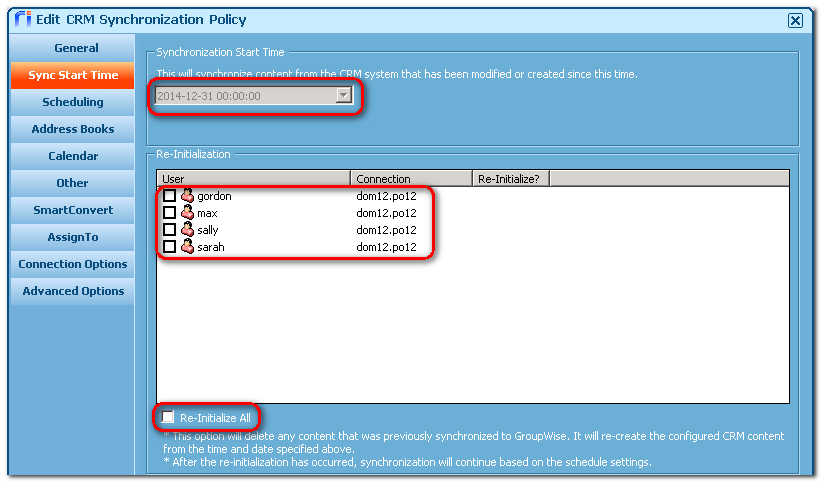
- The Sync Start Time tab changes to lock the Sync Start Date and Time.

Once Riva has performed an initial sync for the target GroupWise users, the list of target users appears, and reinitialization options become available below the target users list.
-
On all other policy tabs, the category and sub-category names, address book names, and parent folders become read-only.

It will not be possible to make changes to those items unless all of the users are selected and a full re-initialization for all users for all modules is selected on the Start Sync Time tab.
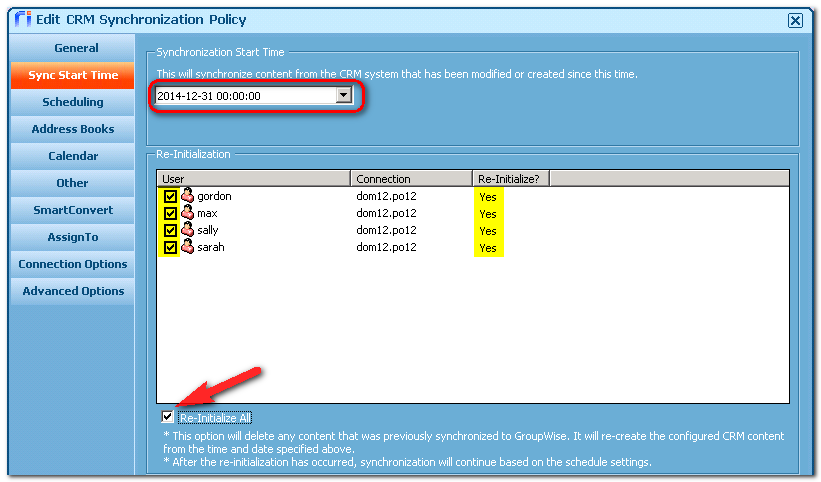
This action will unlock all the locked fields and settings in the CRM sync policy. If the policy has never been synched before through the Riva CRM Agent Service, then reinitializing has no effect on the first initial sync of the users when the policy is enabled.
Article ID: 480
Last updated: 20 Dec, 2016
Revision: 7
Also listed in
|


.png)


