If required, Riva can be moved to a different Windows system. Most moves are required to satisfy one of two requirements:
-
A corporate migration to the latest version of Windows and decommissioning of older Windows systems, or
-
Moving Riva to a Windows system that can better meet the resource requirements of a larger enterprise deployment (100 or more syncing user accounts).
For instructions if you need to relocate the Riva folder structure on the same Windows system, see Move Riva to a different folder or volume on the same Windows system.
The steps in this article have been written to move the Riva On-Premise server, but they can be used to move any installation instance of Riva. For the list of Windows services that Riva can install, based on the policy or application configured for that instance of Riva, see
Monitoring the Riva Sync Service.
Terms used:
For the procedure to move Riva to a different Windows system, refer to the following terms:
-
Source system or server: The Windows server where Riva is currently installed. This instance of Riva will be decommissioned.
-
Target system or server: The Windows server where Riva will be moved to. This instance of Riva will be deployed as the operational Riva server.
To move Riva to a different Windows system:
- Prepare the target host Windows system to meet the system requirements for Riva.
- Remove the current Riva sync service.
- Prepare the Riva folder structure for a move.
- Move Riva from the source Windows system to the target Windows system.
- Upgrade Riva on the target Windows system.
- Enable Riva on the target server.
- Decommission the current Riva server.
Step 1: Prepare the Target Host Windows System
To prepare the target host Windows system:
-
Ensure that the target host Windows system meets the system requirements.
- Configure connections to the target email and CRM systems. (Refer to the source Windows system.)
Step 2: Remove the Riva Sync Service from the Source Host Windows System
It is critical to ensure that the Riva sync service on the source Windows system be removed. This is necessary to prevent creating duplicate records in the CRM, which would occur if two instances of the Riva sync service configured against the same target systems and users were running concurrently.
-
On the source Riva server, start the Riva Service Monitor application, and stop the service.
-
Open Windows Services, and confirm that the Omni Riva (Sync Service) status is blank.
-
In older versions of Riva, the service was called Omni Riva (CRM Agent for Exchange) or Omni Riva (CRM Agent).
-
If the status is displaying Stopping, see Riva service is "Stopping..." for steps to force the service to stop.
-
In Windows Services, open the properties of the Riva sync service, and copy the path to the service to the Windows clipboard.
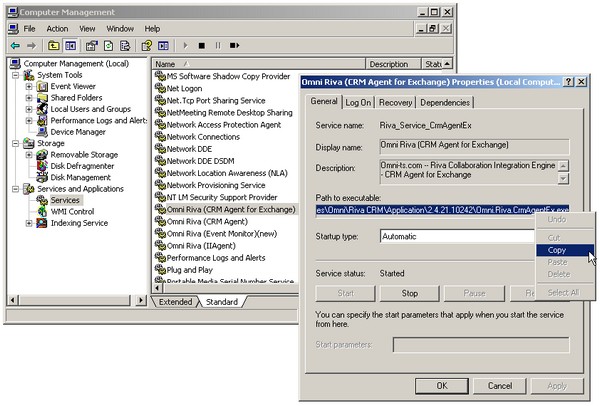
-
Open a CMD prompt with elevated privileges (Run as administrator).
-
Enter CD \ and press ENTER. Type a " (double quotation mark), then click in the CMD prompt window, right-click, and select Paste. After \Omni.Riva.CrmAgentEx.exe, add a " (double quotation mark), add a space, type --uninstall, and press ENTER.
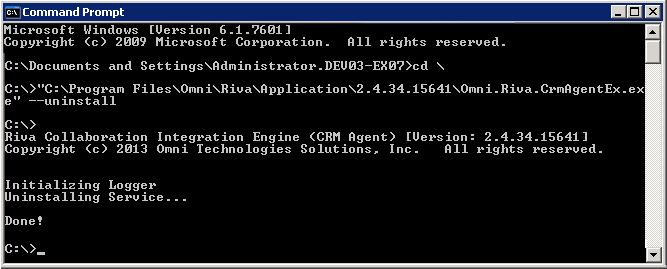
-
When Done! appears, press ENTER, and close the CMD prompt window.
-
Refresh Windows Services, and confirm that the Riva sync service has been removed from the list of installed services.
-
Close Windows Services.
Step 3: Prepare the Riva Folder Structure for a Move
In most circumstances, if Riva has been deployed for a significant period of time, the size of the Riva folder can be substantial. It is best to remove non-essential files to reduce the size of the Riva folder structure. This will reduce the amount of time it takes to move Riva to a new host Windows system, especially if the move is to a new data center.
Here are some suggestions for trimming non-essential files from the Riva folder structure to minimize the size of the ZIP file:
-
Create a full backup of the Riva folder structure, for example Riva-2014.07.10-Backup.zip.
-
In the Riva Manager application, on the menu bar, select Policies, and disable all of the sync policies.
-
In Windows Explorer, navigate to Riva\Application\, and remove all the version folders older than the one you are currently using.
-
In Riva\Logs\, remove all log files that are more than six days old.
-
In Riva CRM Integration Logs\, remove the user folders that are no longer in sync policies. Optionally remove log files from every user's folder that are more than six days old.
-
Remove the Riva\Resources\ and Riva\LicenseRequests\ folders.
-
Remove any backup copies of folders under Riva that were made earlier, for example Riva\Configuration.bak or Riva\Copy - Configuration\.
Additionally, you can trim some files from the sync policy transaction folders. You have to be careful with this to ensure that you do not remove the wrong files. (You can recover those folders from the backup created at step 1 if required.)
-
In the Riva Manager application, on the menu bar, select Policies. Edit a sync policy.
-
Select General, press the CTRL key, and double-click the Name label in the form beside the text box of the policy name.
Result: Windows Explorer displays the contents of the transaction folder for that sync policy.
-
Navigate to the Lookup folder.
Result: You will see a folder for each user, for example USERNAME$DOMAIN$COM for username@domain.com.
-
Remove the folders for users that have been permanently removed from the sync policy and will never be added back.
-
For every sync policy, repeat steps 1 to 4.
Create a ZIP file of the Riva folder structure
Archive the following folders into a Riva.zip file:
Riva\Application\
Riva\Configuration\
Riva\CRM Integration Logs\ (Older log files have been removed.)
Riva\Custom\
Riva\Licenses\
Riva\Logs\ (Older log files have been removed.)
Riva\Transactions\ (Folders of permanently inactive users have been removed.)
Step 4: Move (or Copy) the Riva Directory to the Target Windows System
This is when you move or copy the installation instance of Riva from the source Windows system to the target Windows system:
-
On the source Windows system, start the Riva Manager application. On the menu bar, select Policies. For every sync policy, right-click and select Disable.
-
On the target Windows system, create the desired Omni folder structure on a local drive. Mapped network drives cannot be used. Examples of valid folder structures:
c:\Program Files\Omni (For Windows 64-bit.)
c:\Program Files(x86)\Omni (For Windows 32-bit.)
d:\Omni (Example for secondary volume.)
-
Copy the Riva.zip file from the source Windows host to the target windows host, and extract it into the Omni folder created at step 2.
Step 5: Upgrade Riva on the Target server
Manually upgrade Riva to the latest public release.
Step 6: Enable Riva on the Target Server
To prepare the Riva instance on the target Windows system:
-
On the source Windows system, ensure that you have removed the Riva sync service.
-
On the target Windows system, perform the following steps.
-
In Windows Explorer, locate the Riva folder.
-
Create a shortcut to the desktop for the Riva.exe and Riva Service Monitor application.
-
Start the Riva Service Monitor application.
-
Start the Riva Manager application. If you are running Riva 2.4.49 or earlier, then on the menu bar, select Setup.
-
In the right pane, for every email connection that is used by a CRM sync policy, open the email connection, and perform a test connection to a target user specified in the sync policy. Ensure that the test connections work.
-
In the right pane, for every CRM connection that is used by a CRM sync policy, open the CRM connection, and perform a test connection to a target user specified in the CRM sync policy. Ensure that the test connections work.
-
On the menu bar, select Policies. Ensure that all sync policies are disabled.
-
Edit one of the sync policies. Make any desired changes, and save the policy. When prompted to save the policy and install the Riva sync service, select Yes.
If all of the sync policies are disabled, Riva cannot yet sync any data.
-
Ensure that the Riva sync service is configured properly. See Configure the properties of the Riva sync service.
-
Select the sync policy that is configured for the smallest number of users, and enable the policy. In the Riva Service Monitor application, confirm that the target user accounts appear to be syncing correctly.
-
Enable the rest of the sync policies, and continue to monitor data sync.
Troubleshooting
If the target connection tests do not work, or if you notice errors in the Riva Service Monitor after installing and starting the Riva sync service on the target Windows system, review the Knowledge Base to find the answer to the errors, or use the Request support procedure to obtain technical assistance from the Riva Success Team.
Step 7: Decommission the Previous Riva On-Premise Server
-
Archive or store the backup Riva folder ZIP file created.
-
On the source host Windows system, remove the Riva folder structure.
