Microsoft Dynamics CRM versions supported by Riva Cloud:
- Dynamics 365 CRM (Dynamics CRM online); and
- Dynamics CRM 2016, 2015, and 2013 (commercially hosted and on-premises).
Requirement for Microsoft Dynamics On-Premises:
Any version syncing with Riva Cloud must be set up as an IFD (Internet Facing Device).
Choose one of the following:
Create an OAuth-Based Office 365 Connection to Dynamics CRM
-
If you are using Riva Cloud Corporate, ensure that you have followed this procedure: Prepare Dynamics CRM for Riva Cloud Corporate.
-
Log in to https://www.rivacloud.com.
-
On the Get Started page, select Configure your CRM.
-
On the Select a CRM Platform page, select Microsoft Dynamics.
The Microsoft Dynamics Connection Options window appears.
-
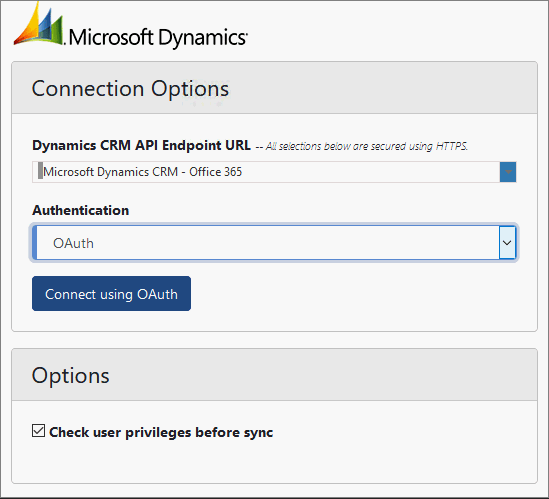
In the Dynamics CRM API Endpoint URL field, select Microsoft Dynamics CRM - Office 365.
Result:
-
The Authentication field is set to OAuth;
-
the Connect using OAuth button appears; and
-
fields that are not relevant to OAuth disappear.
-
Under Options, configure Check user privileges before sync: (Selected by default, even for users who do not have the required permissions to see the option.)
-
Click Connect using OAuth.
-
In the Microsoft Sign in window, provide your credentials.
-
Save the Riva connection.
Result: When the sync policy is enabled, the next sync cycle will use OAuth to connect to Dynamics CRM. You do not need to configure an OAuth app for Dynamics. Riva Cloud automatically takes care of all that for you.
– or –
Create a Password-Based Connection to Dynamics CRM
-
If you are using Riva Cloud Corporate, ensure that you have followed this procedure: Prepare Dynamics CRM for Riva Cloud Corporate.
-
Log in to https://www.rivacloud.com.
-
On the Get Started page, select Configure your CRM.
-
On the Select a CRM Platform page, select Microsoft Dynamics.
-
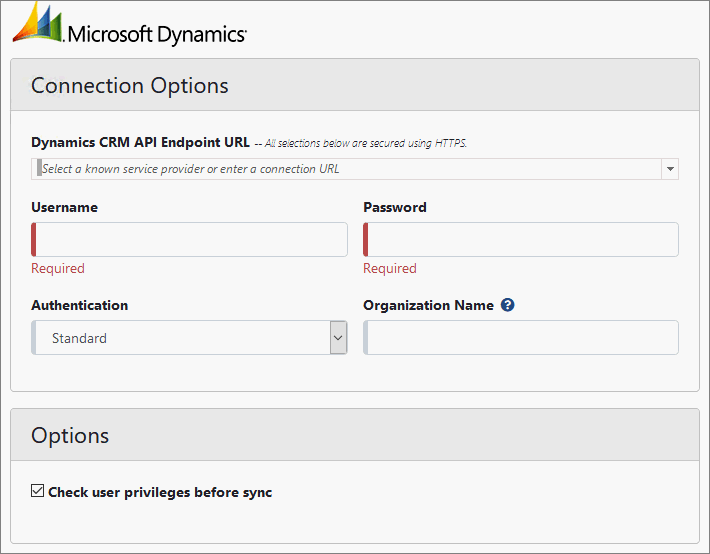
On the Microsoft Dynamics Connection Options page, fill out the fields as described below the screen shot.
Connection Options:
-
Dynamics CRM API Endpoint URL:
- For Office 365 without OAuth authentication, select your region;
Note: The Microsoft Dynamics CRM - Office 365 "region" is used for OAuth. For instructions, see Create an OAuth-based connection.
- For Microsoft Dynamics On-Premises, obtain the URL for the site, for example https://mycompany.mscrm.com, and enter it; or
- For a commercially hosted solution, obtain the URL for the site, and enter it.
-
Username and Password: Enter the user name, for example admin@mscrm.demo.com, and enter the password.
- Organization: Do one of the following:
- Enter the case sensitive Unique Name. How to find it. Riva validates the entry in the CRM.
- If it is valid, the ID is used to sync.
- If it not valid, the sync is prevented and an error appears in the log.
- OR -
- Leave the field blank.
- If your Dynamics CRM environment has only one organization, it is used for the sync.
- If there are multiple organizations, the first organization found on the list of organizations in Dynamics CRM is used for the sync.
-
Authentication:
- For Office 365, leave the Authentication set to Standard.
Note: The value was set when you selected the appropriate Office 365 Dynamics CRM API Endpoint URL.— If the Authentication is set to OAuth, see Create an OAuth-based connection.
- For Microsoft Dynamics On-Premises or a commercially hosted solution, select Standard or Active Directory, as per your Dynamics CRM configuration.
Options:
-
Select OK.
Riva Cloud attempts to connect to your CRM account with the credentials and connection information that you have provided.
-
Do one of the following:
- If the connection setup is successful, select OK. The CRM connection is added to your Riva Cloud account.
- If you experience issues, contact the Riva Success Team.
