With Riva Bookings, you can now reduce email scheduling back and forth by up to 85%!
Contents:
- Signing into Riva Bookings
- Settings
- Default Availability
- Meeting Preferences
- Integrations
- Creating an availability link
- Create a new availability link
- Add Meeting Details
- Add Internal Attendees
- Select My Availability
- Availability time range
- Additional Options
- Publish
- Using your availability links
- Signature Link
- Single Use Link
- Details
- Attendees
- Availability
- Recipient experience
- Date & Time
- Details
- Confirmation
- Confirmation Emails
- Reschedule & Cancel
Once your organization has been configured for Riva Bookings, the online web portal will be available for you to start using. To start creating availability links for easy scheduling, you have two options to access online:
- Navigate to https://byriva.com. You will be prompted to enter your email. Based on your email domain, Riva will show the suitable sign-in method.
- If your organization uses Office 365 or Exchange Online, you can sign in via "Sign in with Microsoft"
- If your organization uses Exchange On-Premise, you will need to manually enter your Microsoft email and password
- Navigate to https://{your-company-domain}.byriva.com. You will be able to bypass entering the email and will be shown the suitable sign-in method right away.
- Your company domain is most likely your email domain. For example, if it is alex@herbsherb.com, the domain will herbsherb. If not, contact your Riva admin.
- Sign in through Riva Insight with our Riva Bookings Integration.
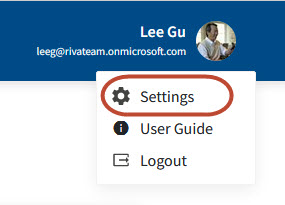
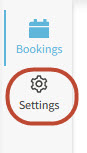
After you log in for the first time, it's recommended that you configure your settings via "Settings" under your profile
Default Availability
- This is where you can set the default availability that is shown when you create your availability link. Of course, this can be overwritten if you choose to.
- Usually, you would set your work hours as the default availability
.PNG)
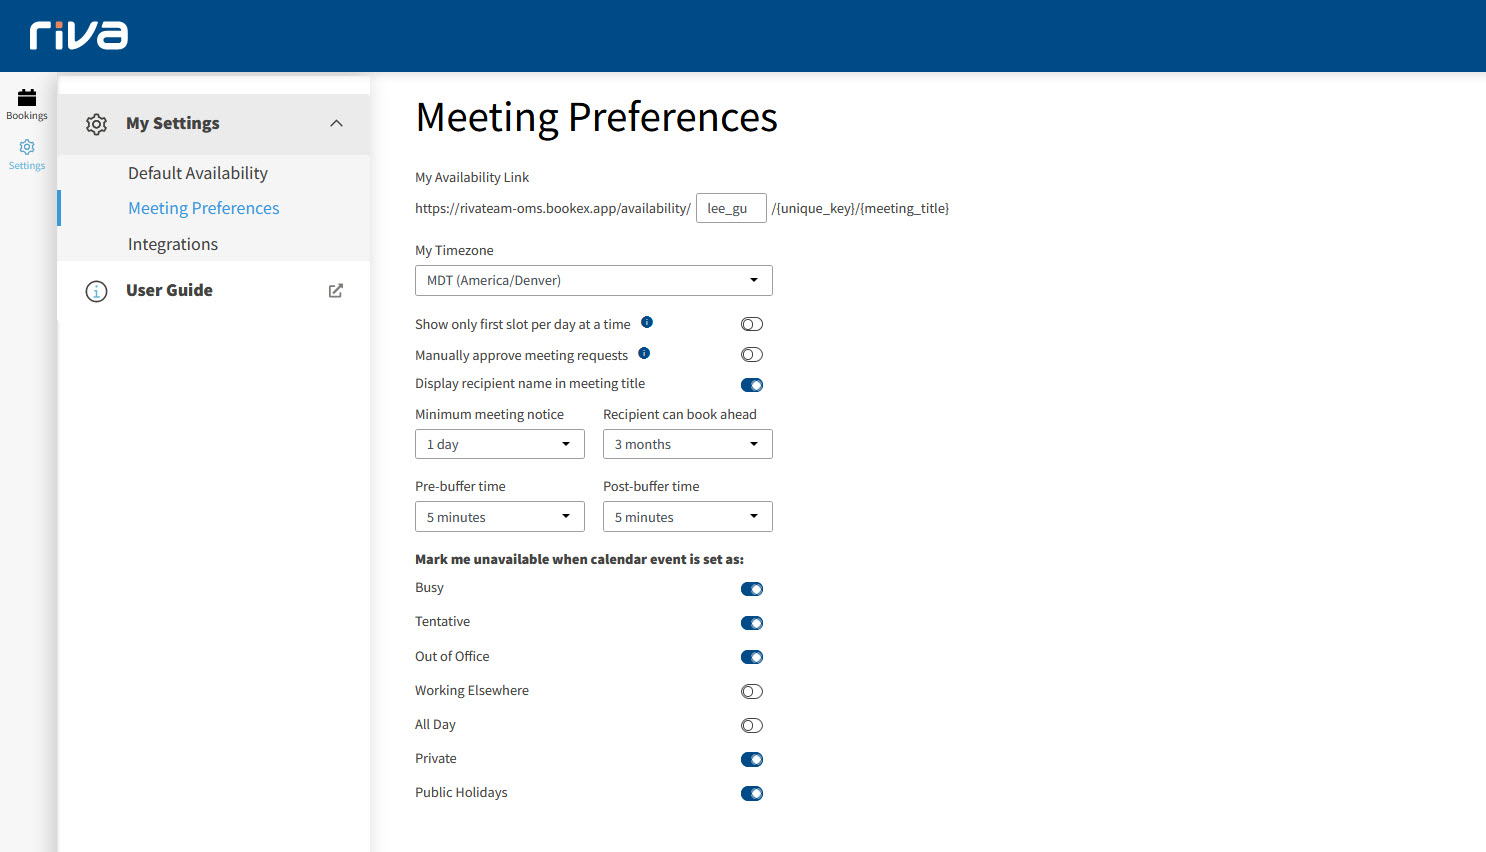
Meeting Preferences
- My Availability Link: The URL is the link that you would be sending to recipients; by default, this is generated using your first name and last name. However, you can change this part of the URL to be even more personalized.
- Advanced Options: This section will allow you to enable any kind of smart scheduling options, These settings will be selected by default for any new availability link you create.
- Show only first slot per day at a time: With this option on, the recipient can only see a single time slot available for each day of the week. This is useful if the organizer doesn’t want to be booked at various times throughout the whole day, but wants their meetings to be stacked or sequenced for incoming requests. For example, if my availability on Monday is 9 a.m. to 5 p.m. for a 30-minute meeting and I am currently completely free during those times, the first recipient can only see 9 a.m. as available. Once the 9 a.m. time slot is booked, the next person will only see 9:30 a.m. as an available option.
- Manually approve meeting requests: This allows the organizer to review incoming meeting requests and approve them to create meeting appointments across everyone’s calendar. If not enabled, all meeting requests are automatically approved.
- Display recipient name in meeting tile: Riva will append the recipient’s name in the meeting title so that the organizer can get a quick view of upcoming meetings with their clients.
- Minimum meeting notice: This setting allows the organizer to control the earliest time that someone can book with them.
- Recipient can book ahead:This setting limits how far ahead a recipient can book a time on the organizer's calendar. For example, if it is October right now and I set this setting to 1 month, the recipient can only book ahead until November.
- Pre/Post buffer time: To ensure best meeting practices and allow time between meetings for the organizer to take breaks, travel, or manage their notes. For example, if the recipient requests a meeting from 9 to 9:30 am, and the organizer sets a 15-minute pre and post-buffer, the next person can only book before 8:45 am or after 9:45 am.
- Mark meeting unavailable when calendar event is set as: Organizers have the option to open more meeting slots by showing ‘tentative’ meetings (or other statuses) as available time.
Integrations
- Online Meetings:
- Currently, we offer 2 different online meetings integration, Zoom, and Microsoft Teams
- For both, toggling them on will enable Zoom and Teams integration, which means that they can be selected as the location choice when you are creating an availability link.
- Use my personal ID field for Zoom: You can also select whether a unique meeting ID will be generated, or if your Personal Meeting ID will be used in the Zoom link.
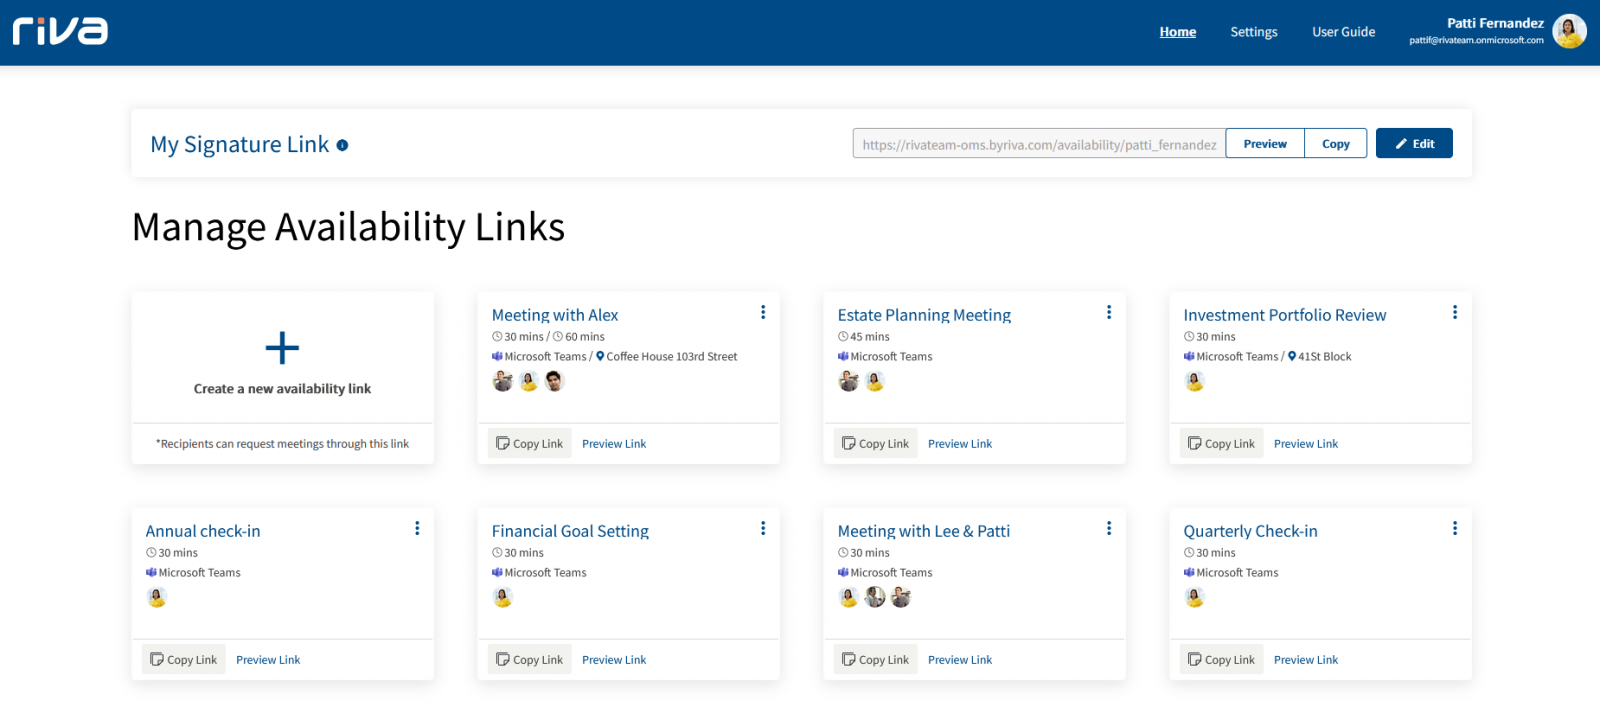
Create availability links to send to your email recipients so they can request to book a meeting with you for a chosen date and time. As a Bookings user, can have one or multiple availability links and choose which one to send depending on your scheduling needs. For example, organizers might have a general meeting link for a "General Meeting", one for a "Customer Support Call" and another for a "Sales Meeting" with a potential client.
Create a new availability link
Click on "Add a new Availability Link", which will open up a creation panel.
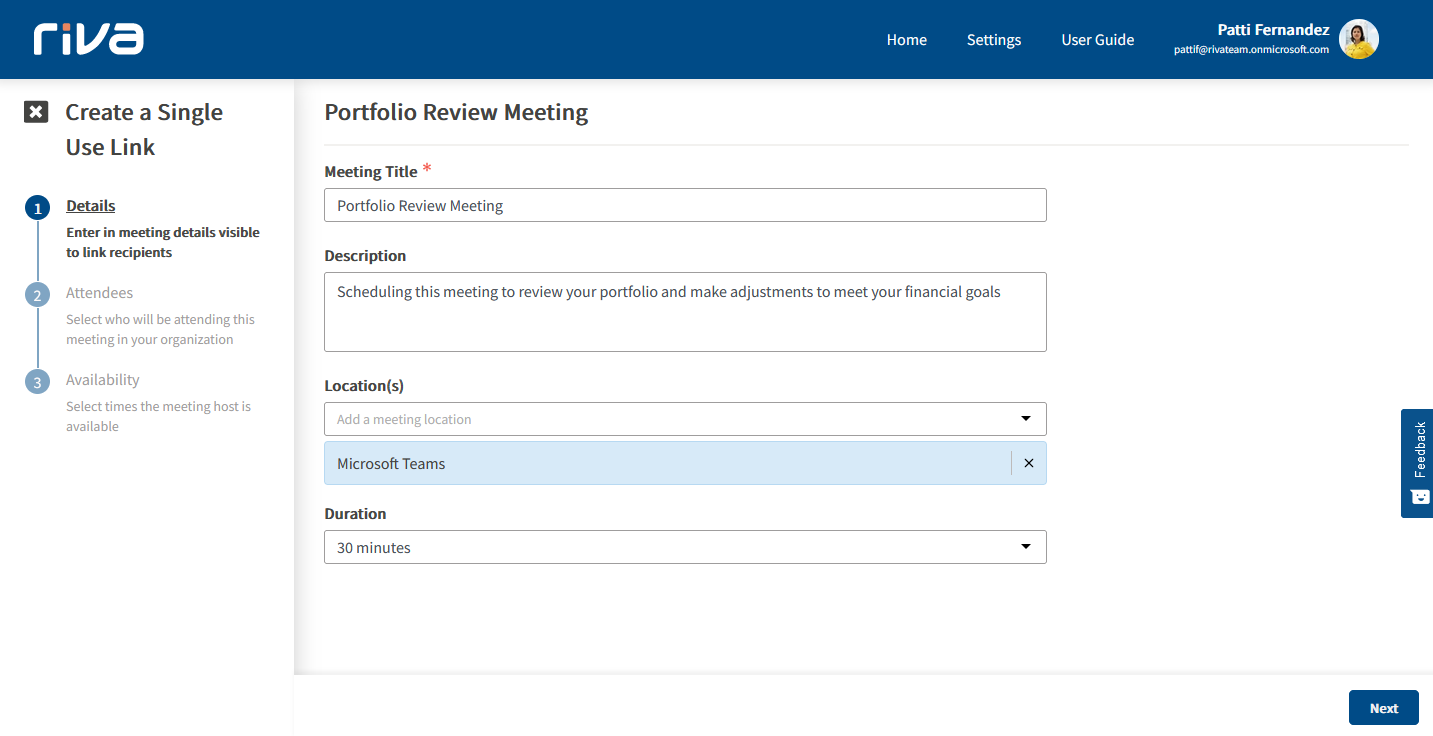
Add Meeting Details
- Meeting Title: Subject of the meeting invitation.
- Description: Meeting description for the invitation.
- Location: Organizers can create multiple options for location(s) that a user can choose while selecting a meeting slot. This can range from multiple online platforms, such as Zoom, Microsoft Teams, In-person, (address is provided by the organizer), Phone, or Other online meeting options. Organizers also can set a default location for the meeting, which will be the pre-selected option when recipients view the availability link.
- Location: When an online option is selected, the organizer can choose from Microsoft Teams meeting, Zoom Meeting, or add a custom option. Choosing this option will automatically create a team or Zoom meeting link which is added to the description of the invitation for ease.
- Duration: Organizers have the option to select multiple durations for a meeting and set a default option for the meeting. The recipient can select their preferred duration.

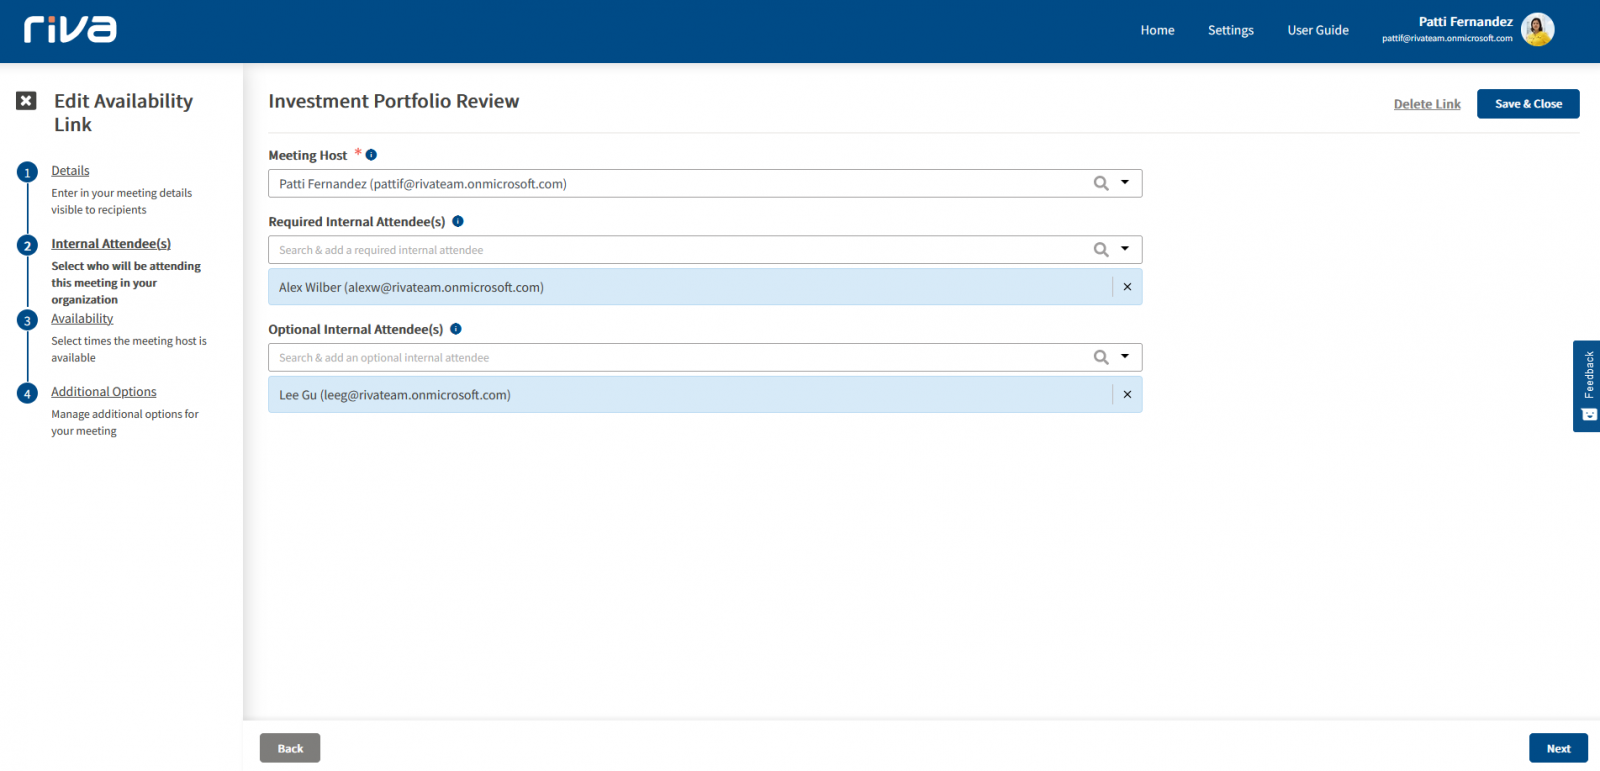
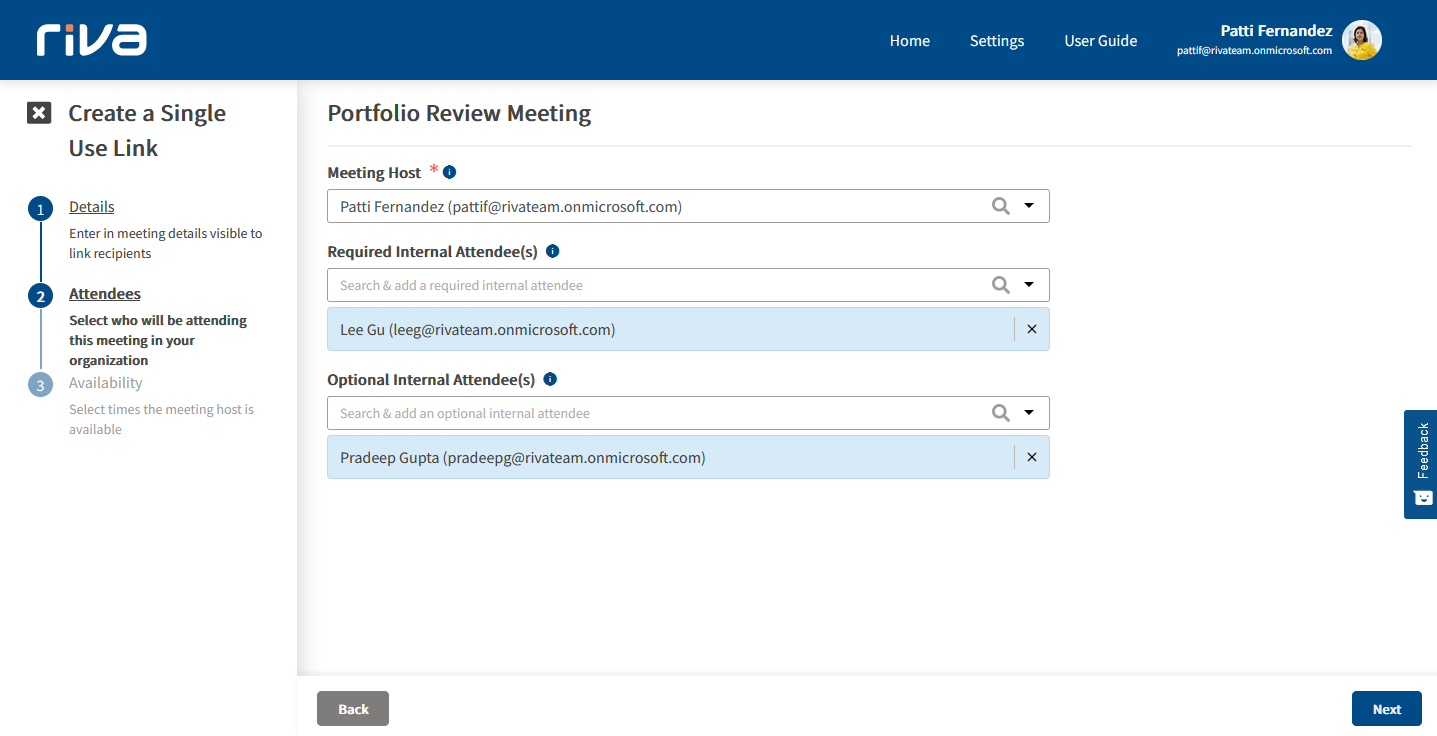
Add Internal Attendees
Select who will be the participants of this meeting from your organization.
- Meeting Host: Owner & organizer for the meeting. This option is used to support delegation scenarios where an assistant can create a meeting link on behalf of their staff.
- Required Internal Attendees: Riva bookings support multi-stakeholder meetings by utilizing the required attendee field. For all attendees that are added here, Riva will find a cross-section of time that is available for all attendees.
- Optional Internal Attendees: Riva will not look to find a time in their calendar and these attendees will be invited to meetings by default. This helps to stay in the loop without forwarding invitations to internal attendees.
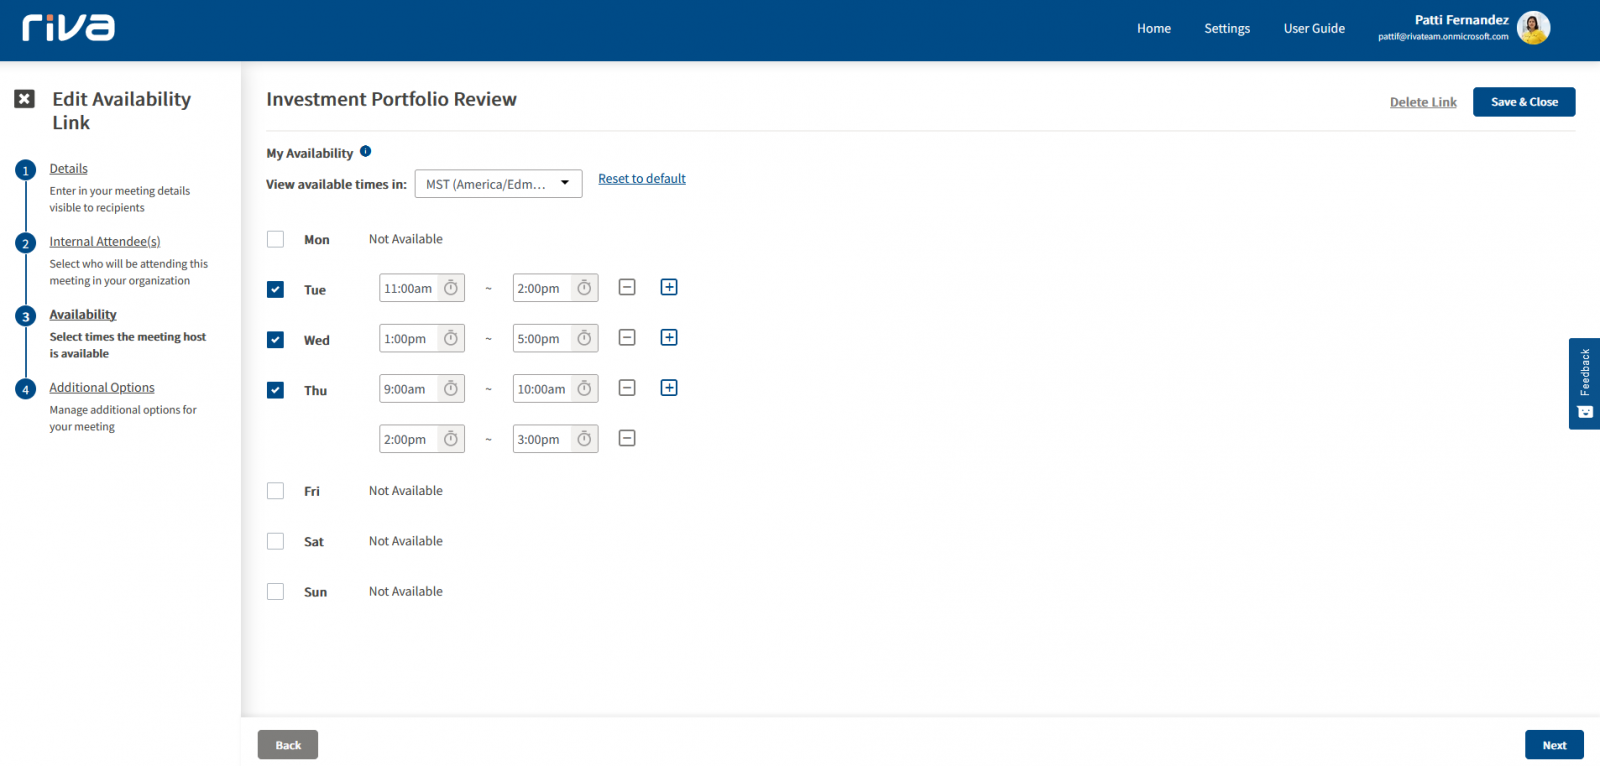
Select My Availability
Based on the availability you set here per link, recipients will only be able to book times you are free based on your outlook calendar's availability and the time frames you choose for the availability link.
Availability of the meeting host is shown by default which can be overwritten by setting custom availability according to their needs. Riva allows for multiple blocks of hours on the same day and the available slots are dynamically updated. The availability is based on what you set under “Default Availability” settings.
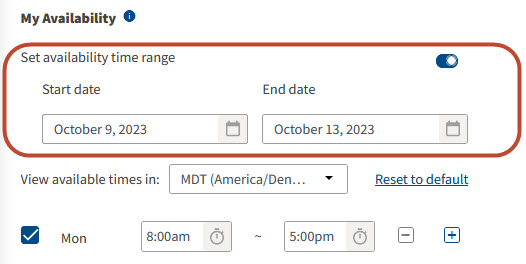
Set availability time range
Availability time range allows the organizer to define a specific time range to be available. For example, this option is helpful for sales reps covering regional offices or attending conferences and tradeshows on the floor and are only available for specific time frames.
Additional Options
This section will allow organizers to enable and adjust any smart scheduling options. By default, the settings will be what you had set in "Meeting Preferences". Making changes here will overwrite "Meeting Preferences" for the select availability link.
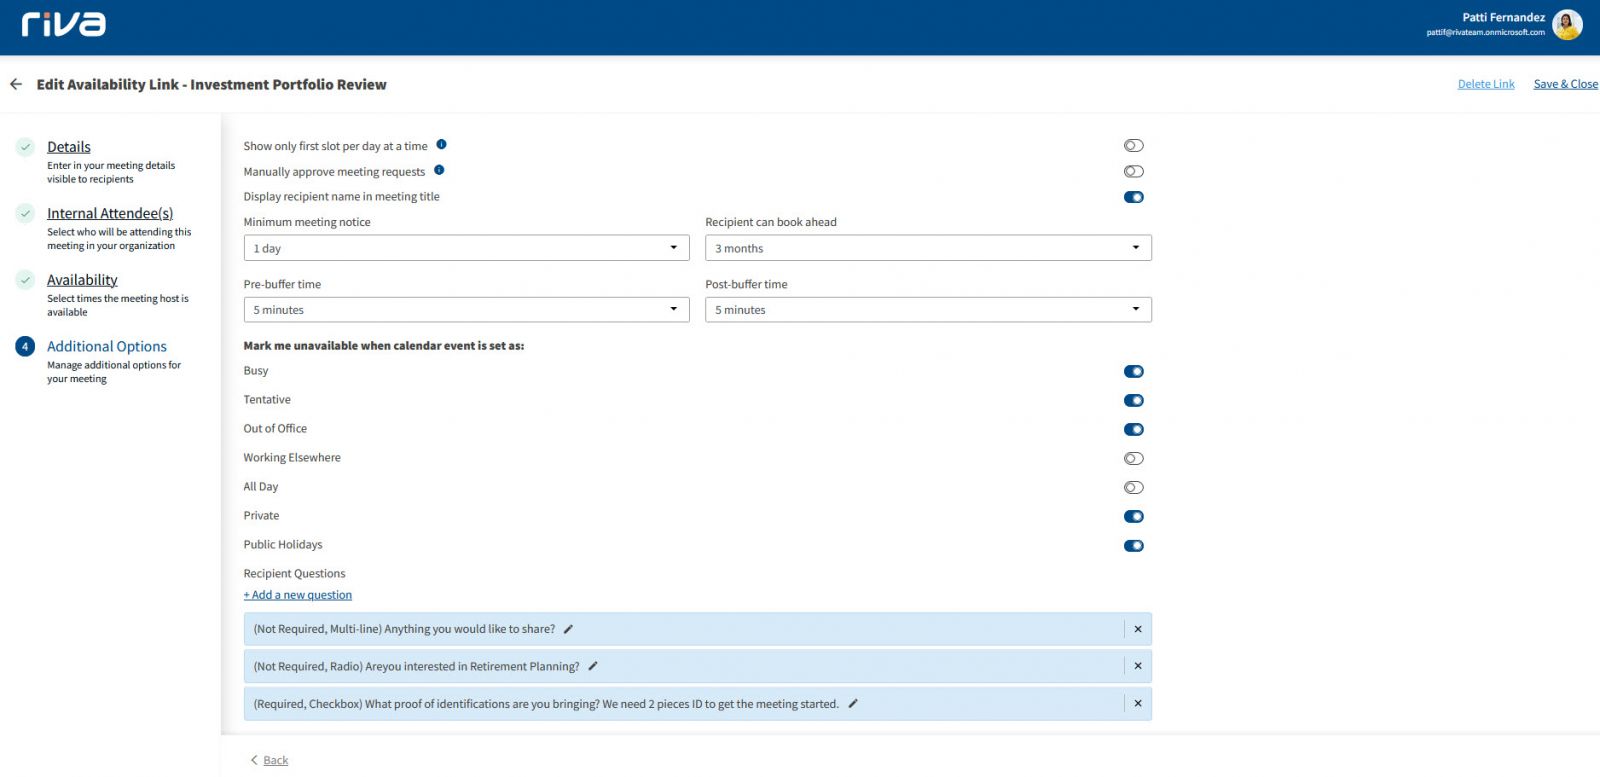
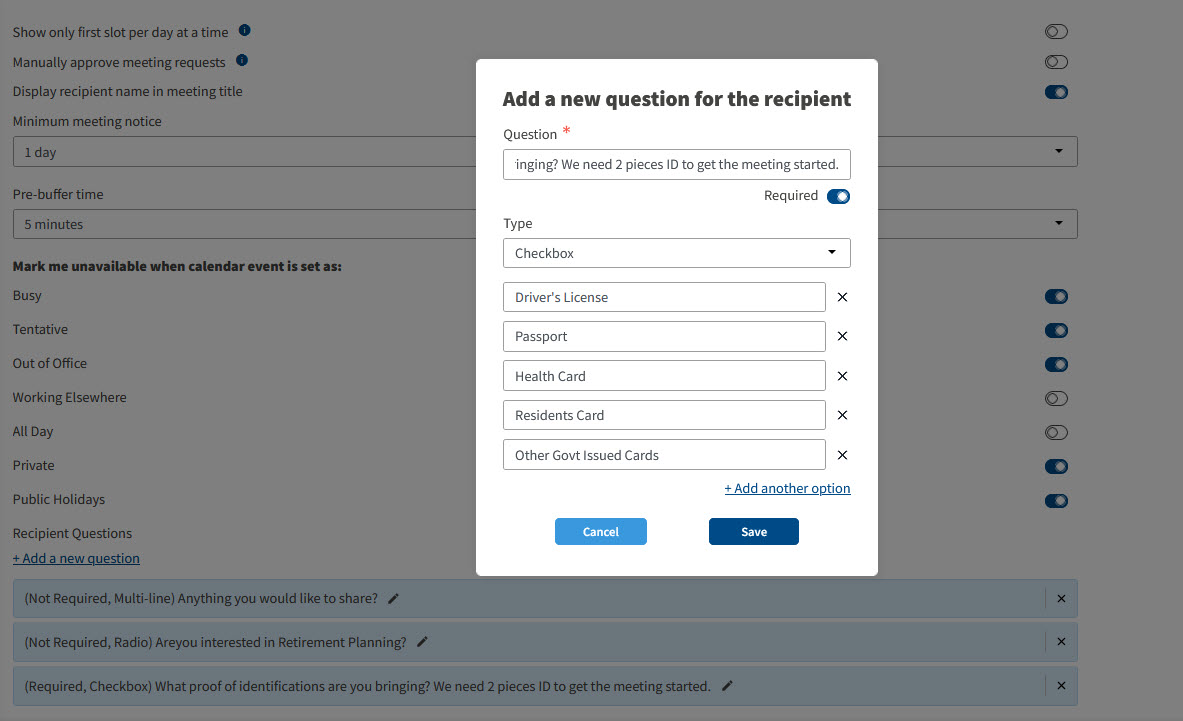
One additional option is the Recipient Questions feature. This feature allows organizers to customize questions they want the recipient to answer prior to booking the meeting with you. You can see an example of some customized recipient questions in the recipient experience. Riva Bookings supports the following question types: Single line, multi-line, radio button, and check box. These questions can also be marked as required or optional.
To learn more about the other additional options, refer to Meeting Preferences.
Publish
From here, you can click on “Publish” and your link will show up as a card on the home page. You can also choose to navigate to previous steps via the back button if you want to change any details.
Once the link has been published, you can delete, edit, view, or copy a link.
- Delete: This will delete your availability link
- Edit: You can edit any details of the availability link. Make the necessary changes and click on close & save to make changes or click 'Delete Link' to completely delete the link
- Preview: This allows you to see the view of what the link recipient will see
- Clone: Create a duplicate availability link so that you don't have to create one from scratch
In order to have recipients request a meeting with you, you will need to send it to the necessary recipients. There are a couple of ways to do this.
- Manually copy and paste: On the Riva Bookings Home page, click on the "Copy link" button on any of the cards you wish to use. Navigate to your communication platform like email or messaging platform and paste it and send it to your recipient.
- Use Riva Insight: Learn how you can insert availability links directly from Riva Insight here.
A signature link is a type of availability link intended to be inserted into your email signature or on your website to make your availability always accessible to customers.
When you log in to your account for the very first time, signature link details are already filled out with basic information so that you can get started right away. Of course, you have the option to edit the link to suit your needs. The experience of a signature link is exactly the same as an availability link except that as the signature link is meant for you specifically, you cannot delegate or add other additional internal attendees.
For one-time meetings that you do not want to store as an availability link, or for meetings that you don't want to expose your whole calendar for, we have a new type of link called a "Single Use Link".
Step 1: Enter Details
Everything is the same as the details you enter for an availability link. The key difference is that you can only select 1 duration.
Step 2: Add Attendees
Again, everything is the same as adding attendees for an availability link. Note that delegation is also supported.
Step 3: Select your availability
As an organizer, you will be manually selecting the exact timeslots that you want to show as available. The reserve selected times toggle will create temporary "HOLD" meetings in your calendar wherever you marked yourself as available so that you don't overbook those slots with another meeting.
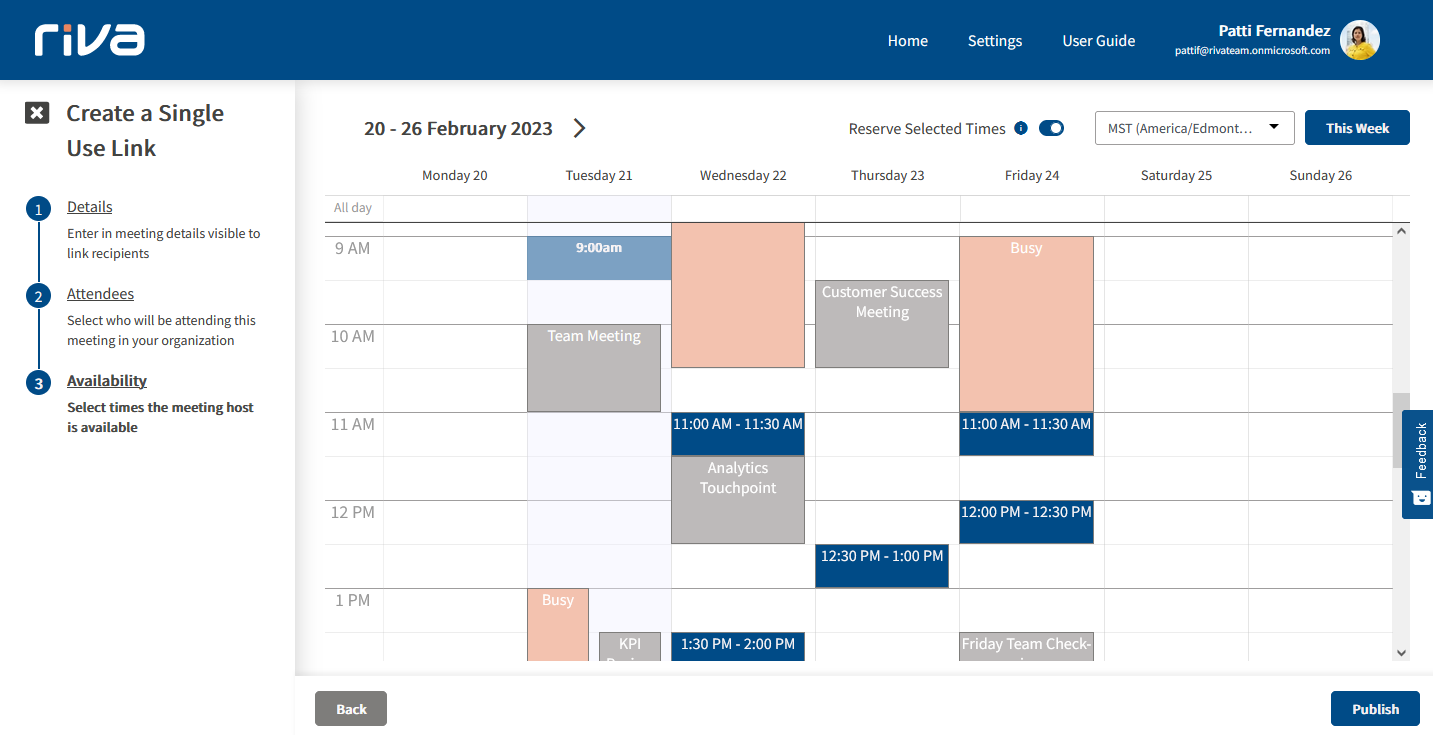
Note: that you can select already busy slots. If you or your required attendees have busy calendars, you can try to increase visibility by deselecting "Busy" or "Tentative" check boxes. For example, maybe you decide that you are willing to overbook your tentative meetings - you can deselect "tentative" to not show them on the calendar view.

As you are manually selecting the times, there is no need to have an "additional options" step as you do for availability links.
Once you have published the single-use link, you can either copy the single-use link or copy a text template that lists all the time slots that were marked as available. The link will expire once it has been used or after its last selected availability slot.
When a recipient clicks on the availability link, they are redirected to a page on the web browser to request a meeting with you. Here is the experience for the recipient.
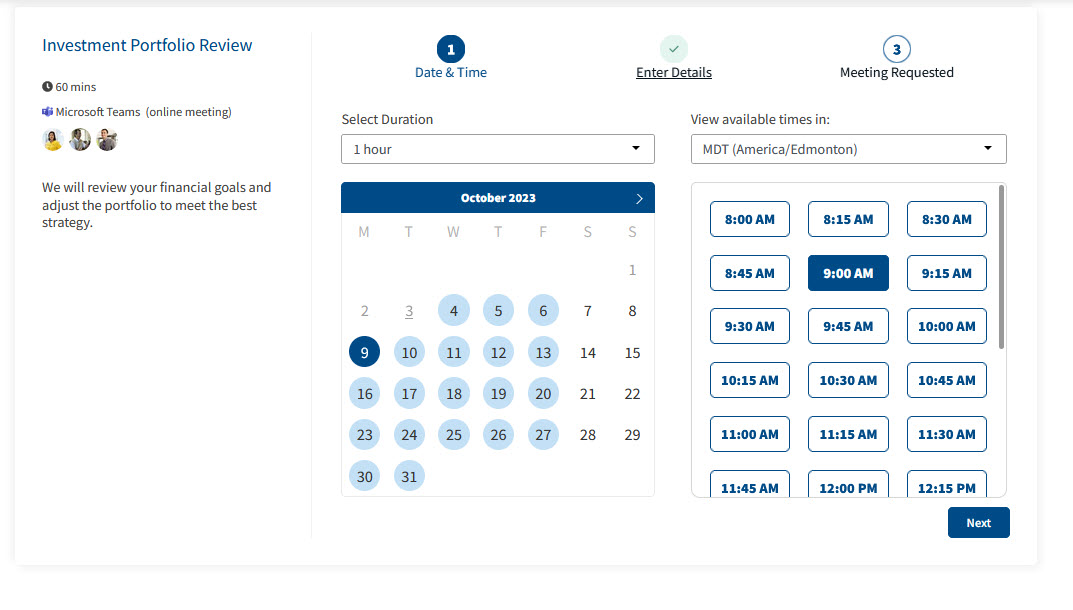
Step 1: Select Date and Time
- Select Duration: Recipients can set the duration via the dropdown if multiple durations are available based on their preferences
- Calendar: Shows the available days that work across all internal required attendees.
- View available times in: Option to adjust the time zones. By default, Riva Bookings detects the recipient's timezone and displays the options in their timezone.
- Time Slots: Shows the available time slots that work across all internal required attendees. Recipients can view timeslots in different time zones using the "View available times in" dropdown.
Step 2: Enter Details (as a recipient)
- Name: Recipient to enter their name
- Email: Recipient to enter their email
- Location: Multiple meeting locations provided by the organizer. The recipient can choose an option to their preference
- Invite Guests: Recipients can add emails of people they want to invite to the meeting
- Recipient Questions: Depending on the questions that the organizer had added as a part of the "Additional Options", those questions will be shown here.

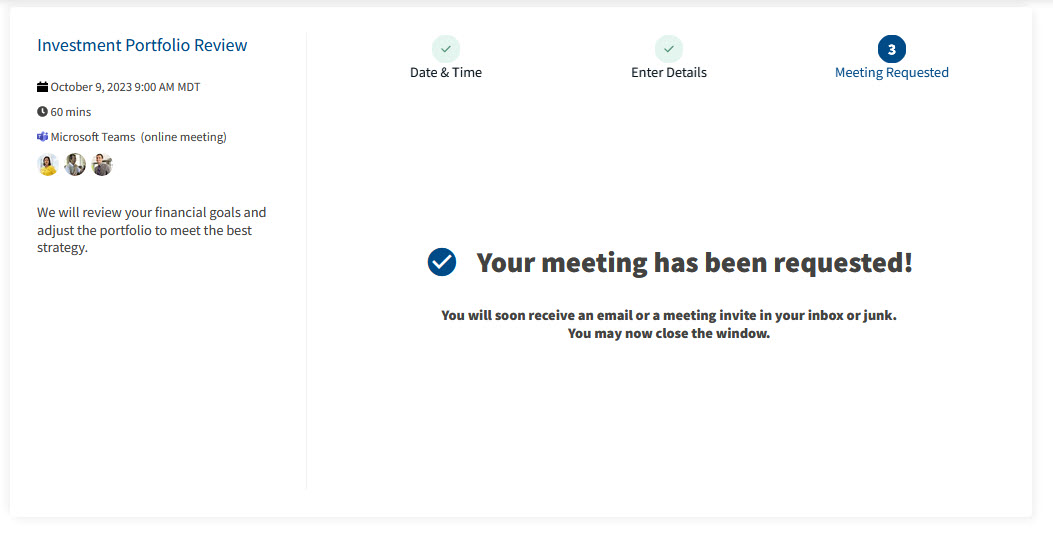
Step 3: Complete
- The recipient can now close the window and wait for a confirmation email
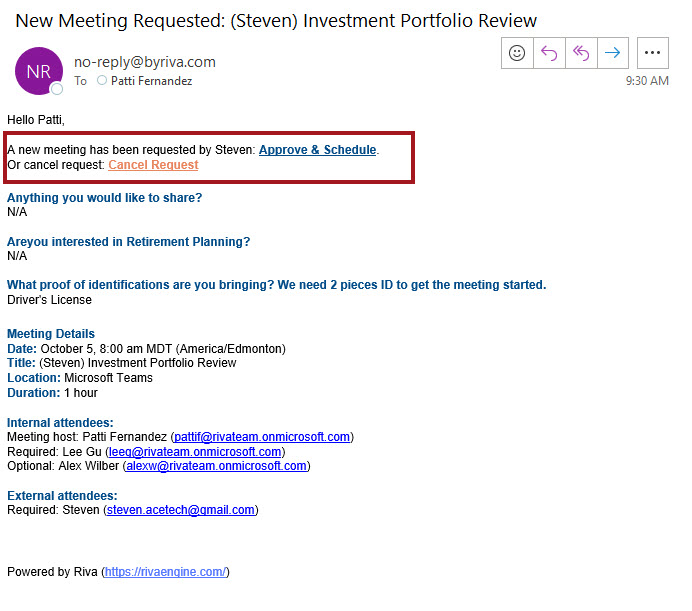
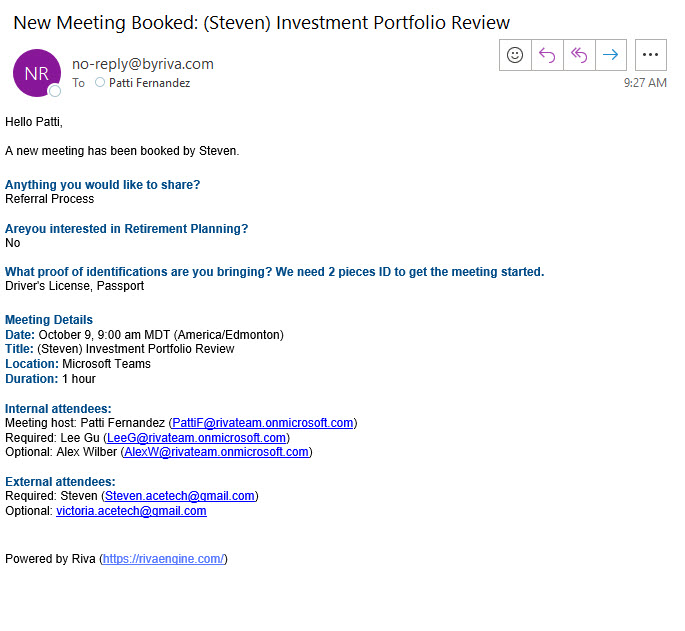
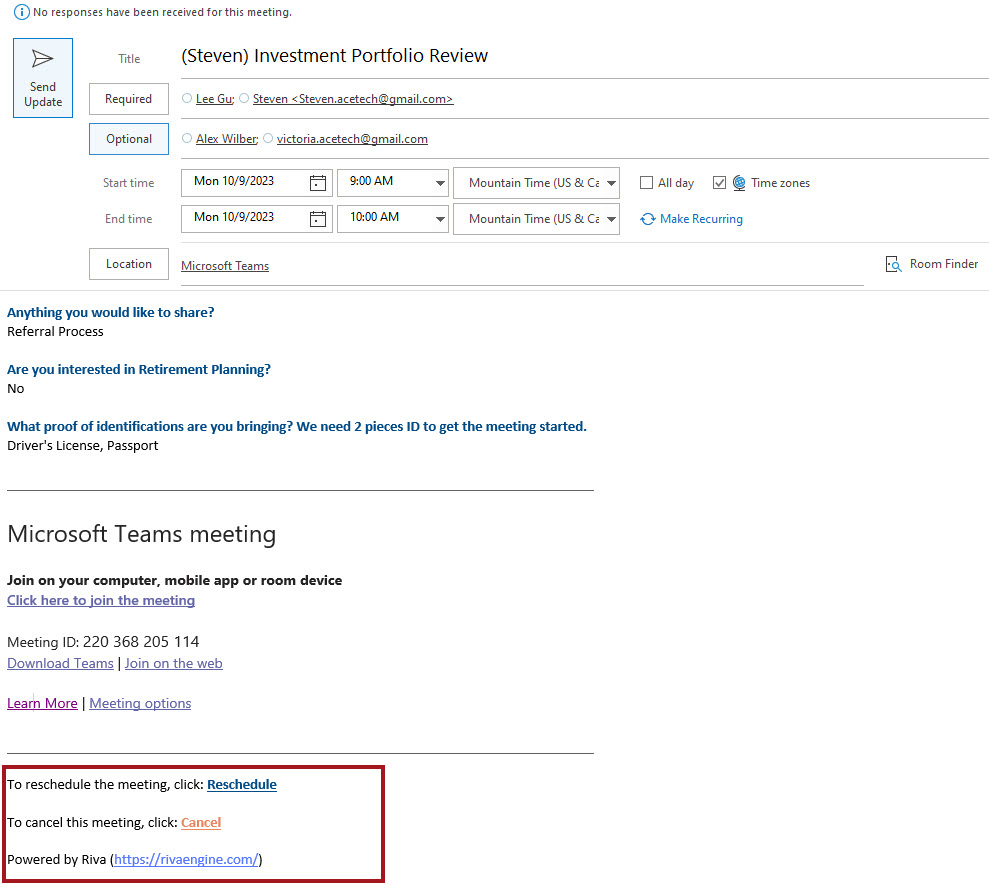
Confirmation Emails
- The recipient clicks on "Request Meeting" through the recipient experience described above
- Initial Emails:
- If "Manually Accept Meeting Requests" is turned on, the meeting host receives an email to approve or cancel the meeting request
- If "Manually Accept Meeting Requests" is turned off, a calendar event is created automatically and the meeting host receives a confirmation via email
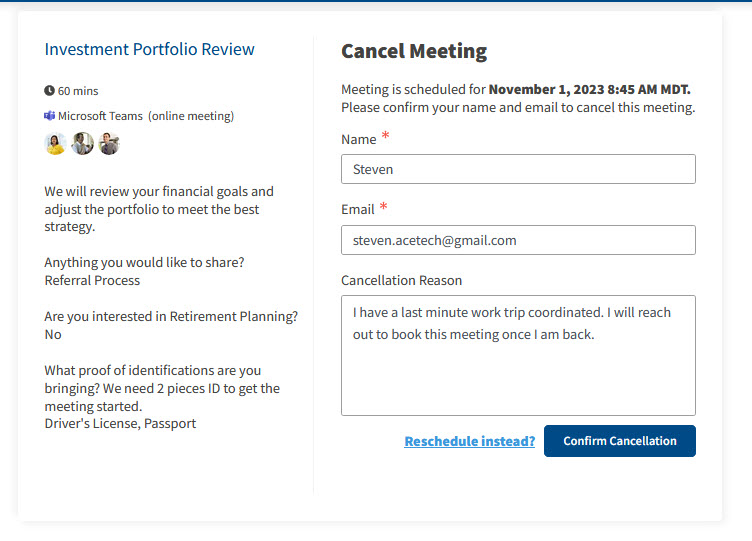
Reschedule and Cancel
Each meeting invitation allows all attendees to Reschedule or Cancel a meeting.
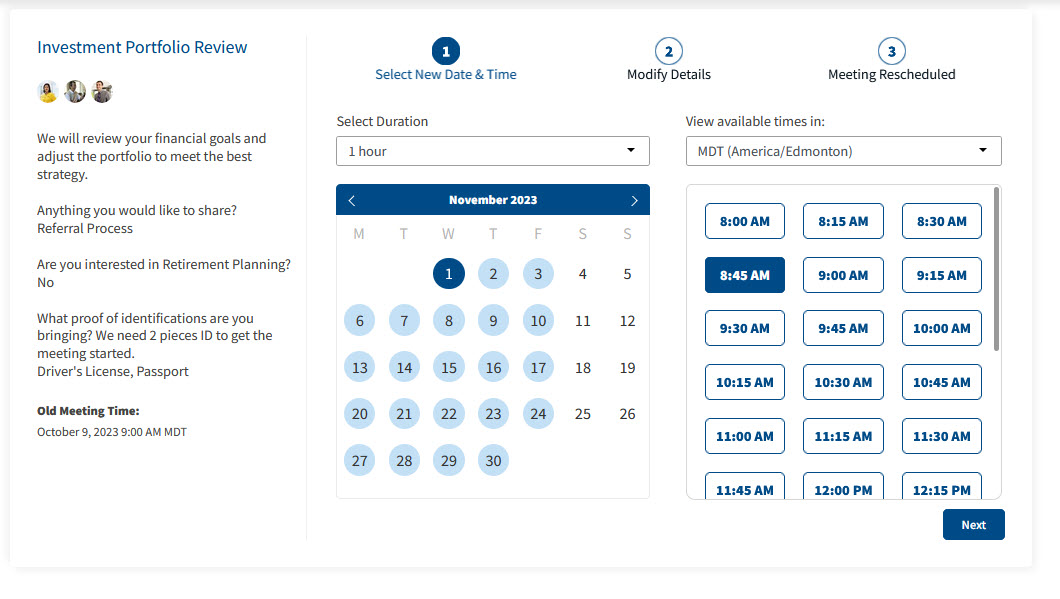
Reschedule Flow
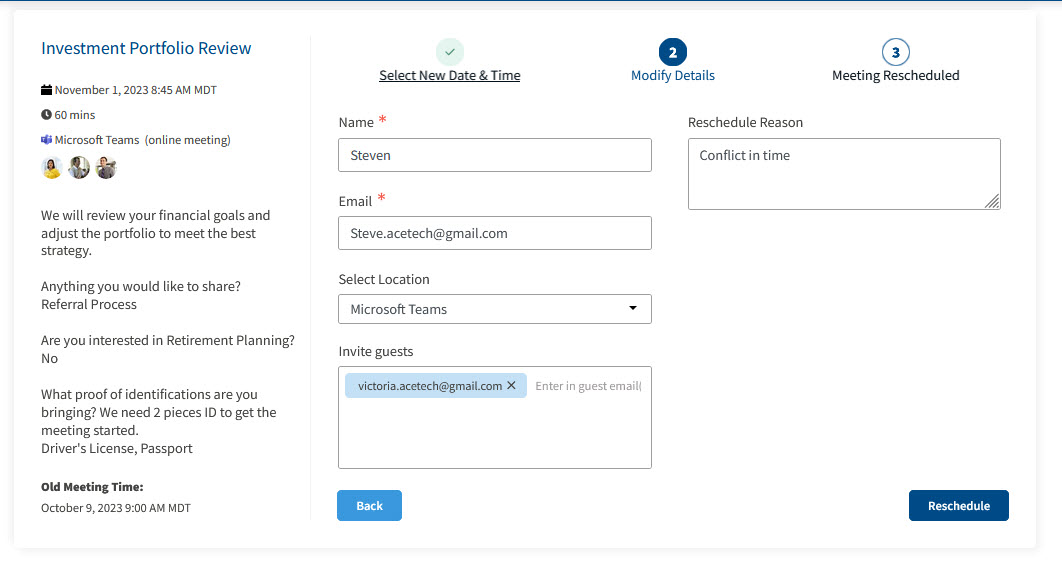
- The Recipient clicks on the Reschedule Link and navigates to select a new date and time on the Bookings Platform. The previously selected details are preserved for the meeting,
- Then the recipient is prompted to modify any details.
- Finally, the confirmation page for rescheduling request.

Cancel Flow
- The recipient clicks on the cancel link and navigates to the Bookings Platform to cancel the meeting.