This article applies to Riva On-Premise 2.4.41 or higher for all the
supported email systems. It describes how to create a
connection group for the
impersonation sync of users who are explicitly specified in the sync policy.
It is also possible to configure a dynamic connection group in which
- each user has an individual connection that is created by Riva and
- the users do not need to be explicitly specified in the sync policy.
To set up a dynamic connection group,
contact the Riva Success Team.
To use connection groups of any kind in Riva Cloud,
contact the Riva Success Team.
To set up a connection group for Riva On-Premise impersonation:
- Ensure that you have two or more valid email or CRM connections.
- Create a connection group.
- Test a connection group and configure other settings.
- Use the connection group in a sync policy.
Step 1: Ensure That You Have Two or More Valid Email or CRM Connections
For instructions on creating connections, see
Step 2: Create an Impersonation Connection Group
To create a connection group for the Riva sync impersonation of explicitly specified users:
-
Open the Riva Manager application.
-
On the menu, under Connections, select Add Other and choose Connection Group.
Note: In earlier versions of Riva, the menu displays Setup instead of Connections. Select Setup and, on the left pane, select Connection Group.
-
On the Welcome page of the Connection Group Wizard, select Next.
-
On the next page, enter a Connection Group Name.
In Riva 2.4.44 or higher, configure the other settings on this page:
- Connection Type: Select Exchange, Google, or Other.
- If you selected Exchange or Google, select Specify the connections that should be added to the group.
- If, instead, you select Automatically add connections of the same types to this group, a dynamic connection group is created. For more information, contact the Riva Success Team.
-
Select Next.
-
On the page titled Select connections for connection group, select one of the applicable service account email or CRM connections used by Riva to impersonate users, and select Add.
-
For each applicable impersonation email or CRM connection, repeat step 6.
-
Select Next, and select Finish.
-
Verify that a connection group has appeared on the right pane of the Riva Manager application.
Test the connection group and possibly configure other settings, and use the connection group in a sync policy.
Step 3: Test a Connection Group and Configure Other Settings
To test a connection group and possibly configure other settings:
-
Open the Riva Manager application. If the menu displays Setup, select Setup.
-
On the right pane, double-click the connection group to edit it.
The Connection Edit window appears.
-
To test the connection: On the Connection Test page, leave the User E-mail field blank, and select Run Test.
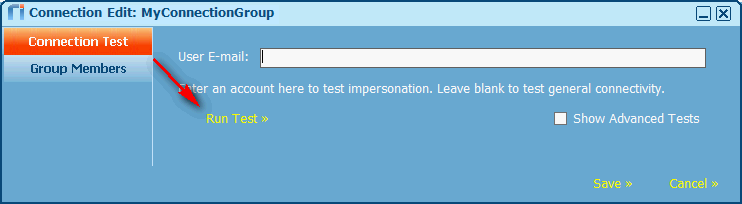
Result: The system tests whether the credentials configured for the connections are working properly. If so, a Connection Test Succeeded message box appears.
-
Select OK.
-
To test impersonation access: In the User E-mail field, provide the email address of one of the email accounts that the connection group will synchronize with the CRM, and select Run Test.
If impersonation works, a Connection Test Succeeded message box appears.
-
Select OK.
-
To configure other settings, select the Group Members tab, and do any of the following:
-
To add more connections one at a time: In the Select... field, select a connection, and to the right, select Add.
-
To remove a connection: In the large list box, select the connection, and below the box, select Remove.
-
(Riva 2.4.44 or higher.) To distribute the load over multiple connections: Below the large list box, select the Enable randomization of connection execution check box.
Result: The system tries connections at random instead of always beginning with the connection at the top of the list (and moving down the list only if the connection fails).
Now use the connection group in a sync policy.
Step 4: Use the Connection Group in a Sync Policy
To use a connection group in a policy:
-
In the Riva Manager application, on the menu, select Policies.
-
On the right pane, double-click a policy to edit it.
-
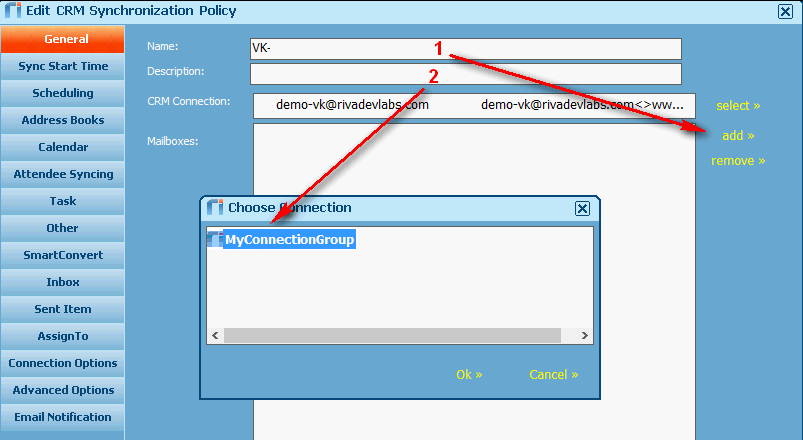
In the Edit CRM Synchronization Policy window, on the right pane, to the right of the largest box, select Add. In the Choose Connection window that appears, select the connection group, and select OK.
-
If you selected an email connection group, then in the Mailbox Browser window that appears, add the mailboxes of the syncing users that will be impersonated by one of the Riva account email connections specified in the connection group.
Shortcuts are available to add a large number of mailboxes. For instructions on adding large numbers of mailboxes, select one of these links:
-
Back in the Edit CRM Synchronization Policy window, in the bottom right corner, select Save.
