Contents:
What Needs to Be Prepared
Supported IBM Notes versions: The Riva Domino database requires a minimum version of Domino 8.5 and fully supports Domino 9.0.
IBM Notes / IBM Domino Connector: Riva leverages the strength and flexibility of IBM Domino by exposing web services that are called by the Riva Connector.
Requirements:
To Create an IBM Notes Connection
-
In the Riva Manager application, on the menu bar, select Setup. In the left pane, select IBM Notes to open the connection wizard.
-
On the wizard's Welcome page, select Next.
-
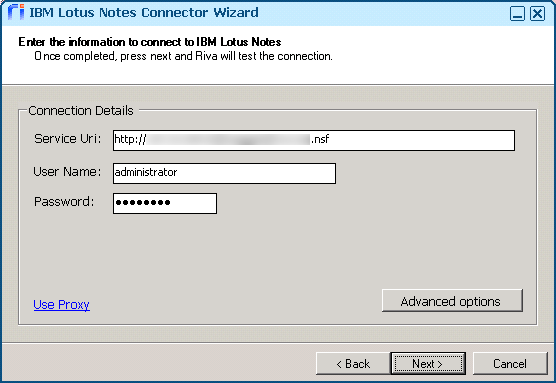
Provide the required information:
-
Service Uri: Enter the connection path to the Riva Connector application file, including the .nsf file name.
Note: The Riva Connector .nsf application file was created at step 2.6 of Deploying the Riva Connector, after downloading a Riva Connector .ntf template file at step 2.1.
-
User Name: Enter the user name for the connection user created in Domino. Must be an admin user with proper permissions who can access multiple target user mail databases.
-
Password: Enter the connection user's password.
-
Use Proxy: If proxy options are required to access the Service Uri, select this button.
-
Select Next to create the connection.
The Riva Manager application creates an IBM Notes connection object.
To Test and Edit the IBM Notes Connection
-
In the Riva Manager application, on the menu bar, select Setup. In the right pane, double-click the icon that represents the IBM Notes Connection object.
-
Confirm that the connection credentials look correct.

-
(Riva 2.4.46 or higher.) Optional: Assign a user-friendly Display Name.
-
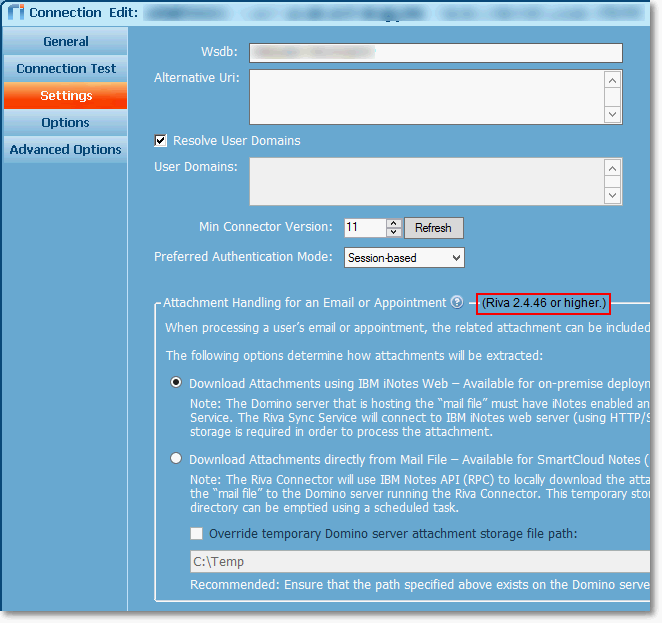
Select Settings. Ensure that the Resolve User Domains check box is selected and that Preferred Authentication Mode is set to the desired option.
Preferred Authentication Mode:
-
Default: (This is the setting selected by default.) The session-based authentication mode is used. If that is not successful, the HttpAuth-based mode is used.
-
Session-based: Only the session-based authentication mode is used.
-
HttpAuth-based: Only the HttpAuth-based authentication mode is used.
-
In Riva 2.4.46 or higher, set the Attachment handling option. Note: This option requires Riva Connector Version 11.00119 or higher.
Attachment handling for an Email or Appointment.
When processing a user's email or appointment, the related attachment can be included when the record is read.
The following options determine how attachments are extracted:
-
Download Attachments using IBM iNotes Web: Available for on-premises deployments of IBM Domino / Notes. (Default.)
Note: The Domino server that is hosting the mail file must have iNotes enabled and iNotes must be accessible from the Riva Sync Service. The Riva Sync Service will connect to the IBM iNotes web server (using HTTP/S) to download the attachment. No temporary storage is required in order to process the attachment.
-
Download Attachments directly from Mail File: Available for SmartCloud Notes (in Hybrid mode) / IBM Verse / IBM Domino and Notes On-Premise.
Note: The Riva Connector will use IBM Notes API (RPC) to locally download the attachment directly from the Domino server hosting the mail file to the Domino server running the Riva Connector. The temporary storage is required by the IBM Notes API. This directory can be emptied by means of a scheduled task.
To override the default temporary Domino server attachment storage file path, select the check box titled Override temporary Domino server attachment storage file path and enter the override path in the box immediately below the check box.
Recommended: Ensure that the path specified above exists on the Domino server that hosts the Riva Connector.
-
Select the Connection Test tab.
-
Leave the User E-Mail field empty, and select Run Test.
The system verifies whether the credentials configured for this connection are working correctly.
-
In the Connection Test Succeeded message box that appears, select OK.
-
To test an individual mailbox connection: In the User E-Mail field, enter the mailbox email address, and select Run Test.
.png)
-
In the Connection Test Succeeded message box that appears, select OK.
