Riva CRM Integration - Documentation and Knowledge Base

Create an App.Setting File to Enable Advanced Options

Article ID: 304
Last updated: 29 Nov, 2018

Many advanced options can be set to adjust how Riva and its components work together. In some cases, the use of an advanced option requires the creation of an App.Setting file, as described in this article. In other cases, you can enter advanced options into fields in the Riva Manager application; for more information, see Set advanced options for CRM connections or sync policies.

Contents:

What is an App.Setting File?

An App.Setting file is a file that contains code to set various advanced options for a specific component of Riva. Multiple App.Setting files can be created. These files have a predefined XML format that must be respected; otherwise, the specific component may not start.

Create an App.Setting File

To create an App.Setting file:

  1. Make critical backups.
  2. Locate the proper directory.
  3. Create the App.Setting (.config) file.
  4. Copy the default contents into the new .config file.
  5. Insert specific contents.
  6. Save and test your settings.

Step 1: Make critical backups

  • Create copies of the following:

    • The Riva\Configuration folder.

    • All the .config files that reside in Riva\Application\<version in use>.

Tip: Always back up your current Riva configuration and application before deleting or altering existing files.
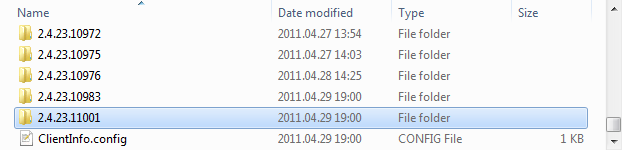
Step 2: Locate the proper directory

Locate the directory appropriate for your configuration. Every time Riva is updated and a new version is installed, a new "application" directory is created. This "application" directory contains executables, DLL libraries, and localization resources.

  • Riva\Application\Base\ for a new installation

    – or –

  • Riva\Application\<latest version>\ for an updated installation. (Note: Always select the latest version or the currently running version.)

Step 3: Create the App.Setting (.config) file

  1. In the directory identified at step 2, create a text file.

    Depending on the component that you want to set the advanced options for, the file name will be different.

  2. In this table, find the appropriate file name:

    To modify this the file name is
    Riva Manager application RivaApp.exe.config
    Riva Service Monitor application Omni.Riva.CrmMonitor.exe.config
    Riva CRM Agent for
    • Exchange
    • IBM Notes
    • Google
    • GroupWise: new connection
    32-bit Omni.Riva.CrmAgentEx.exe.config
    Riva CRM Agent for
    • Exchange
    • IBM Notes
    • Google
    • GroupWise: new connection
    64-bit Omni.Riva.CrmAgentEx64.exe.config
    Riva CRM Agent for GroupWise: legacy connection Omni.Riva.CrmAgent.exe.config

  3. Save the file by using the appropriate name. Ensure that the extension is ".config" and NOT ".txt".

Step 4: Copy the default contents into the new file

  • Copy the contents of the default template into the new .config file.

    Default template of an "empty" App.Setting file

    <?xml version="1.0" encoding="utf-8"?>
    <configuration>
      <appSettings>
        <add key="App.Setting1.Key" value="
    App.Setting1.Value" />
      </appSettings>
    </configuration>

    Take care to copy the contents exactly as they appear. The required format is the same for every Riva App.Setting file.

Step 5: Insert specific contents

  • In the default contents that you copied into the file, replace "App.Setting1.Key" and "App.Setting1.Value" respectively with the "key" and "value" that you have received from Riva support or found in another Knowledge Base article.

    Note: Be sure to enclose the key and the value with double quotation marks ("), exactly as in "App.Setting1.Key" and "App.Setting1.Value" in the template.

Step 6: Save and test your changes

  1. Save the file.

  2. Restart the component that the file was created for.

  3. Verify that the option is producing the desired effect.

Example of an App.Setting File with Four Advanced Settings

<?xml version="1.0" encoding="utf-8"?>
<configuration>
  <appSettings>
    <add key="LoggingLevel" value="DEBUG
" />
    <add key="Web.Proxy.Username" value="administrator" />
    <add key="Web.Proxy.Password" value="mysecret" />
    <add key="Web.Proxy.Domain" value="AD_NT_DOMAIN" />
  </appSettings>
</configuration>

Article ID: 304
Last updated: 29 Nov, 2018
Revision: 13
Views: 15282
Also read

Also listed in