After the CRM and G Suite connections are configured, the next step is to create, configure, and enable the sync policy.
Note: CRMs have different synchronization options. Other than the CRM-specific options, the general setup and configuration of the sync policy apply to all supported CRMs.
To create the G Suite sync policy:
-
Log in to https://www.rivacloud.com.
-
On the Get Started page, select Configure your synchronization policy.
To configure the G Suite sync policy:
- Configure the General settings.
- Configure the workday sync intervals.
- Determine which data to sync:
- Configure the Email SmartConvert options. (Applies to Trial, Standard, and Premium subscriptions only.)
- Configure the Email AssignTo options. (Applies to Trial, Standard, and Premium subscriptions only.)
- Configure the Email Sent Items and Email Inbox options. (Applies to Premium subscriptions only.)
- Enable the sync policy.
Step 1: Configure the General Settings
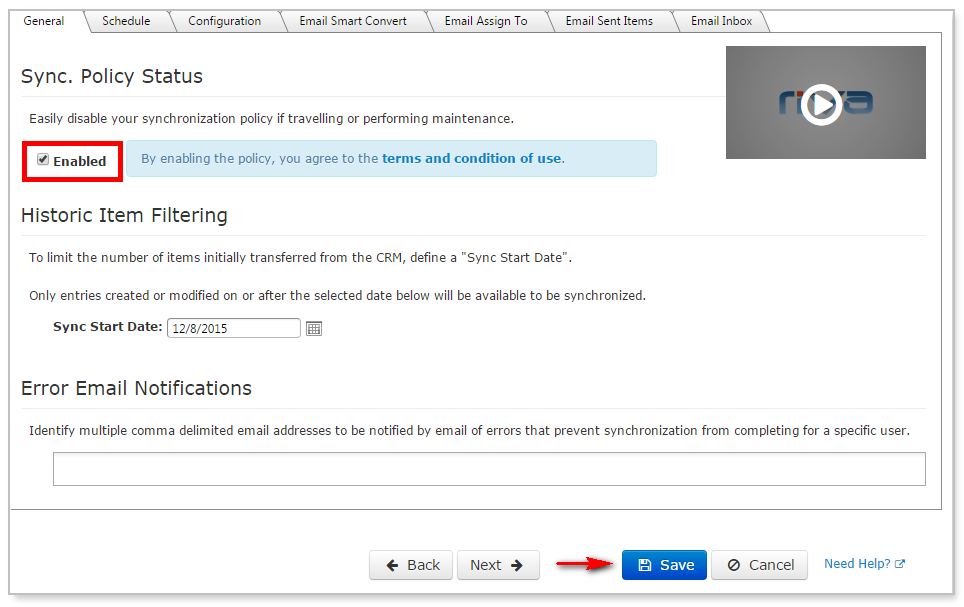
The General tab displays the Sync Policy Status, Historic Item Filtering, and Error Email Notifications settings.
CAUTION: While on the General tab, do NOT select
Save.
Selecting Save now would cause some settings on the Configuration tab to become read-only before you had a chance to configure them:
Continue configuring your sync policy, and we will tell you when you should select Save. Thank you!
To configure the General settings:
-
Ensure that the Enabled check box is cleared (not selected).
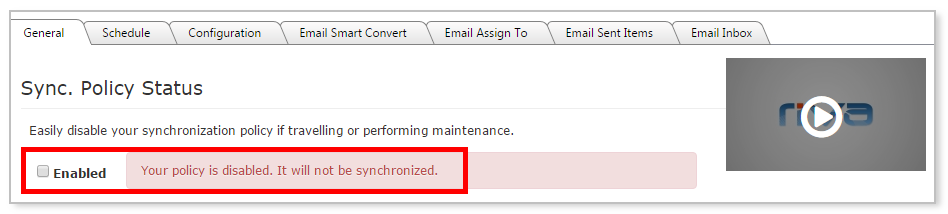
The policy must remain disabled until you have completed your sync policy configuration.
-
Under Historic Item Filtering, to the right of Sync Start Date, select the calendar button, and choose the desired date.

This defines which items the initial sync copies from the CRM to the target user's G Suite account. When Riva performs the initial sync, Riva selects contacts and leads, calendar items (appointments, phone calls, meetings, etc.), and uncompleted tasks that were created or modified on or after the sync start date. During this initialization process, no information syncs from G Suite to the CRM.
Important Note:
During the first sync cycle, Riva syncs items from the CRM to G Suite as follows:
- Appointments whose “Start Date/Time” is the same as or later than the specified “Synchronization Start Time”.
- Tasks whose "Due Date" is the same as or later than the specified “Synchronization Start Time”; otherwise, if no “Due Date” is specified, Riva syncs active tasks.
- Items from all other modules when the items' “Modified Date” is the same as or later than the specified “Synchronization Start Time”.
Note: For trial licenses, you are limited to a sync start date of 15 days into the past. After purchasing Riva, update the sync start date as far back as necessary.
-
In the Error Email Notifications field, enter one or more email addresses for the administrators to receive notifications whenever a user encounters five concurrent sync errors.

Step 2: Configure the Workday Sync Intervals
CAUTION: While on the Schedule tab, do NOT select
Save.
Selecting Save now would cause some settings on the Configuration tab to become read-only before you had a chance to configure them:
Continue configuring your sync policy, and we will tell you when you should select Save. Thank you!
To configure the workday sync intervals:
-
On the Schedule tab, modify the sync intervals for "peak" and "off peak" hours.

The options available differ depending on your subscription level.
Tip: If your CRM service limits API calls, you may want to increase the sync interval to reduce the number of times a full sync is scheduled.
Notes:
- Blackout times are designed to prevent wasting resource usage during non-working hours. If your business runs 24 hours per day or operates in multiple time zones around the world, contact the Riva Success Team to have this option adjusted accordingly.
- All sync policies created in Riva Cloud 2017.5 or higher are configured by default to detect every individual user's time zone setting in the CRM. That individual setting is used to determine the peak, off-peak, and blackout times for that individual's sync. To request the change for existing sync policies, contact the Riva Success Team.
Step 3: Determine Which Data to Sync
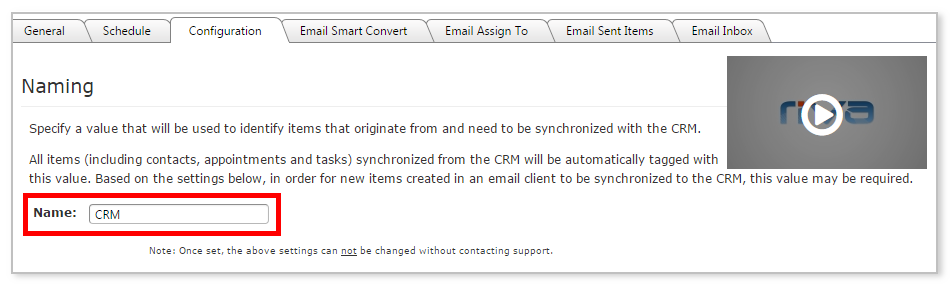
Naming
-
On the Configuration tab, specify a value in the Name field that will be used to identify items that originate from and need to be synchronized to the CRM.
By default, Riva displays a name that matches the target CRM. Once the policy is saved for the first time, this value is greyed out and cannot be changed. This name will be given to the Google contact group or separate calendar, if that option is chosen later on.
CAUTION: Do NOT select
Save yet!
Selecting Save now would cause the Calendar Mode setting on this tab to become read-only before you had a chance to configure it.
Continue configuring your sync policy, and we will tell you when you should select Save. Thank you!
Address Book Modules
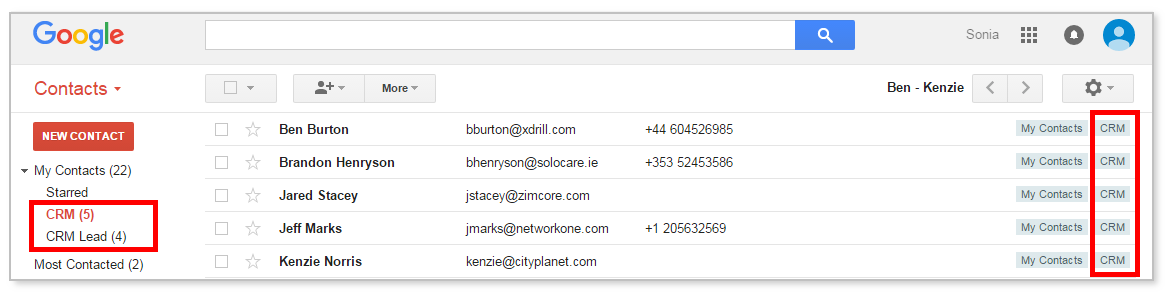
When Riva performs an initial sync, and if either contacts or leads are enabled, Riva adds the Name value to the user's G Suite Contact group list. By default, all contacts that Riva syncs from the CRM and creates in the G Suite address book are synced to the Contact group list specified (for example, "CRM"). For leads, these are assigned to a sub-group name (for example, "CRM Lead").
In a bi-directional (two-way) sync from G Suite to the CRM, the contact is stored in My Contacts in G Suite. This is the default behaviour for G Suite. Note: Even though the contact exists in both My Contacts and the specified contact group section, both instances are considered the same item. Google also imposes a limit on the total number of contacts you can hold in your Google account. For more information, see Contacts size limitations.
-
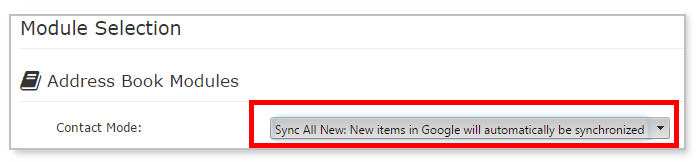
Select Require Group or Sync all new.
-
Require Group: (Default.) The user has to create the contact in the Riva-created group (for example "CRM") or add an existing contact to the group before Riva syncs it to the CRM from G Suite.
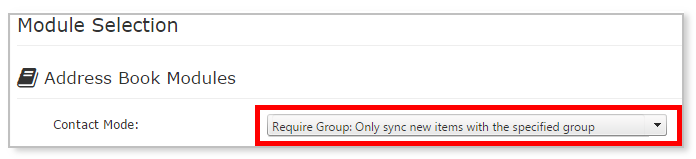
-
Sync All New: Riva automatically syncs new contacts from G Suite to the CRM and assigns the contact to the specified group in G Suite. Note: By default, Google creates contacts for newly sent emails. If Sync All New is selected, those contacts also sync to the CRM. For more information, see Potential sync impact on CRMs due to Gmail's Autocreate Contacts feature.
-
Select the modules that require synchronization.

- Contacts: Selecting the check box enables the syncing of contacts: Riva adds the specified contact group (for example "CRM") to the user's G Suite contact group list.
- Leads: Selecting the check box enables the syncing of leads: Leads are placed in their own contact group (for example "CRM Lead") in the user's G Suite contact group list.
-
Set the Filter By option.
- Must be Owner: Riva syncs only the contacts and/or leads that the user owns (or is assigned) in the CRM to the corresponding user's G Suite address book.
- All visible: Riva syncs all the visible CRM contacts and/or leads to the corresponding user's G Suite address book. The concept of visibility depends on the CRM:
- For Salesforce, NetSuite, and Oracle On Demand, Basic Impersonation syncs all contacts that are visible to the Riva CRM connection user specified on the CRM connection in Riva Cloud.
- For GoldMine, info@hand, intelecrm, Microsoft Dynamics CRM, Sage CRM, and Sugar, Enterprise Impersonation syncs all contacts that are visible to the target CRM user.
Note: The results of the Filter by option may be narrowed down by other filters. Riva supports "organic contact filters", which dynamically sync contacts when a relevant relationship is documented in the CRM for an activity related to the contacts. For more information, see Organic contact filtering.
-
Set the sync direction.
- Two-way Sync: Riva syncs contacts and/or leads from the CRM to G Suite and from G Suite to the CRM.
- Read-only: CRM to Mailbox Only: Riva syncs only one way: from your CRM to G Suite.
-
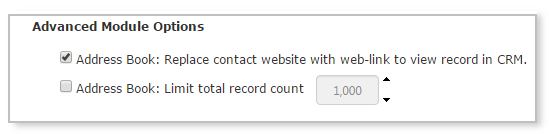
Set the Advanced module options.
- Replace Google contact website field with contact web-link to view record in CRM: If this option is selected, Riva-synced CRM contacts include a view link to that record in the CRM from within the Google contact.
- Limit total record count: If this option is selected, the value can be set. This option limits the total number of Riva-synced CRM contacts created in the user's G Suite address book. The most current based on date/time last saved is copied. If the maximum value is reached, Riva removes older Riva-synced CRM contacts from G Suite to sync newer CRM contacts. Use this option to prevent mobile devices from locking up due to an excessive number of contacts being synced.
Calendaring Modules
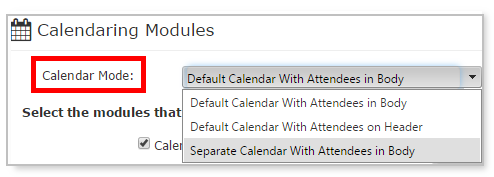
Select the calendar mode option. This setting will become read-only the first time you select Save.
- Default Calendar with Attendees in Body: (Default; recommended for most scenarios.) The default allows syncing of CRM-created appointments and meeting invites from outside the organization and is suitable for mobile users, because Riva syncs the attendee contact details to the body of the calendar items. (The attendees would not be visible if they were on the guest list.)
- Default Calendar with Attendees in the Guest List: CRM-originating appointments sync to the default Google calendar with the attendees on the guest list. This option is designed for a closed environment where only Riva users are required to sync only internal calendar items. Meeting invites from external individuals outside of the organization do not sync.
- Separate Calendar with Attendees in Body: CRM appointments sync to a separate Google calendar with the attendee details in the appointment body. It essentially acts as a mirror to items on the CRM calendar. It is also given the Riva-created name (for example "CRM").
For more information, see Google calendar sync with CRM: Three Riva packages.
.png)
If you have done the following, you can safely select
Save at any time while configuring the rest of the sync policy.
- On the General tab, you have cleared the Enabled check box to prevent syncing before you have finished configuring the sync policy.
- On the Configuration tab, you have set the Name and Calendar Mode settings, which become read-only the first time you select Save.
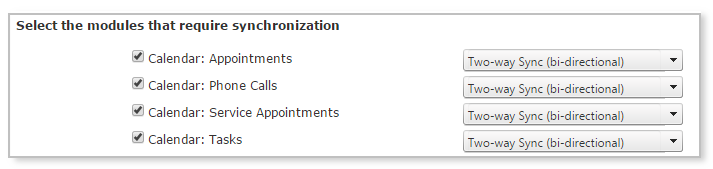
Select the modules that require synchronization
Appointments, Phone Calls, Service Appointments, and Tasks: Selecting a module enables sync for that module. Note: Which modules are available for synchronization depends on your CRM.
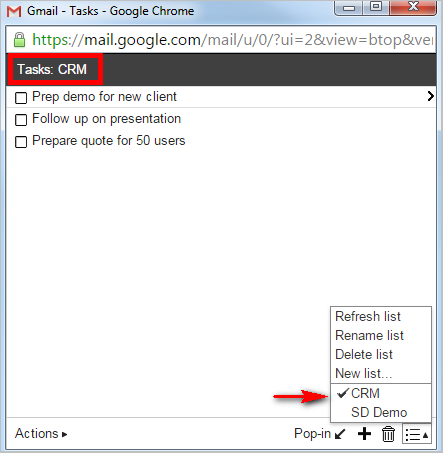
If the Tasks module is selected, then by default Riva creates a separate tasks list in Google tasks and syncs your CRM tasks to it. In Google, set the view to see that tasks list. This means that the user must manually create the task in the Riva-created task list (for example "CRM") to sync it to the CRM.
For each module, select the sync direction.
- Two-way Sync: Riva syncs appointments, phone calls, and/or tasks to the CRM from G Suite and from the CRM to G Suite.
- Read-only: CRM to Mailbox Only: Riva syncs only one way: from your CRM to G Suite.
Synchronize recurring appointments from mailbox to CRM: Selecting this option enables "sync series", so that each recurring appointment in the series is created in the CRM as a separate appointment. For more information, see Understanding how recurring appointments are handled by Riva.
Skip appointments tagged as 'Private' in the mailbox calendar: By default, Riva syncs G Suite appointments marked as private to the CRM and either handles them as private CRM appointments (if the CRM supports the private flag) or "privatizes" the appointment in the CRM. This means that the appointments are not visible to others, but your time is still accounted for. Selecting this option skips the synchronization to CRM completely.
Folder-Based Modules
Important Note: Riva makes use of G Suite labels, which are similar to Exchange folders. That is why the documentation refers to "labels", even though the Riva Cloud interface uses the word "folder".
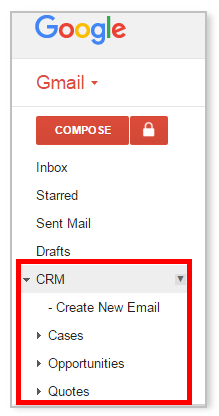
Selecting modules such as cases, quotes, or opportunities enables the synchronization of those modules to a drop label in G Suite. The modules selected here dictate which modules sync, depending on the other settings you set on the Email AssignTo tab. Note: The availability of modules for sync depends on your CRM.
Best practices:
- Do not select data that you do not want to sync to a user's G Suite account.
- Do not select modules that are not enabled in the CRM for the users.
- You can change any of the module selections at a later date if you need to.
- If you clear the check box from any of the modules, the drop labels in G Suite will be removed for that module.
.png)
Set the Filter By option.
- Must be Owner: Riva syncs only the modules that the user owns (or is assigned) in the CRM.
- All visible: Riva syncs all CRM modules that are visible. The concept of visibility depends on the CRM:
- For Salesforce, NetSuite, and Oracle On Demand, Basic Impersonation syncs all contacts that are visible to the Riva CRM connection user specified on the CRM connection in Riva Cloud.
- For GoldMine, 1CRM (info@hand), intelecrm, Microsoft Dynamics CRM, Sage CRM, and Sugar, Enterprise Impersonation syncs all contacts that are visible to the target CRM user.
Attendee Syncing
For users with a Riva Cloud Lite subscription, you can configure Attendee Syncing on the Configuration tab. For Riva Cloud Trial, Standard, and Premium subscriptions, the settings are inherited from the Email SmartConvert tab.
When Riva syncs an appointment from G Suite to the CRM, it tries to match the attendees to existing contacts and users by email address. For those that do not match, you can configure the attendee matching settings.
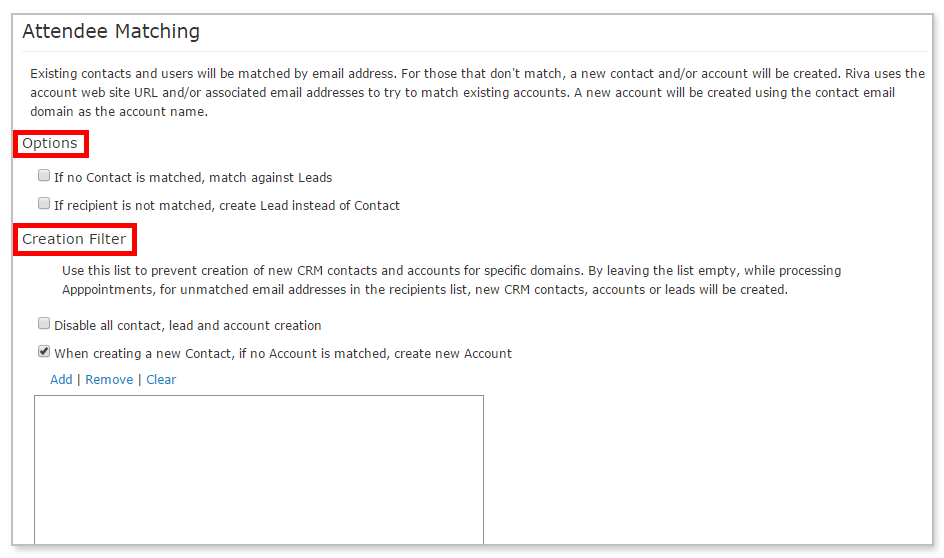
Options:
- If no Contact is matched, match against Leads: If this option is selected, when Riva attempts to match email addressees against contacts and cannot find a matching contact, it attempts to match against CRM leads.
- If recipient is not matched, create Lead instead of Contact: If no CRM contact or lead is matched for an email addressee, Riva creates a lead instead of a contact. If this option is selected, the When creating a new Contact, if no Account is matched, create new Account option does not work.
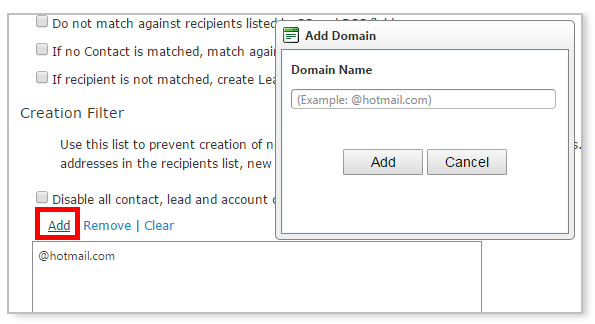
Creation Filter:
- Disable all contacts and account creation: If selected, this option prevents SmartConvert from creating accounts or contacts if a match for the email addressees cannot be found in the CRM contacts. In this case, the item is not created in the CRM. This forces the user to create the account and contact in the CRM manually.
- When creating a new Contact, if no Account is matched, create new Account:
- [Selected]: When Riva creates a new CRM contact, it links the new contact to an existing CRM account with the same email domain; otherwise, Riva creates the account and links the new CRM contact to the new CRM account.
- If the email addressee is just an email address (for example, johnd@mycompany.com), then the new CRM contact is named for the email address "johnd@mycompany.com".
- If the email addressee is a name and email address (for example, John Doe <johnd@mycompany.com>), then Riva creates a CRM contact named "John Doe".
- If a CRM account is created, it is named for the email address domain name (for example "mycompany.com").
- [Cleared]: Riva links a new CRM contact to an existing CRM account; otherwise, it creates an orphan CRM contact in the CRM (if the target CRM supports orphaned contacts).
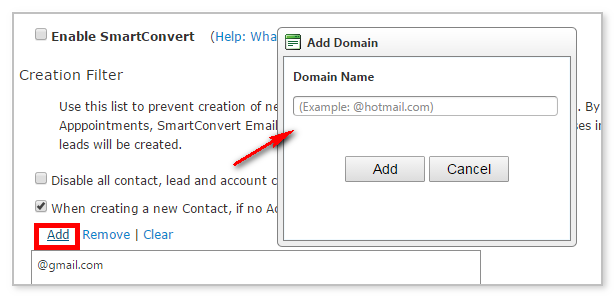
To prevent Riva from creating any contacts or accounts in the CRM for specific domains, for example @gmail.com, select Add, and type the domain in the Add Domain box. We recommend adding domain names of common generic online email services like Google, Yahoo, Live.com, and your own company email domain. This does not prevent Riva from archiving emails to existing contacts or accounts with those domains.
Step 4: Configure the Email SmartConvert Options
If you have done the following, you can safely select
Save at any time while configuring the rest of the sync policy.
- On the General tab, you have cleared the Enabled check box to prevent syncing before you have finished configuring the sync policy.
- On the Configuration tab, you have set the Name and Calendar Mode settings, which become read-only the first time you select Save.
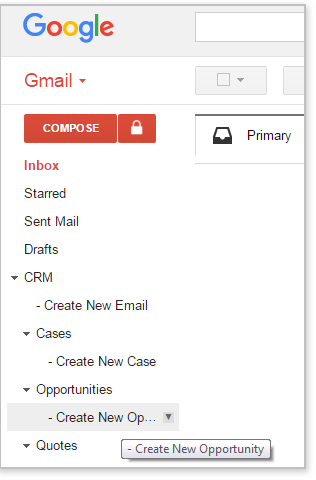
On the Email SmartConvert tab, define how Riva handles emails that are moved into the "- Create New Opportunity", "- Create New Case", or "- Create New Quote" drop labels in Google. By moving or copying an email into the appropriate drop label in Gmail, a user makes SmartConvert
-
Create an opportunity, case, or quote by using the source email as the subject and content of the new CRM object.
-
Use the email domain name to check if the accounts exist in the CRM.
-
Use the email address to check if the contacts exist in the CRM.
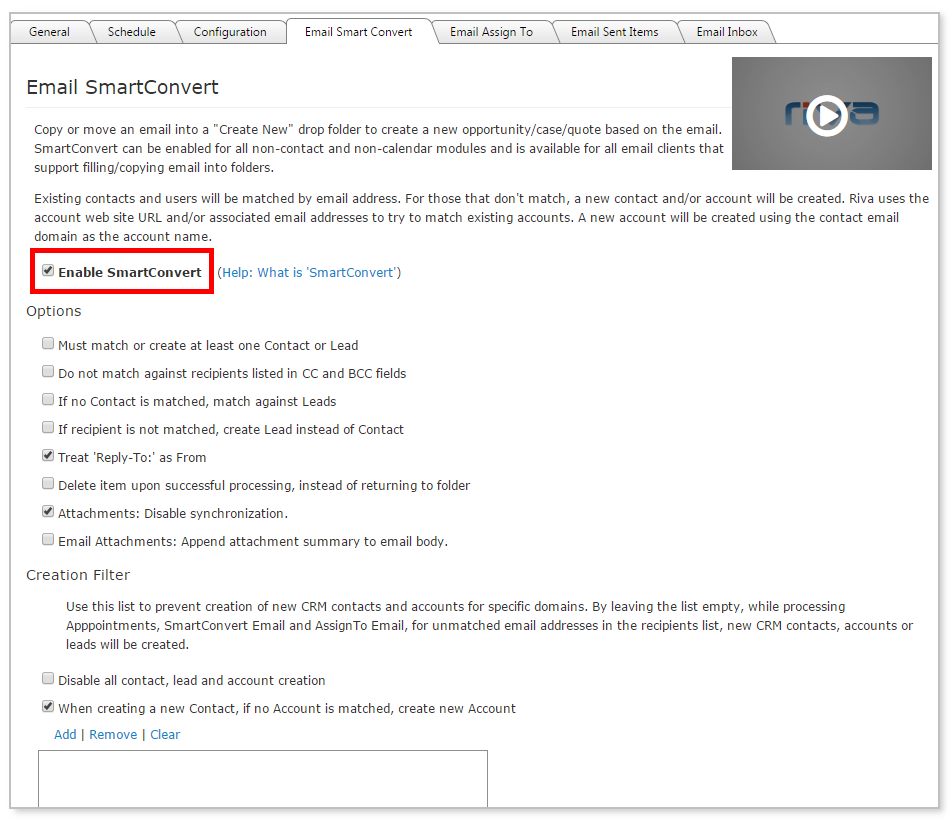
To enable SmartConvert, select the Enable SmartConvert check box.
Set the options.
Riva first reads the addressees in the header of the email. For each addressee, Riva attempts to find a matching CRM user (referred to as the "system user" in the Riva logs), contact, and/or lead in the CRM. Syncing (creating a copy of) the email into the CRM is handled in accordance with the contact and account/organization (and email item handling) option settings. Select or clear the following check boxes:
- Must match or create at least one Contact or Lead: [Selected]: Riva must find at least one email addressee in the CRM as a contact or lead, or it must create a contact or lead if no matches are discovered by Riva in the CRM.
- Do not match against recipients listed in CC and BCC fields: When Riva examines the addressees of an email, it ignores all CC and BCC email addressees. Emails copied to the CRM are not linked to those contacts.
- If no Contact is matched, match against Leads: When Riva attempts to match email addressees against contacts and cannot find a matching contact, it attempts to match against CRM leads.
- If recipient is not matched, create Lead instead of Contact: If no CRM contact or lead is matched for an email addressee, Riva creates a lead instead of a contact. If this option is selected, the When creating a new Contact, if no Account is matched, create new Account option does not work.
- Treat 'Reply-To:' as From: (Default: [Selected], which is recommended.) When Riva check the sender of the email, if the addressee does not match the "Reply-To" value, Riva uses the "Reply-to" email address.
- Delete item upon successful processing, instead of returning to label: (Default: [Cleared], which is recommended.)
- [Cleared]: After creating the email item in the CRM, Riva moves the email item from the "- Create New" or AssignTo drop label to the Inbox and labels that email item as Processing Complete.
- [Selected]: After creating the email item in the CRM, Riva deletes the email item from the "- Create New" or AssignTo drop label. The deleted email items are purged from the user's mailbox and cannot be recovered.
- Attachments: Disable synchronization: (Default: [Selected].)
- [Selected]: Riva does not sync email attachments to the CRM.
- [Cleared]: Riva syncs email attachments to the CRM while respecting any CRM attachment uploading restrictions (for example, file size or file type) that are in place.
- For attachment uploading restrictions, see your CRM documentation.
- Note: For an appointment attachment, only the URL is synced. It is synced to the CRM appointment's description. It is up to the CRM user to use the link and provide authentication to access the attachment.
- Note: Riva does not guarantee the sync of every email attachment if this option is not checked. Users should be careful to comply with regulatory provisions of SEC, FINRA, HIPAA, and any other email retention laws and regulations. Riva is not certified as an email archiving solution that meets standards required by email retention laws or regulations. Corporate use of certified email archiving services or products is recommended in addition to Riva.
- Attachments: Append attachment summary to email body: (Default: [Cleared].) If this is selected and an item with attachments is synced to the CRM but one or more attachments are blocked by a filter, an attachment blocked summary is added to the body of the item saved in the CRM. Users can cross-reference to the source email from their mailbox to look for the original attachment.
- For calendar items, the summary indicates only the name of the attachment. For all other items, the summary indicates the name and size of the attachment.
Creation Filter:
- Disable all contacts and account creation: If selected, this option prevents SmartConvert from creating accounts or contacts if a match for the email addressees cannot be found in the CRM contacts. In this case, the item is not created in the CRM. This forces the user to create the account and contact in the CRM manually.
- When creating a new Contact, if no Account is matched, create new Account:
- [Selected]: When Riva creates a CRM contact, it links the new contact to an existing CRM account with the same email domain; otherwise, Riva creates the account and links the new CRM contact to the new CRM account.
- If the email addressee is just an email address (for example, johnd@mycompany.com), the new CRM contact is named for the email address "johnd@mycompany.com".
- If the email addressee is a name and email address (for example, John Doe <johnd@mycompany.com>), Riva creates a CRM contact named "John Doe".
- If a CRM account is created, it is named for the email address domain name (for example "mycompany.com").
- [Cleared]: Riva links a new CRM contact to an existing CRM account; otherwise, it creates an orphan CRM contact in the CRM (if the target CRM supports orphaned contacts).
"Create New" drop labels in Gmail:
Step 5: Configure the Email AssignTo Options
If you have done the following, you can safely select
Save at any time while configuring the rest of the sync policy.
- On the General tab, you have cleared the Enabled check box to prevent syncing before you have finished configuring the sync policy.
- On the Configuration tab, you have set the Name and Calendar Mode settings, which become read-only the first time you select Save.
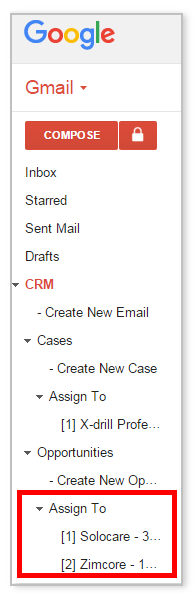
The Email AssignTo feature enables you to archive emails to "other" items like cases, opportunities, projects, or quotes.
- To turn this feature on, select the Enable AssignTo check box.

If the option is enabled, individual AssignTo "drop labels" are created for the most current CRM objects (cases, opportunities, projects, and quotes), depending on which modules you enabled on the Configuration tab.
Folder Creation Options:
- Maximum number of tracked items: Defines the maximum number of drop labels created. The maximum allowed is 99 labels. If there are more current items than what is configured as the maximum (for example, you have 31 open cases, but you set this value to 30), the oldest drop label is removed from the user's mailbox and replaced with the newest or newest revised drop label. This has no effect on the actual item in the CRM. The item's age is determined by the item's last modified (saved) date.
- Maximum age of tracked items: Defines the maximum age that an item can reach before Riva removes the drop label from your Outlook client. The maximum allowed is 99 days. Even if you have not reached the maximum number of allowed drop labels, a drop label is removed once it reaches the maximum age. Set this value to the average span for your sales cycle. For example, if your sales cycle is normally 45 days, set this value to 45. You can re-add a drop label by opening the corresponding item in your CRM and saving it. That action modifies the last modified date for the item and restarts the age tracking for it. The item's age is determined by the item's last modified (saved) date.
Folder Sort Options:
- Sort by date modified: Lists drop labels of the same type by date modified.
- Sort alphabetically: Lists drop labels of the same type alphabetically.
Step 6: Configure the Email Sent Items and Email Inbox Options
If you have done the following, you can safely select
Save at any time while configuring the rest of the sync policy.
- On the General tab, you have cleared the Enabled check box to prevent syncing before you have finished configuring the sync policy.
- On the Configuration tab, you have set the Name and Calendar Mode settings, which become read-only the first time you select Save.
This automatic email sync feature is available only for Premium license subscribers.
The Email Sent Items and Email Inbox tabs are for automatic email synchronization. Both tabs have the exact same options but respectively affect your Sent Items or Inbox separately. When the feature is enabled, users do not have to manually move or copy an email from the Sent Items and/or Inbox to a "- Create New Email" label to archive the email to the CRM.
Warning: Enabling this feature can significantly increase the amount of physical storage space used by the CRM to store archived sent email and/or inbound email. Carefully consider CRM financial costs for data storage before enabling this feature.
- To turn the feature on, select Enable Email Sent Items or Enable Email Inbox.
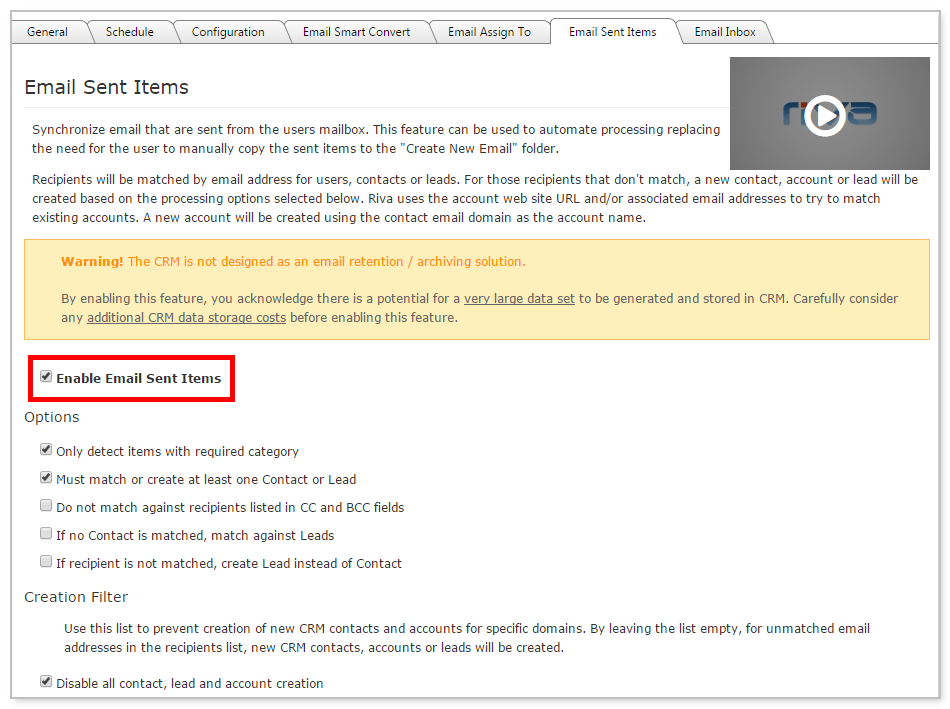
The following options are automatically selected:
- Only detect items with required category: This requires that you assign the Riva-created label to any emails you want to sync. To clear this option, which would enable automatic email sync, contact the Riva Success Team.
- Must match or create at least one Contact or Lead: If this option is selected, Riva must find at least one email addressee in the CRM as a contact or lead, or it must create a contact or lead if no matches are discovered by Riva in the CRM.
- Disable all contacts, leads and account creation (recommended): This option prevents SmartConvert from creating new accounts or contacts if a match for the email addressees cannot be found in the CRM contacts. This requires the user to create the account and contact in the CRM manually. If this option is cleared, see additional processing options.
Configure the other options.
- Do not match against recipients listed in CC and BCC fields: If this option is selected, when Riva examines the addressees of an email, it ignores all CC and BCC email addressees; emails copied to the CRM are not linked to those contacts.
- If no Contact is matched, match against Leads: If this option is selected, when Riva attempts to match email addressees against contacts and cannot find a matching contact, Riva attempts to match against CRM leads.
- If recipient is not matched, create Lead instead of Contact:
- [Selected]: If no CRM contact or lead is matched for an email addressee, Riva creates a lead instead of a contact. The When creating a new Contact, if no Account is matched, create new Account option does not work.
Additional Processing Options:
- If you do not want Riva to create any contacts or accounts in CRM for specific domains, for example @gmail.com, select Add, and type the domain in the Add Domain box. We recommend adding domain names of common generic online email services like Google, Yahoo, Live.com, and your own company email domain. This does not prevent Riva from archiving emails to existing contacts or accounts with those domains.
Step 7: Enable the Sync Policy
Before you enable the sync policy, we recommend that you review all the settings and options on all tabs.
To enable the sync policy:
-
On the General tab, select Enabled, and select Save.
Your browser refreshes and shows you that the policy has been enabled.
-
Wait up to four hours for the initial synchronization to occur between the CRM and the user's G Suite account.
-
To see the synchronization history, select View Logs.
.png)
To learn more about Riva's basic sync features, see How Riva syncs your CRM and Google data.
